How To Make A Retractable Table
Retractable tables are valuable additions to spaces where adaptability and efficient use of area are paramount. These tables, also known as fold-away or drop-leaf tables, offer a surface that can be easily extended for use and then retracted when not needed. This makes them ideal for small apartments, workshops, craft rooms, or any area where flexibility is key. Constructing a retractable table involves careful planning, precise measurements, and an understanding of the mechanisms that allow for smooth extension and retraction. This article provides a detailed guide on how to build a retractable table, outlining the necessary materials, tools, and step-by-step instructions.
Before embarking on this project, it is crucial to determine the desired dimensions of the table, both in its extended and retracted states. This will dictate the amount of material needed and influence the design of the retraction mechanism. Careful consideration should be given to the intended use of the table and the available space. A scaled drawing or 3D model can be beneficial in visualizing the final product and identifying any potential issues before cutting any materials.
The following materials will be required for a standard retractable table: hardwood or softwood lumber (depending on the desired aesthetic and budget), hinges (piano hinges or standard hinges), table legs (pre-made or custom-built), screws, wood glue, sandpaper, wood stain or paint (optional), and a sealant (optional). Tools needed include: a measuring tape, pencil, saw (circular saw, jigsaw, or hand saw), drill, screwdriver, sander, clamps, and safety glasses.
1. Designing and Preparing the Tabletop
The tabletop is the primary surface of the retractable table and its construction requires careful planning. The tabletop will consist of two or three sections, depending on the type of retraction mechanism chosen. For a simple drop-leaf design, the tabletop will have a main section and a hinged leaf. For a more complex sliding mechanism, the tabletop may be divided into three sections: a fixed center section and two sliding leaves.
First, determine the overall dimensions of the tabletop when fully extended. These dimensions will be used to calculate the size of each individual section. For a drop-leaf table, the main section should be sized to provide adequate surface area when the leaf is retracted. The leaf section should be equal in width to the desired extension of the table. For a sliding table, the center section will typically be narrower than the sliding leaves. The combined width of the two leaves should equal the desired extension.
Once the dimensions have been determined, cut the lumber to size using a saw. Precision is essential at this stage to ensure that the sections fit together seamlessly. After cutting, sand all surfaces and edges of each section until smooth. This will improve the aesthetic appearance and provide a better surface for finishing. Assemble the tabletop sections using wood glue and clamps. Ensure that the sections are aligned properly before the glue dries. Once the glue has dried, remove the clamps and reinforce the joints with screws, if desired.
For a drop-leaf design, attach the leaf section to the main section using hinges. Piano hinges are recommended for a continuous, strong connection. Ensure that the hinges are aligned properly to allow the leaf to swing smoothly. For a sliding table, the leaves will need to be mounted on slides or runners that allow them to move in and out. These slides can be purchased commercially or custom-built using wood or metal. Attach the slides to the underside of the tabletop and the table frame, ensuring that they are aligned properly and allow for smooth movement.
2. Constructing the Table Frame and Leg Support
The table frame provides structural support for the tabletop and houses the retraction mechanism. It also serves as the attachment point for the table legs. The frame should be sturdy enough to support the weight of the tabletop and any items placed on it.
The frame is typically constructed from lumber that is slightly smaller in width than the tabletop. The frame should be designed to fit snugly around the underside of the tabletop, providing a stable platform. The frame can be assembled using wood glue, screws, or a combination of both.
For a drop-leaf table, the frame will need to incorporate a mechanism to support the leaf when it is extended. This can be accomplished using folding brackets or swing-out supports. These supports should be securely attached to the frame and designed to lock into place when the leaf is extended. For a sliding table, the frame will need to accommodate the sliding mechanism. The slides or runners should be securely attached to the frame in a manner that allows for smooth and stable movement of the leaves.
The table legs can be purchased pre-made or custom-built. Pre-made legs are available in a variety of styles and materials, making it easy to find a suitable option. Custom-built legs allow for greater design flexibility and can be tailored to match the aesthetic of the tabletop. The legs should be attached to the frame using screws or bolts. Ensure that the legs are aligned properly and securely fastened to provide a stable base for the table.
Reinforcements, such as corner braces or cross-supports, can be added to the frame to increase its strength and stability. These reinforcements should be strategically placed to provide maximum support and prevent the frame from warping or sagging over time.
3. Implementing the Retraction Mechanism
The retraction mechanism is the key component of a retractable table. It allows the tabletop to be easily extended and retracted, maximizing the versatility of the table. The type of retraction mechanism used will depend on the design of the tabletop and the desired level of functionality.
For a drop-leaf table, the retraction mechanism is relatively simple. The leaf is hinged to the main section of the tabletop and is supported by folding brackets or swing-out supports. When the leaf is not in use, it is folded down and rests against the side of the table frame. When the leaf is needed, the supports are extended, and the leaf is swung up into position.
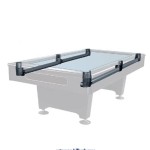
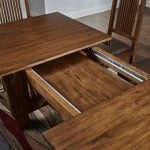
For a sliding table, the retraction mechanism is more complex. The leaves are mounted on slides or runners that allow them to move in and out from under the center section of the tabletop. These slides can be purchased commercially or custom-built. The slides should be chosen based on the weight and size of the leaves. Ball-bearing slides are recommended for smooth and reliable movement.
The slides should be attached to the underside of the tabletop and the table frame in a manner that allows for smooth and stable movement of the leaves. The slides should be aligned properly and securely fastened to prevent them from binding or coming loose. A locking mechanism can be added to hold the leaves in place when they are fully extended or retracted. This can be accomplished using latches, magnets, or other types of fasteners.
The operation of the retraction mechanism should be smooth and effortless. The leaves should move easily without binding or sticking. Any adjustments or modifications should be made as needed to ensure optimal performance.
After the construction is complete, the entire table should be thoroughly inspected for any imperfections or weaknesses. All screws and bolts should be tightened, and any rough edges should be sanded smooth. The table can then be finished with wood stain, paint, or a sealant to protect it from moisture and wear.
The choice of wood stain or paint will depend on the desired aesthetic. A clear sealant can be applied to protect the wood and enhance its natural beauty. The finishing process should be done in a well-ventilated area, and all safety precautions should be followed. Allow the finish to dry completely before using the table.
With careful planning and execution, constructing a retractable table is a rewarding project that can add versatility and functionality to any space. The completed table will provide a convenient and adaptable surface that can be easily extended for use and retracted when not needed.

How To Make A Folding Table

Free Woodworking Plans To Build A Fabulous Folding Table The Design Confidential

How To Make A Folding Table 20 Diy Plans Wood Outdoor

Free Woodworking Plans To Build A Fabulous Folding Table The Design Confidential

How To Make A Simple Folding Table Step By

How To Build A Folding Workbench Addicted 2 Diy

Small Folding Table Updated 10 Steps With S Instructables

Easy 2x4 Workbench Outfeed Table Diy Retractable Casters

How To Build An Easy Diy Folding Table Family Handyman

Folding Leg Work Table
Related Posts