Armstrong Groutable Vinyl Tile: A Comprehensive Review
Armstrong Flooring, a long-established name in the flooring industry, offers a range of groutable vinyl tile products designed to mimic the look of ceramic or stone tile while providing the comfort and ease of installation associated with vinyl. This article offers a comprehensive review of Armstrong groutable vinyl tile, encompassing its key features, installation process, performance characteristics, maintenance requirements, and overall value proposition. The aim is to provide potential buyers with the necessary information to make an informed decision regarding this type of flooring.
Understanding Groutable Vinyl Tile
Groutable vinyl tile, also known as luxury vinyl tile (LVT) with grout, is a composite flooring material constructed from multiple layers, typically including a backing layer, a core layer, a printed design layer, and a wear layer. The design layer allows for a high degree of realism, replicating the appearance of natural materials like stone, slate, or ceramic. What distinguishes groutable vinyl tile from standard LVT is its intended use with grout, which enhances the tile-like aesthetic and provides a more authentic look and feel. The wider grout lines contribute to a more substantial and permanent impression than standard vinyl flooring.
Armstrong's groutable vinyl tile offerings are designed to be more forgiving than traditional ceramic or stone. They are often warmer and softer underfoot, offering a degree of comfort that hard flooring options lack. This characteristic can be beneficial in areas where people stand for extended periods, such as kitchens or bathrooms. The construction of the tiles also generally makes them more resistant to cracking than ceramic or stone, particularly in areas subject to slight subfloor movement.
The groutable aspect of these tiles is crucial to their aesthetic. While not all vinyl tiles are designed to be used with grout, groutable options are specifically engineered to accommodate grout lines. This feature elevates the appearance, transforming a vinyl floor into a convincing imitation of ceramic or stone. The choice of grout color also plays a significant role in the overall design, allowing homeowners to customize the look of their floors from classic to contemporary.
Key Features and Benefits of Armstrong Groutable Vinyl Tile
Armstrong groutable vinyl tile boasts several features that contribute to its appeal as a flooring option. These features impact its aesthetics, durability, and ease of maintenance. Understanding these characteristics is critical in evaluating its suitability for specific applications.
One of the primary benefits is its water resistance. Vinyl, by its nature, is highly resistant to water damage, making groutable vinyl tile a suitable choice for areas prone to moisture, such as bathrooms, kitchens, and laundry rooms. While the grout itself can be susceptible to staining and mildew if not properly sealed and maintained, the underlying vinyl tile is impervious to water penetration, protecting the subfloor from moisture damage.
The wear layer is another crucial aspect of the tile’s performance. A thicker wear layer provides greater protection against scratches, scuffs, and stains. This layer determines the long-term durability and appearance of the flooring, particularly in high-traffic areas. Armstrong offers varying wear layer thicknesses in its groutable vinyl tile lines, allowing consumers to choose a product that meets their specific needs and budget.
Installation is typically considered easier than installing traditional ceramic or stone tile. Groutable vinyl tile often comes in a peel-and-stick or interlocking format, simplifying the installation process. This can save on professional installation costs, making it a more accessible option for DIY enthusiasts. However, proper subfloor preparation remains crucial for a successful and long-lasting installation. A level, clean, and dry subfloor is essential to prevent issues such as unevenness, shifting, or adhesive failure.
The design versatility of Armstrong groutable vinyl tile is a significant advantage. The tiles are available in a wide range of colors, patterns, and sizes, replicating various natural materials and allowing for diverse design aesthetics. This versatility enables homeowners to create the desired look and feel for their space without the cost and maintenance associated with natural stone or ceramic tile. The ability to customize the grout color further enhances the design possibilities.
Installation Process and Considerations
The installation of Armstrong groutable vinyl tile, while generally straightforward, requires careful attention to detail to ensure a successful and durable outcome. Proper subfloor preparation and adherence to the manufacturer's instructions are paramount.
Subfloor preparation is arguably the most critical step in the installation process. The subfloor must be clean, level, and dry. Any existing flooring must be removed, and any imperfections, such as cracks or holes, must be repaired. Unevenness in the subfloor can lead to the tiles shifting or cracking over time. In some cases, a self-leveling compound may be required to create a perfectly smooth surface. Furthermore, the subfloor must be thoroughly cleaned to remove any dust, dirt, or debris that could interfere with the adhesive bond.
Once the subfloor is prepared, the tiles can be laid out in a dry run to determine the optimal layout and minimize waste. This step allows for adjustments to be made before the adhesive is applied. It's essential to consider the room's dimensions and any architectural features that may affect the tile placement. When laying out the tiles, ensure consistent spacing for the grout lines. Spacers can be used to maintain uniform grout lines throughout the installation.
The installation method will vary depending on the type of tile. Peel-and-stick tiles are generally the easiest to install, requiring only the removal of the backing paper and careful placement on the prepared subfloor. Interlocking tiles snap together, creating a floating floor. For tiles that require adhesive, use the manufacturer-recommended adhesive and apply it evenly to the subfloor. Press the tiles firmly into the adhesive, ensuring full contact and proper adhesion. Avoid walking on the newly installed tiles until the adhesive has fully cured, as recommended by the manufacturer.
After the tiles are installed, the grout can be applied. Choose a grout specifically designed for use with vinyl tile. Follow the manufacturer's instructions for mixing and applying the grout. Use a grout float to work the grout into the joints, ensuring that all the spaces are filled. Remove excess grout from the tile surface with a damp sponge, being careful not to remove grout from the joints. Allow the grout to cure fully before sealing it, as required, to protect it from staining and moisture penetration. The sealant should be reapplied periodically to maintain its effectiveness.
Maintenance and Care of Groutable Vinyl Tile
Armstrong groutable vinyl tile is relatively easy to maintain, but regular cleaning and maintenance are essential to preserve its appearance and extend its lifespan. Proper care can prevent staining, scratching, and other forms of damage.
Regular sweeping or vacuuming is crucial to remove dirt, dust, and debris that can scratch the surface of the tile. Use a soft-bristled broom or a vacuum cleaner with a floor brush attachment. Avoid using vacuum cleaners with beater bars, as they can damage the wear layer over time.
For general cleaning, use a mild detergent and warm water. Avoid using harsh chemicals, abrasive cleaners, or scouring pads, as they can dull the finish and damage the tile. Follow the manufacturer's recommendations for cleaning products. A pH-neutral cleaner is generally safe and effective for cleaning vinyl tile.
Spills should be cleaned up immediately to prevent staining. Use a clean cloth or sponge to blot the spill. Avoid rubbing, as this can spread the stain. For stubborn stains, use a mild stain remover specifically designed for vinyl flooring. Test the stain remover in an inconspicuous area first to ensure that it does not damage the tile.
The grout lines are particularly susceptible to staining and mildew growth. Regular cleaning with a grout brush and a mild bleach solution can help prevent these problems. Sealing the grout is also crucial to protect it from staining and moisture penetration. The grout sealant should be reapplied periodically, as recommended by the manufacturer.
To minimize scratches and scuffs, use floor protectors under furniture legs. Avoid dragging heavy objects across the floor. Place mats or rugs in high-traffic areas to protect the flooring from wear and tear. Regular maintenance and care will help preserve the appearance and lifespan of Armstrong groutable vinyl tile, ensuring a beautiful and durable flooring solution for years to come.

Armstrong Flooring Marble Striations Ancestral Gray 2 6 Mil X 12 In W L Groutable And Stick Vinyl Tile 1 Sq Ft Piece The Department At Com

Armstrong Flooring Cream Pearl 2 6 Mil X 12 In W L Groutable And Stick Vinyl Tile 1 Sq Ft Piece The Department At Com

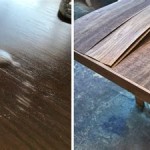
Diy Grouted Vinyl Floor Tiles Show Off Decorating And Home Improvement Blogdiy Blog

Reviews For Armstrong Flooring Universal Black And White 2 Mil X 12 In W L Stick Water Resistant Vinyl Tile 30 Sqft Case Pg The Home Depot

Diy Grouted Vinyl Floor Tiles Show Off Decorating And Home Improvement Blogdiy Blog

Armstrong Flooring Camaberley Limestone 2 6 Mil X 12 In W L Groutable And Stick Vinyl Tile 1 Sq Ft Piece The Department At Com

Reviews For Armstrong Flooring Universal White And Gray 3 Mil X 12 In W L Stick Water Resistant Vinyl Tile 30 2 Sqft Case Pg The Home Depot

Armstrong Flooring Marble Striations Ancestral Gray 2 6 Mil X 12 In W L Groutable And Stick Vinyl Tile 1 Sq Ft Piece The Department At Com

Luxury Vinyl Tile Armstrong Alterna Reserve Color Allegheny Slate Italian Earth Size 16x16 Grout Floor Flooring Bathroom

Alterna Engineered Tile Flooring