DIY Folding Table Over Washer and Dryer: Maximizing Space and Functionality
In compact living spaces, optimizing every square inch is paramount. Laundry rooms, often relegated to small corners or hallways, can particularly benefit from space-saving solutions. Installing a DIY folding table over a washer and dryer presents a practical and aesthetically pleasing method to enhance functionality and efficiency in such constrained areas.
This article details the process of creating a custom folding table designed to fit snugly over a standard washer and dryer set. It will cover necessary materials, tools, a step-by-step construction guide, and considerations for safety and stability. The aim is to provide comprehensive instructions enabling individuals with basic woodworking skills to undertake this project confidently.
Planning and Preparation: Measuring and Material Selection
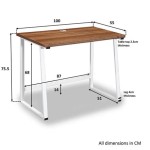
The initial phase of this project involves meticulous planning and preparation. Accurate measurements of the available space are critical to ensure a proper fit. The width and depth of the washer and dryer should be measured precisely, adding a few inches of clearance on each side and top for ease of use and ventilation. Consider the height of the appliances as well; the table should be positioned high enough to prevent contact with the machines during operation, but low enough to remain comfortable for tasks like folding laundry.
Once the dimensions are determined, material selection becomes the next crucial step. Plywood, MDF (Medium-Density Fiberboard), and solid wood are all viable options, each offering different advantages and disadvantages. Plywood is known for its strength and stability, resisting warping. MDF provides a smooth surface ideal for painting, but is heavier and less water-resistant than plywood. Solid wood offers natural beauty and durability but can be more expensive and prone to expansion and contraction with humidity changes. The choice should reflect the individual's budget, skill level, and desired aesthetic.
Beyond the primary tabletop material, additional components are required. These include hinges for the folding mechanism, supporting brackets to secure the table to the wall and provide stability when unfolded, screws or bolts for assembly, wood glue, sandpaper, paint or stain for finishing, and potentially a latch or magnetic closure to keep the table folded against the wall when not in use.
Finally, safety equipment is essential. Safety glasses should be worn at all times when cutting or sanding. A dust mask is recommended to prevent inhalation of fine particles. Ear protection is advisable when using power tools like saws and drills.
Construction: Building the Tabletop and Support Structure
The construction phase begins with cutting the chosen material to the precise dimensions determined during the planning stage. A circular saw or table saw is recommended for making straight, clean cuts. If using a handsaw, careful measurements and steady hand are necessary to achieve accurate results. After cutting, the edges of the tabletop should be sanded smooth to remove any splinters or rough spots.
Next, the support structure must be built. This typically involves creating a frame around the underside of the tabletop to provide additional rigidity and a secure mounting surface for the folding hinges. The frame can be constructed from the same material as the tabletop or a different type of wood depending on the desired strength and appearance. The frame pieces should be cut to size and joined together using wood glue and screws. Clamps can be used to hold the pieces in place while the glue dries.
Once the frame is assembled, the hinges can be attached. Piano hinges, which run the entire length of the tabletop, provide maximum support and stability. Alternatively, multiple smaller hinges can be used. The hinges should be aligned carefully and secured to both the frame and the wall-mounted support brackets with screws. It is crucial to use screws of the appropriate length to avoid protruding through the tabletop or damaging the wall.
The wall-mounted support brackets are a critical component of the folding table. These brackets provide the primary support for the table when it is in the unfolded position. They should be made from sturdy material such as steel or heavy-duty wood. The brackets should be securely fastened to the wall studs using appropriate hardware. If studs are not accessible, drywall anchors may be necessary, but it is important to choose anchors that can support the weight of the table and its contents.
Finally, a latch or magnetic closure can be installed to keep the table folded against the wall when not in use. This prevents the table from accidentally falling open and potentially causing injury or damage. The latch should be easy to operate and secure enough to hold the table in place.
Finishing and Installation: Achieving a Professional and Safe Result
After the construction is complete, the next step is to finish the table. This involves sanding, painting, or staining the wood to protect it from moisture and enhance its appearance. Sanding should be done with progressively finer grits of sandpaper to create a smooth surface. Any imperfections or gaps can be filled with wood filler.
When painting or staining, it is important to follow the manufacturer's instructions carefully. Apply even coats and allow sufficient drying time between coats. A primer may be necessary to ensure proper adhesion of the paint or stain. Consider using a water-based paint or stain, as these are generally lower in VOCs (Volatile Organic Compounds) and are more environmentally friendly.
Before installing the table, double-check all measurements to ensure a proper fit. The wall-mounted support brackets should be attached to wall studs whenever possible. Using a level during installation is critical to ensuring that the table is level and stable. After the table is installed, test its folding mechanism to ensure that it operates smoothly and securely. Apply weight to the table in the unfolded position to verify that it can support the intended load.
Consider adding edge banding to the tabletop to protect the edges from damage and provide a more finished look. Edge banding can be made from wood veneer, plastic, or metal. It is typically applied with heat-activated adhesive or contact cement.
Cable management solutions can be incorporated to keep cords and cables organized and out of the way. This can be achieved by drilling holes in the tabletop or attaching cable clips or ties to the underside of the table. This is particularly helpful if the table will be used as a workspace for laptops or other electronic devices.
Ensure adequate ventilation around the washer and dryer. The folding table should not obstruct airflow to the appliances. Consider adding ventilation holes to the tabletop or leaving a gap between the back of the table and the wall to allow for air circulation. Overheating can damage the appliances and create a fire hazard.
Regularly inspect the table for signs of wear and tear, such as loose screws, broken hinges, or water damage. Tighten any loose screws and replace any damaged components promptly. Applying a sealant or varnish to the wood can help protect it from moisture and prolong its lifespan.
The placement of the folding table should be carefully considered to avoid obstructing access to other areas of the laundry room. Ensure that there is enough space to move around comfortably and safely when the table is unfolded. The table should not block doorways or impede access to essential services such as electrical outlets or water shut-off valves.
Consider the aesthetic of the surrounding space when choosing the finish for the table. The table should complement the existing décor and create a cohesive look. Choose colors and materials that harmonize with the rest of the laundry room.
By following these steps and considerations, individuals can successfully construct and install a DIY folding table over their washer and dryer, maximizing space and functionality in even the smallest laundry rooms. This project provides a practical and aesthetically pleasing solution to common space constraints, enhancing the overall efficiency and organization of the home.

Easy Diy Wood Laundry Room Countertop For Folding

Build A Laundry Folding Table Over Your Washer And Dryer

Diy An Oversized Table For The Laundry Room Under 100 Major Hoff Takes A Wife

Easy Diy Laundry Table Over Washer And Dryer Build Steps Abbotts At Home

Diy Waterfall Butcher Block Washer Dryer Counter We The Dreamers

I Love This Easy Diy Laundry Table Top Slides Over A Washer Dryer Abbotts At Home

Diy An Oversized Table For The Laundry Room Under 100 Major Hoff Takes A Wife

Diy Countertop For Less Than 40 Laundry Folding Table Build

Laundry Room Redo Diy Folding Table Little Vintage Cottage

Easy Diy Laundry Table Over Washer And Dryer Build Steps Room