DIY Bar Height Table: A Comprehensive Guide to Construction and Customization
The allure of a bar height table lies in its versatility. It serves as a casual dining space, a functional workspace, and an attractive focal point in a home or social setting. Constructing a bar height table through a do-it-yourself (DIY) approach offers numerous advantages. It allows for complete customization in terms of size, materials, and design, enabling the creation of a piece that perfectly complements the existing decor and meets specific needs. Furthermore, undertaking a DIY project offers significant cost savings compared to purchasing pre-made furniture, allowing for allocation of resources toward higher-quality materials or unique design features.
This article provides a comprehensive guide to building a bar height table, covering the essential steps from planning and material selection to construction and finishing. Detailed instructions and considerations will be outlined to ensure a successful and satisfying DIY experience. The focus will remain on practical advice and proven techniques, empowering individuals with the knowledge and skills to create a durable and aesthetically pleasing bar height table.
Planning and Design Considerations
The initial phase of any DIY project involves meticulous planning and design. This stage dictates the final outcome and influences the choice of materials, tools, and construction techniques. Several key factors should be considered to ensure the bar height table meets the intended purpose and aesthetic requirements.
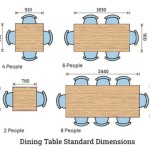
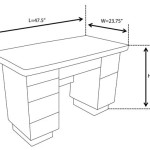
Firstly, determining the appropriate dimensions is crucial. Bar height tables typically range from 40 to 42 inches in height, designed to accommodate bar stools. The length and width of the tabletop should correlate with the available space and the number of people intended to use it. Consider the intended use – will it primarily serve as a dining area, a workspace, or a combination of both? A larger tabletop might be necessary for dining or projects that require ample surface area. A smaller, more compact table could be suitable for smaller spaces or for use as a drink station.
Next, selecting the design style is paramount. The aesthetic of the bar height table should harmonize with the existing decor of the room. Options range from rustic and industrial designs utilizing reclaimed wood and metal accents to sleek and modern designs featuring clean lines and minimalist aesthetics. The design should also consider the structural integrity of the table. A stable and durable base is essential to prevent wobbling or tipping, especially when the table is fully loaded.
Finally, a detailed plan or sketch outlining the dimensions, materials, and construction techniques is highly recommended. This plan serves as a visual guide throughout the project and helps to identify potential challenges or modifications early on. It can also be used to calculate the necessary materials, minimizing waste and ensuring accurate procurement.
Material Selection and Tool Acquisition
The choice of materials significantly impacts the durability, aesthetics, and overall cost of the bar height table. Selecting appropriate materials requires careful consideration of factors such as strength, resistance to wear and tear, and aesthetic appeal. The tools required will vary depending on the chosen materials and construction techniques.
For the tabletop, various options are available, each with its own advantages and disadvantages. Solid wood, such as maple, oak, or walnut, offers exceptional durability and a classic aesthetic. However, solid wood can be more expensive and requires proper sealing and finishing to prevent warping or cracking. Plywood provides a more cost-effective alternative while still offering good strength and stability. When using plywood, ensure it is of a high grade with a smooth, even surface. Butcher block offers a visually appealing and durable option, particularly suitable for tables that will be used for food preparation. Alternatively, reclaimed wood can add a unique and rustic character to the table, but requires careful preparation to ensure it is free of pests and debris.
The base of the bar height table can be constructed from wood, metal, or a combination of both. Wooden legs offer a traditional and customizable option, while metal legs provide a more industrial and modern aesthetic. Metal legs are typically fabricated from steel or iron and can be purchased pre-made or custom-welded. Consider the weight-bearing capacity of the legs and ensure they are adequately sized to support the tabletop and any anticipated load. For added stability, a crossbar or apron can be added to the base, connecting the legs and providing additional support. The material choice should reflect the overall design style and consider the structural requirements of the table.
Essential tools for constructing a bar height table typically include a measuring tape, a level, a saw (circular saw, miter saw, or hand saw), a drill, a screwdriver, sandpaper, clamps, and safety glasses. Depending on the chosen materials and construction techniques, additional tools such as a router, a planer, or a welding machine may be required. Invest in high-quality tools to ensure accurate cuts, secure fastenings, and a professional finish. Prioritize safety by wearing appropriate protective gear, such as safety glasses, gloves, and a dust mask.
Construction Techniques and Assembly
The construction phase involves assembling the individual components into a cohesive and functional bar height table. This stage requires careful attention to detail, accurate measurements, and secure fastenings. Adhering to established construction principles ensures a stable and durable finished product.
Begin by preparing the tabletop. If using solid wood, ensure it is properly dried and planed to a uniform thickness. If using plywood, sand the surface smooth to remove any imperfections. Apply any desired edge treatments, such as rounding over the edges with a router or adding edge banding to conceal the plywood layers. If using reclaimed wood, thoroughly clean and sand the surface, removing any loose debris or splinters. Prepare the tabletop to receive the base by pre-drilling pilot holes for the screws or bolts that will be used to attach the legs.
Next, construct the base of the table. If using wooden legs, cut them to the desired length, ensuring they are all the same height. Assemble the legs using screws, bolts, or wood glue and clamps. Add a crossbar or apron to the base for added stability, ensuring it is securely attached to the legs. If using metal legs, attach them to the tabletop using screws or bolts, ensuring they are properly aligned and securely fastened. Verify that the base is level and stable before proceeding.
Finally, attach the tabletop to the base. Carefully position the tabletop over the base, ensuring it is centered and aligned. Securely fasten the tabletop to the base using screws or bolts, ensuring they are driven straight and tight. Use appropriate fasteners for the chosen materials and ensure they are of sufficient length and strength. After attaching the tabletop, inspect the entire table for any loose connections or imperfections. Tighten any loose screws or bolts and address any structural issues before proceeding to the finishing stage.
Finishing and Sealing
The finishing stage enhances the aesthetic appeal of the bar height table and protects it from wear and tear. Applying a suitable finish and sealant preserves the materials, enhances their natural beauty, and prolongs the lifespan of the table. The choice of finish depends on the material used and the desired aesthetic.
For wooden tabletops, various finishing options are available, including stains, paints, varnishes, and oils. Stains enhance the natural grain of the wood while adding color and depth. Paints provide a solid, opaque finish, allowing for customization with a wide range of colors. Varnishes offer a durable and protective finish, resisting scratches and moisture. Oils penetrate the wood, providing a natural and tactile finish. Choose a finish that complements the overall design style and provides the desired level of protection.
Before applying the finish, prepare the surface by sanding it smooth with fine-grit sandpaper. Remove any dust or debris with a tack cloth. Apply the finish according to the manufacturer's instructions, using smooth, even strokes. Allow the finish to dry completely between coats and sand lightly with fine-grit sandpaper to remove any imperfections. Apply multiple coats of finish for added durability and protection. After applying the final coat, allow the finish to cure completely before using the table.
For metal bases, various finishing options are available, including paints, powder coating, and clear coats. Paints provide a durable and protective finish, allowing for customization with a wide range of colors. Powder coating offers an even more durable and scratch-resistant finish, ideal for high-traffic areas. Clear coats protect the metal from rust and corrosion while preserving its natural appearance. Choose a finish that complements the overall design style and provides the desired level of protection.
Regardless of the chosen finish, ensure it is applied properly and allowed to cure completely before using the bar height table. Proper finishing enhances the aesthetic appeal, protects the materials, and prolongs the lifespan of the table. It is an essential final step in the DIY process that should not be overlooked.

How To Build A 2x4 Outdoor Bar Table The Diy Dreamer

Bar Top Console Table Rogue Engineer

Diy High Top Farmhouse Style Pub Table Tips And Tricks

How To Build A 2x4 Outdoor Bar Table The Diy Dreamer

Bar Height Pub Table Diy Cocktail

Counter Height Farmhouse Table For Four Ana White

Diy Pub Table A Step By Tutorial

Modern Reclaimed Pub Table Diy Plans Rogue Engineer

How To Build A 2x4 Outdoor Bar Table The Diy Dreamer

Counter Height Farmhouse Table For Four Ana White