How To Remove White Heat Spots From Wood Table Top
White heat spots on a wooden table top are a common household headache. These unsightly blemishes, often appearing as hazy, milky rings or marks, are not burned wood. They are typically caused by trapped moisture within the finish of the wood. When heat from a hot object, such as a mug or pan, interacts with the finish, it can temporarily soften the protective layer, allowing moisture to penetrate. As the finish cools and hardens again, the trapped moisture remains, creating the white discoloration. Effective removal necessitates drawing out this trapped moisture without damaging the underlying wood or finish.
Identifying the type of finish on the wood is crucial for selecting the appropriate removal method. Common types of wood finishes include lacquer, varnish, polyurethane, shellac, and wax. A simple test can help determine the finish type. In an inconspicuous area of the table, gently rub a small amount of denatured alcohol with a cotton swab. If the finish becomes sticky or dissolves, it is likely shellac or lacquer. If the finish remains unaffected, it is likely varnish, polyurethane, or wax. This distinction is vital, as certain methods are more suitable for specific finishes.
Before attempting any of the methods outlined below, it is recommended to clean the table top with a soft, damp cloth to remove any surface debris or contaminants. Allow the surface to dry completely before proceeding. This ensures that the chosen method focuses solely on addressing the white heat spot and not on removing pre-existing dirt or grime.
Using an Iron and Cloth
This method is frequently cited as an effective and relatively gentle way to remove white heat spots. The principle behind its effectiveness lies in applying gentle heat to re-mobilize the trapped moisture, allowing it to evaporate. The cloth acts as a buffer, protecting the finish from direct heat and potential damage.
To begin, gather the necessary materials: an iron (ensure it is clean and filled with water), a clean, dry cotton cloth (such as an old t-shirt or pillowcase), and optionally, distilled water in a spray bottle. Set the iron to a low setting without steam. The key here is gentle heat, not intense heat that could further damage the finish. If the iron has a steam function, ensure it is turned off.
Fold the cotton cloth into several layers to create a thick pad. This padding will help distribute the heat evenly and prevent scorching. Place the folded cloth directly over the white heat spot. Ensure the cloth completely covers the affected area, extending slightly beyond the edges of the spot.
Carefully place the heated iron onto the cloth, directly over the white heat spot. Maintain light, constant pressure. Move the iron in a slow, circular motion across the cloth for approximately 10-30 seconds. Avoid leaving the iron in one spot for too long, as this could concentrate the heat and potentially damage the finish.
Lift the cloth and inspect the white heat spot. If the spot has faded or disappeared, the process is complete. If the spot is still visible, repeat the process, increasing the time slightly (e.g., 30-60 seconds). It may be necessary to repeat this process several times, checking the progress after each iteration.
If the heat spot persists after several attempts, lightly dampen the cloth with distilled water. The added moisture can sometimes help to draw out the trapped moisture within the finish. However, use caution and avoid saturating the cloth, as excessive moisture can exacerbate the problem. Repeat the ironing process with the slightly damp cloth, monitoring the progress carefully.
Once the white heat spot has been removed, allow the table top to cool completely. After cooling, apply a furniture polish or wax to restore the shine and protect the finish. This will also help to seal the surface and prevent future moisture penetration.
Using a Hair Dryer
Similar to the iron method, using a hair dryer employs heat to draw out the trapped moisture. The primary advantage of using a hair dryer is the greater degree of control over the heat application. The lower intensity of heat reduces the risk of overheating and damaging the finish, making it a suitable option for more delicate surfaces.
To begin, gather a hair dryer and a clean, soft cloth. Set the hair dryer to its lowest heat setting. Direct the airflow of the hair dryer towards the white heat spot, holding it a few inches away from the surface. Moving the hair dryer back and forth facilitates even heat distribution and prevents concentrated heat exposure.
After directing warm air to the area, lightly buff the affected area with a soft cloth. This helps to encourage moisture evaporation. Observe the spot while continuing to apply heat with the hair dryer. It may take several minutes of continuous application to see noticeable results.
If the white spot begins to fade, continue the process until it disappears completely. If the spot persists after a reasonable amount of time (e.g., 10-15 minutes), consider increasing the heat setting on the hair dryer slightly. However, always monitor the surface closely to avoid overheating. Maintaining gentle, consistent heat is preferred to minimize the risk of damage.
Once the spot has been removed, allow the area to cool completely. Apply a furniture polish or wax to restore the finish and protect the wood. This step is particularly important after any heat treatment, as it helps to re-seal the surface and prevent future moisture damage.
Using Mayonnaise or Petroleum Jelly
This method relies on the oils in mayonnaise or petroleum jelly to penetrate the finish and displace the trapped moisture. While seemingly unconventional, this approach has proven effective in many cases, particularly for newer heat spots. The oils help to re-emulsify the moisture, allowing it to be absorbed or evaporated.
To use mayonnaise, apply a generous dollop directly onto the white heat spot. Ensure the spot is completely covered with a thick layer of mayonnaise. Allow the mayonnaise to sit on the spot for several hours, or preferably overnight. The longer the mayonnaise remains in contact with the spot, the greater the chance of it penetrating the finish and displacing the moisture.
After the soaking period, gently wipe away the mayonnaise with a clean, soft cloth. If the white heat spot has disappeared, the process is complete. If the spot is still visible, repeat the process, allowing the mayonnaise to sit for a longer period. It may take several applications to fully remove stubborn spots.
To use petroleum jelly, apply a thick layer to the white heat spot, ensuring it is completely covered. Allow the petroleum jelly to sit on the spot for several hours or overnight. Similar to mayonnaise, the longer exposure increases the likelihood of success.
After the soaking period, wipe away the petroleum jelly with a clean, soft cloth. If the white heat spot has faded or disappeared, the process is complete. If the spot persists, repeat the process or try another method. Be sure to thoroughly clean the area after removing the petroleum jelly to prevent a sticky residue from attracting dust and dirt. Use a mild soap and water solution, followed by a clean water rinse, and then dry the surface thoroughly.
Regardless of whether mayonnaise or petroleum jelly is used, after removing the product, apply a furniture polish or wax to restore the finish and protect the wood. This will also help to remove any lingering residue and leave the surface clean and shiny.
It is important to note that this method may not be effective for older or more severe heat spots. In such cases, other methods or professional refinishing may be necessary. However, this approach is worth trying as a gentle and potentially effective solution.
These methods provide a range of options for addressing white heat spots on wooden table tops. By understanding the principles behind each method and carefully following the instructions, individuals can often successfully remove these blemishes without resorting to more drastic measures, such as refinishing. Before attempting any method, always test it on an inconspicuous area of the table to ensure it does not damage the finish. Patience and persistence are key to achieving optimal results.

How To Remove White Heat Marks On Furniture Jenny Komenda

How To Remove Heat Stains From Wood 10 Easy Diy Ways

How To Remove A White Heat Stain From Wood Furniture

How To Remove White Spots From Wood Table Top Chair Up

How To Remove White Stains From Wood

How To Remove Heat Stain From Wood Step By Guide And Useful Tips Stains Tabl White Dark Table Staining

Testing 7 Easy Ways To Get A Heat Stain Out Of Wood Clean With Me

How To Remove Heat Stains From Wood Furniture The Easy Way Abbotts At Home

Testing 7 Easy Ways To Get A Heat Stain Out Of Wood Clean With Me
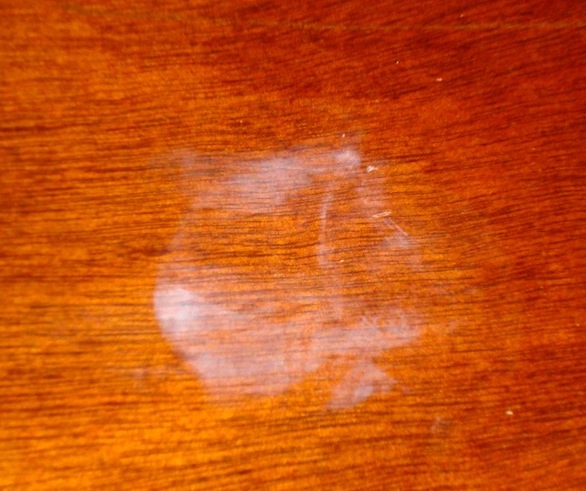
Removing Water Spots From A Finish The Wood Whisperer
Related Posts

