Wood Plank Coffee Table DIY: A Comprehensive Guide
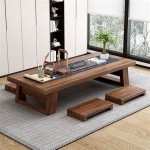
A wood plank coffee table, characterized by its rustic charm and inherent durability, represents a popular do-it-yourself (DIY) project for both novice and experienced woodworkers. The appeal stems from its relative simplicity in design and construction, as well as the wide range of aesthetic possibilities afforded by different wood types, stains, and finishing techniques. This guide provides a detailed overview of the process, encompassing material selection, construction steps, and finishing options, enabling individuals to create a customized coffee table that complements their existing decor.
The selection of materials is paramount to the success of any woodworking project. For a wood plank coffee table, the choice of wood dictates the table’s visual appeal, structural integrity, and overall longevity. The table’s dimensions must also be carefully considered to ensure it complements the space in which it will reside.
Material Selection: Wood, Fasteners, and Finishes
The primary consideration when embarking on a wood plank coffee table DIY project is the selection of the wood itself. Softwoods like pine and fir are economically viable and relatively easy to work with, making them suitable for beginners. However, they are more susceptible to dents and scratches. Hardwoods, such as oak, maple, and walnut, offer superior durability and aesthetic appeal but are generally more expensive and require more skill to work with. Reclaimed wood presents a unique option, offering a rustic aesthetic and promoting environmental sustainability. However, reclaimed wood often requires extensive preparation, including cleaning, sanding, and addressing any existing imperfections.
The quantity of wood required depends on the desired dimensions of the coffee table. A typical coffee table ranges from 48 to 60 inches in length, 24 to 36 inches in width, and 16 to 18 inches in height. The plank width will influence the final appearance and the number of planks needed to achieve the desired table top width. Ensure to account for potential waste during cutting and milling.
Fasteners are crucial for ensuring the structural integrity of the table. Wood screws are a common choice, offering sufficient holding power for most applications. The length of the screws should be appropriate for the thickness of the wood being joined. Pocket hole screws represent an alternative, creating a strong and concealed joint. Wood glue, used in conjunction with screws, significantly enhances the strength and stability of the joints.
The choice of finish impacts the aesthetic appeal and protects the wood from moisture and wear. Options include stains, which enhance the wood grain and add color; sealants, which protect the wood from water damage; and topcoats, which provide a durable and scratch-resistant surface. Polyurethane is a popular choice for topcoats, offering excellent durability and resistance to water and chemicals. Oil-based finishes provide a natural look and feel but require more maintenance. Water-based finishes are environmentally friendly and dry quickly but may not be as durable as oil-based options.
Beyond the core materials, certain tools are indispensable for constructing a wood plank coffee table. A circular saw or miter saw is necessary for cutting the wood planks to the desired length. A sander, whether orbital or belt, is crucial for smoothing the wood surface and preparing it for finishing. A drill is needed for pre-drilling holes for screws and attaching the legs. Clamps are essential for holding the wood pieces together while the glue dries. Safety glasses and a dust mask are indispensable for protecting the eyes and respiratory system from sawdust and other debris.
Construction Process: Assembling the Table Top and Legs
The initial step in construction involves preparing the wood planks. This entails cutting the planks to the desired length using a circular saw or miter saw. Precise cuts are essential for ensuring a square and uniform table top. After cutting, the planks should be sanded thoroughly, starting with a coarse grit sandpaper (e.g., 80 grit) and gradually progressing to finer grits (e.g., 120, 220 grit) to achieve a smooth surface. Pay particular attention to the edges of the planks, ensuring they are smooth and free of splinters.
The next stage involves assembling the table top. The planks can be joined together using various methods, including wood glue and screws or pocket hole joinery. When using wood glue and screws, apply a generous amount of glue to the edges of the planks and clamp them tightly together. Pre-drill holes for the screws to prevent the wood from splitting. Space the screws evenly along the length of the planks, ensuring they are countersunk to prevent them from protruding above the surface.
Pocket hole joinery offers a more concealed method of joining the planks. Drill pocket holes along the underside of the planks, using a pocket hole jig. Apply wood glue to the edges of the planks and clamp them together. Insert pocket hole screws into the pre-drilled holes, tightening them securely to create a strong joint.
Once the glue has dried, remove the clamps and sand the table top again to ensure a smooth and even surface. Pay particular attention to any gaps or unevenness between the planks. If necessary, fill any gaps with wood filler and sand smooth once dry.
The choice of legs can significantly impact the overall aesthetic of the coffee table. Pre-made metal legs offer a modern and industrial look. Wooden legs, either purchased or custom-made, provide a more traditional or rustic appearance. Hairpin legs are a popular choice, offering a sleek and minimalist design.
Attaching the legs to the table top involves several methods, depending on the type of legs used. Metal legs typically have pre-drilled mounting plates that can be screwed directly into the underside of the table top. Wooden legs can be attached using wood screws and L-brackets or by creating mortise-and-tenon joints. Ensure the legs are positioned evenly and securely to provide stability to the table.
For attaching legs with screws and L-brackets, position the L-brackets on the inside corners of the legs and align them with the underside of the table top. Pre-drill holes through the L-brackets and into the table top, then secure the brackets with screws. Ensure the screws are of appropriate length to prevent them from protruding through the table top.
Mortise-and-tenon joints offer a stronger and more aesthetically pleasing method of attaching wooden legs. Create a mortise (a hole) in the table top and a tenon (a projecting piece) on the top of the leg. The tenon should fit snugly into the mortise, creating a strong and stable joint. Apply wood glue to the joint and clamp it securely until the glue dries.
Finishing and Maintenance: Protecting and Enhancing the Final Product
The final stage of the DIY process involves finishing the coffee table. This step protects the wood from moisture, scratches, and other damage while enhancing its natural beauty. The choice of finish depends on the desired aesthetic and the level of protection required.
Staining the wood is an optional step that can significantly alter its appearance. Choose a stain color that complements the existing decor. Apply the stain evenly using a brush or rag, following the manufacturer's instructions. Allow the stain to penetrate the wood for the recommended time, then wipe off any excess. Apply multiple coats of stain to achieve a darker color, allowing each coat to dry completely before applying the next.
Applying a sealant is crucial for protecting the wood from moisture damage. Polyurethane is a popular sealant choice, offering excellent durability and water resistance. Apply the sealant evenly using a brush or rag, following the manufacturer's instructions. Allow the sealant to dry completely before applying the next coat. Apply multiple coats of sealant for enhanced protection.
A topcoat provides a durable and scratch-resistant surface. Polyurethane is again a common choice, but other options include varnish and lacquer. Apply the topcoat evenly using a brush or rag, following the manufacturer's instructions. Allow the topcoat to dry completely between coats. Lightly sand the surface between coats to ensure a smooth finish.
Proper maintenance is essential for prolonging the life of the wood plank coffee table. Regularly dust the table with a soft cloth to remove dirt and debris. Avoid placing hot or wet items directly on the table surface, as this can damage the finish. Use coasters and placemats to protect the table from scratches and spills. Clean spills immediately with a damp cloth and mild soap. Avoid using harsh chemicals or abrasive cleaners, as these can damage the finish.
Periodically, the coffee table may require refinishing to maintain its appearance and protect the wood. This involves sanding the surface to remove any scratches or imperfections and reapplying the finish. Follow the same steps as outlined above for applying the finish. With proper care and maintenance, a wood plank coffee table can provide years of enjoyment and serve as a stylish and functional addition to any living space. The DIY approach allows for complete customization, resulting in a unique and cherished piece of furniture.

Diy Wooden Coffee Table A Beautiful Mess

Diy Pallet Wood Coffee Table

Diy Coffee Table With A Live Edge How To Make It From Raw Wood

Diy Slatted Coffee Table With Hairpin Legs Erin Spain

Diy Coffee Table Inspired By West Elm Candy

Diy Modern Wood Coffee Table For Under 100

Square Coffee Table W Planked Top Free Diy Plans

My Diy Wood Slab Coffee Table I

Diy Lift Top Coffee Table Step By Instructions Chisel Fork

How To Make A Wood Coffee Table Diy