How To Build A Kitchen Table
Constructing a kitchen table represents a fulfilling woodworking project, offering both functional utility and a personalized touch to any home. This guide provides a detailed, step-by-step approach to building a durable and aesthetically pleasing kitchen table, suitable for both novice and experienced woodworkers. The instructions cover material selection, required tools, construction techniques, and finishing methods, ensuring a comprehensive understanding of the entire process.
Planning and Design Considerations
Prior to commencing the physical construction, meticulous planning remains critical for project success. This involves defining the table's dimensions, style, and intended use, influencing material choices and overall design. Careful consideration of these factors contributes significantly to a finished product that meets specific needs and complements the existing kitchen aesthetic.
Determining Dimensions: The size of the kitchen table should align with the available space and the number of people it will typically accommodate. Standard dining table heights range between 28 and 30 inches. The table's length and width should accommodate comfortable seating for the intended number of users, allowing sufficient elbow room while maintaining convenient access to serveware placed in the center.
Selecting a Style: The intended style guides the overall design, impacting leg design, tabletop shape, and finishing techniques. Options include farmhouse, modern, rustic, and traditional styles. Researching diverse styles and selecting one that complements the existing décor greatly contributes to a desirable final result. This involves examining table legs, tabletop edges, and joinery methods that define specific design aesthetics.
Material Selection: Wood selection directly influences the table's durability, appearance, and cost. Hardwoods such as maple, oak, cherry, and walnut offer superior strength and resistance to wear and tear, making them ideal for tabletops. Softwoods, such as pine, are more economical but may require additional protection against dents and scratches. Plywood or MDF are also options for the tabletop if cost is a major concern, but will require careful edge banding. The legs can be constructed from the same wood as the tabletop for a uniform aesthetic, or contrasted for a more dramatic visual effect.
Creating a Detailed Plan: A comprehensive plan should include a scaled drawing of the table, outlining all dimensions and joinery details. This plan serves as a visual guide throughout the construction process, minimizing errors and ensuring accuracy. A cutting list, detailing the required lengths and widths of each component, should also be included to optimize material usage and reduce waste.
Materials and Tools Required
Gathering the necessary materials and tools before construction begins streamlines the process and minimizes potential delays. The specific materials and tools required depend on the chosen design and construction methods. However, a basic list includes the following:
Lumber: The quantity and type of lumber depend on the table's dimensions and design. Purchase lumber dimensions slightly larger than required to allow for trimming and squaring.
Fasteners and Adhesives: Wood screws, wood glue, and potentially pocket-hole screws are necessary for assembling the table's components. Select screws with appropriate lengths and thread types for the chosen wood. High-quality wood glue provides a strong and durable bond, ensuring long-term structural integrity.
Finishing Supplies: Stain, paint, polyurethane, or varnish are required for protecting and enhancing the wood's surface. Select a finish that complements the chosen style and provides adequate protection against moisture and wear. Sandpaper of varying grits is also essential for surface preparation.
Essential Tools: A power saw (circular saw, table saw, or miter saw) for cutting lumber to size is crucial. A drill or impact driver is needed for driving screws and creating pilot holes. A sander (orbital or belt sander) facilitates smoothing surfaces. A measuring tape, square, and pencil are necessary for accurate measurements and marking. Clamps are used to hold components securely together while the glue cures.
Safety Equipment: Safety glasses, a dust mask, and hearing protection are essential for protecting against potential hazards during woodworking operations.
Construction Process
The construction process involves several key steps, including preparing the lumber, assembling the tabletop, constructing the legs and apron, and joining these components to create the finished table. Each step requires precision and attention to detail to ensure a structurally sound and visually appealing table.
Lumber Preparation: Begin by inspecting the lumber for any defects, such as knots or warping. Cut the lumber to the dimensions specified in the plan, ensuring that all cuts are square and precise. Use a jointer and planer to create smooth and flat surfaces, if desired and if these tools are available. This step is critical for achieving tight joints and a professional-looking finish.
Tabletop Assembly: Depending on the design, the tabletop may be constructed from solid wood planks, plywood with edge banding, or a combination of materials. If using solid wood planks, arrange them edge-to-edge and secure them with wood glue and clamps. Allow the glue to dry completely before removing the clamps. For plywood or MDF, apply edge banding to the exposed edges to conceal the core material and create a finished look. The edge banding can be applied with an iron-on adhesive or with contact cement.
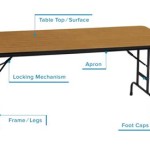
Leg and Apron Construction: The legs can be constructed from solid wood or purchased pre-made. The apron provides structural support for the tabletop and also serves as a decorative element. Cut the apron pieces to the dimensions specified in the plan. Join the apron pieces to the legs using mortise and tenon joints, dowel joints, or pocket-hole screws. The chosen joinery method influences the table's durability and aesthetic appeal.
Joining Tabletop, Legs, and Apron: Secure the apron assembly to the underside of the tabletop. This can be accomplished with wood screws, pocket-hole screws, or threaded inserts. Ensure that the apron is centered and aligned correctly before tightening the fasteners. Reinforce the connection with corner braces if necessary for added stability.
Finishing Techniques
The finishing process enhances the wood's natural beauty and provides protection against moisture, scratches, and stains. Surface preparation is paramount for achieving a flawless finish. This involves sanding the entire table to remove any imperfections and create a smooth surface. Start with a coarse grit sandpaper (e.g., 80-grit) and gradually work your way up to a finer grit (e.g., 220-grit). Remove all dust with a tack cloth before applying the finish.
Straining and Sealing: If desired, apply a stain to enhance the wood's color. Follow the manufacturer's instructions carefully. Allow the stain to dry completely before applying a sealer. A sealer, such as shellac or lacquer, provides a smooth base for the topcoat finish. Sand lightly between coats to remove any imperfections.
Applying the Topcoat: Apply several coats of polyurethane, varnish, or paint to protect the wood and create a durable finish. Follow the manufacturer's instructions regarding application methods and drying times. Sand lightly between coats to remove any imperfections. Allow the finish to cure completely before using the table. A properly applied finish will enhance the table's beauty and protect it from daily wear and tear.
Alternative Finishing Methods: Depending on the desired aesthetic, alternative finishing options include oil finishes, wax finishes, and milk paint. Each finishing method has its own unique characteristics and benefits. Researching these options allows for the selection of a finish that aligns perfectly with the table's style and intended use.

How To Build A Farmhouse Kitchen Table Complete And Easy Plan

How To Build A Kitchen Table With S Wikihow

How To Build A Farmhouse Dining Table Green With Decor

25 Diy Dining Tables Bob Vila

How To Build A Farmhouse Dining Table Green With Decor

Diy Farmhouse Kitchen Table Projects For Beginners
:max_bytes(150000):strip_icc()/ana-white-farmhouse-table-56af6cb25f9b58b7d018abce.jpeg?strip=all)
14 Free Diy Woodworking Plans For A Farmhouse Table

How To Build A Kitchen Table With S Wikihow

Build Your Own Kitchen Table Capturing Joy With Kristen De

How To Build A Kitchen Table Howtospecialist Step By Diy Plans

