How to Mark a Pool Table
Marking a pool table is a crucial aspect of both professional and recreational billiards. Precise markings ensure fair play, consistent gameplay, and adherence to established rules and regulations. This process involves accurately positioning and applying specific markings to the cloth, rails, and diamonds of the table. The correctness of these markings directly impacts the ball placement for various game types and influences strategic shot planning.
The need for accurate markings transcends casual games. Organized tournaments, professional leagues, and even practice sessions benefit significantly from properly marked tables. These markings serve as visual guides, allowing players to quickly identify key positions such as the head spot, foot spot, and center spot. Furthermore, they aid in executing specific shots, particularly those involving break shots in eight-ball or nine-ball, where precise ball placement is paramount.
Ignoring or inaccurately applying these markings can lead to disputes and inconsistencies in gameplay. For instance, an improperly placed head spot can severely impact the fairness of a break, giving one player an unintentional advantage. Therefore, understanding the proper methods and tools for marking a pool table is essential for anyone involved in the sport, from casual players to tournament organizers.
This document details the step-by-step process of marking a pool table, emphasizing accuracy and adherence to established standards. It will cover the necessary tools, measurements, and application techniques required to create a properly marked playing surface.
Key Point 1: Gathering the Necessary Tools and Materials
Before beginning the marking process, ensuring the availability of all required tools and materials is essential for a smooth and accurate execution. The correct tools minimize errors and facilitate a clean, professional-looking finish.
A high-quality measuring tape is paramount. The tape measure should be long enough to span the entire length and width of the pool table bed. A metal tape measure offers more accuracy and durability compared to flexible cloth tapes. Accuracy is crucial; a small error in measurement can propagate throughout the entire marking process, leading to inconsistencies. Calibration of the measuring tape against a known standard is recommended, especially for professional applications.
A suitable marking tool is needed to apply the markings to the pool table cloth. The choice of marking tool depends on the type of cloth and the desired permanence of the markings. For temporary markings used during practice or for temporary layouts, tailor's chalk or specialized pool table marking pencils are appropriate. These tools leave visible marks but can be easily removed with a soft brush or cloth. For more permanent markings, such as those used in commercial or tournament settings, a specialized pool table marking pen or marker is required. These markers use non-bleed, washable inks that penetrate the cloth fibers without spreading or causing discoloration. It is crucial to test any marking pen on a small, inconspicuous area of the cloth before applying it to the entire table to ensure it does not damage or stain the fabric.
A straight edge, such as a long ruler or a metal yardstick, is essential for drawing straight lines accurately. The straight edge should be long enough to span the distances between markings, ensuring that the lines are perfectly straight. A level can also be used alongside the straight edge to ensure it’s aligned on a horizontal plane during the marking process. The use of flimsy or warped straight edges should be avoided, as they can introduce errors and inaccuracies.
Finally, a soft brush or cloth is needed to remove any excess chalk or pencil markings after the marking process is complete. The brush should be clean and free of any debris that could damage or scratch the pool table cloth. A microfiber cloth is ideal for this purpose, as it is gentle and effective at removing loose particles without leaving any residue.
Key Point 2: Accurately Measuring and Marking Key Positions
The accurate placement of key positions on the pool table is critical for gameplay. These positions include the head spot, foot spot, center spot, and the diamond markings along the rails. Each of these markings serves a specific purpose and must be precisely located to ensure fairness and consistency.
The head spot is the point on the head string where the rack is placed in games like eight-ball or nine-ball. To locate the head spot, first determine the exact center of the table's width. This is done by measuring the width of the playing surface and dividing it by two. Mark this center point at both the head rail and the foot rail. The head string runs between the second diamonds from each corner on the head rail. The head spot is where this imaginary line intersects the center line. Mark this point clearly with the chosen marking tool.
The foot spot is located at the exact center of the foot rail. It is used for placing the cue ball during certain games and as the point around which the balls are racked. To find the foot spot, measure the width of the playing surface at the foot rail and divide it by two. Mark this center point with the marking tool. The foot spot should be perfectly aligned with the head spot, creating a straight line down the center of the table.
The center spot is located at the exact center of the pool table's playing surface. It is used as a reference point for various drills and practice routines. To find the center spot, measure the length of the playing surface from the head rail to the foot rail and divide it by two. Then, using the previously marked center points on the head and foot rails as guides, draw a straight line between them using the straight edge and marking tool. The center spot is located at the midpoint of this line. Double-check the accuracy of the center spot by measuring from both the head and foot rails to ensure the distances are equal.
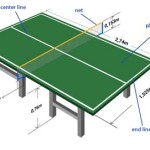
Diamond markings are located along the rails of the pool table and are used as visual aids for aiming and banking shots. The number and placement of diamonds vary depending on the size and type of pool table. Typically, there are three diamonds on each long rail and one diamond on each short rail. To mark the diamonds, first measure the length of each rail and divide it into equal segments based on the number of diamonds. Use the measuring tape and straight edge to accurately mark the positions of the diamonds along the rails. Ensure that the diamonds are evenly spaced and symmetrically positioned on both sides of the table.
Key Point 3: Applying Markings to the Cloth and Rails
The actual application of the markings requires a steady hand and careful attention to detail. The technique used will vary slightly depending on the type of marking tool selected (chalk, pencil, or pen) but the principle of precision remains the same.
When using tailor's chalk or a pool table marking pencil, apply light, even pressure to create clear, visible marks on the cloth. Avoid pressing too hard, as this can damage the cloth fibers or leave a smudge. Use the straight edge as a guide to draw straight lines, ensuring that the chalk or pencil remains in contact with the straight edge throughout the entire stroke. After marking the positions, remove any excess chalk or pencil dust with a soft brush or cloth. Brush in the direction of the nap of the cloth to avoid damaging the fibers.
When using a specialized pool table marking pen or marker, follow the manufacturer's instructions carefully. These markers typically require a light, consistent touch to avoid bleeding or spreading of the ink. Test the marker on a small, inconspicuous area of the cloth before applying it to the entire table to ensure it does not damage or stain the fabric. Use the straight edge as a guide to draw straight lines, and allow the ink to dry completely before removing the straight edge. Avoid applying excessive pressure, as this can cause the ink to bleed through the cloth and create a messy appearance.
For marking the diamonds on the rails, use the chosen marking tool to create small, distinct marks at the pre-measured positions. Ensure that the marks are uniform in size and shape. Consider using a stencil or template to create consistent diamond shapes, especially for permanent markings. If using a marking pen, allow the ink to dry completely before handling the rails. For temporary markings, remove any excess chalk or pencil dust with a soft brush or cloth.
After all markings have been applied, thoroughly inspect the pool table to ensure the accuracy and uniformity of the markings. Double-check the positions of the head spot, foot spot, center spot, and diamond markings. Correct any errors or inconsistencies before using the table for play. Clean any stray markings or smudges with a soft brush or cloth, taking care not to damage the cloth fibers. A properly marked pool table enhances the playing experience and ensures fair and consistent gameplay for all players.
By diligently following these steps, individuals can ensure their pool table is accurately marked, contributing to a more enjoyable and professional billiards experience.

Pool Table Layout Dynamic Billiard Mississauga

Snooker Table Layout Dynamic Billiard Mississauga

How To Mark Your Pool Table Head Spot Foot And Line Full Diy Guide

Layout Of A Pool Table Billiards Snooker And Darts Te Ara Encyclopedia New Zealand

How To Mark Your Pool Table Head Spot Foot And Line Full Diy Guide

The Markings On A Billiards Table Canadian Home Leisure

Welcome To Fcsnooker Snooker Tables Markings For The D Baulk Line And All Coloured Ball Spots

The Markings On A Billiards Table Canadian Home Leisure

How To Mark Your Pool Table For Snooker Full Diy Guide

Dmark The Billiard Table Marker Spinster Billiards