The Ultimate Guide to Essential Aspects of DIY Cutting Table for Sewing Room
A DIY cutting table is a must-have for any sewing enthusiast. It provides a sturdy and spacious surface for cutting fabric, measuring patterns, and assembling projects. Whether you're a beginner or a seasoned pro, having a dedicated cutting table in your sewing room can significantly enhance your workflow and productivity.
Essential Features
When building a DIY cutting table, it's important to consider several key features to ensure it meets your specific needs:
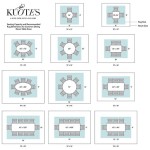
- Size and Height: Determine the appropriate size based on the space available in your sewing room, ensuring it's large enough for your projects. The recommended height is typically around 36-38 inches, which provides a comfortable working position.
- Materials: Choose durable materials like plywood, MDF, or melamine for the tabletop and frame. Consider using metal or hardwood legs for stability.
- Precision Measurement Grid: Incorporate a grid or measuring tape on the tabletop to facilitate precise cutting and measuring.
- Storage Space: Include drawers or shelves to store frequently used tools, fabrics, and patterns, keeping your workspace organized.
- Cutting Mat: Protect the table's surface with a self-healing cutting mat.
Step-by-Step Instructions
Here's a comprehensive guide to help you build your own DIY cutting table:
- Gather Materials: Prepare all the necessary materials and tools before starting the project.
- Create the Top: Build the tabletop frame and attach the plywood or MDF surface. Reinforce with crossbars for added stability.
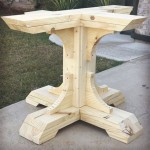
- Assemble the Legs: Construct the legs from desired materials and attach them securely to the tabletop.
- Add Grid Measurement: Transfer a grid or measurement ruler onto the tabletop for accurate cutting.
- Install Storage: Design and build any drawers or shelves for storage and organization.
- Finishing Touches: Sand and paint or stain the table to match your sewing room décor.
- Protect the Surface: Place a self-healing cutting mat on the tabletop to prevent damage from rotary cutters.
Tips for Customization
To further personalize your DIY cutting table, consider incorporating these customization ideas:
- Extendable Surface: Add an extendable leaf to increase the working area when needed.
- Built-in Lighting: Install under-cabinet lighting to improve visibility while cutting.
- Side Storage Cabinet: Create a separate cabinet or drawers on the side for bulky materials like rolls of fabric.
- Rolling Casters: Attach casters to the legs for easy mobility around the sewing space.
Conclusion
Building a DIY cutting table for your sewing room is a rewarding project that can significantly enhance your sewing experience. By following these essential aspects and customization ideas, you can create a functional and stylish cutting table that meets your specific requirements. Enjoy the satisfaction of having a dedicated workspace that makes your sewing projects easier and more enjoyable.

Diy Sewing And Cutting Table With Storage Cubbies Underneath

Build Your Own Diy Cutting Table For Sewing Room Stop Staring And Start

Diy Professional Sewing Room Table Brooks Ann Camper Bespoke

How To Make A Diy Cutting Table With Batting Roll Storage Quilters Candy

Creating My Dream Cutting Table For Sewing Tasha Could Make That

Custom Diy Sewing Cutting Table Noodlehead

Diy Sewing And Cutting Table With Storage Cubbies Underneath

Sewing Room Organization Avery Lane

Custom Diy Sewing Cutting Table Noodlehead

How To Make A Diy Cutting Table With Batting Roll Storage Quilters Candy
Related Posts