Wood Slab Side Table DIY: A Comprehensive Guide
The creation of a wood slab side table provides a fulfilling project for individuals ranging from novice DIY enthusiasts to seasoned woodworking professionals. This project not only yields a unique and aesthetically pleasing piece of furniture but also allows for personal customization and a direct connection with natural materials. A successful build requires careful planning, the selection of appropriate materials, and the execution of precise construction techniques. This article outlines the steps involved in crafting a durable and visually appealing wood slab side table, encompassing material selection, preparation, finishing, and troubleshooting.
The allure of a wood slab side table lies in its inherent natural characteristics. Each slab possesses unique grain patterns, knots, and live edges, ensuring that no two tables are exactly alike. This individuality contributes to the table's character and charm, making it a focal point in any room. Furthermore, constructing the table yourself allows for complete control over the dimensions, style, and finish, resulting in a piece that perfectly complements its surroundings.
Choosing the Right Wood Slab
The selection of a suitable wood slab constitutes the initial and arguably most crucial stage of the project. Several factors warrant careful consideration, including wood species, dimensions, moisture content, and structural integrity. Each of these elements directly impacts the table's aesthetic appeal, stability, and longevity.
Wood species significantly influence the appearance and durability of the side table. Hardwoods, such as oak, maple, walnut, and cherry, are renowned for their strength and resistance to wear and tear. These species generally exhibit tighter grain patterns and greater density, resulting in a more robust and visually appealing finished product. Softwoods, like pine, cedar, and fir, offer a more economical option and are often easier to work with. However, they are more susceptible to scratches and dents and may require additional protective finishes. The selection process should align with the intended use of the table and the desired aesthetic.
The dimensions of the wood slab are determined by the intended function and the overall design of the side table. Consider the available space where the table will be placed and the desired height, width, and thickness. A thicker slab generally provides greater stability and a more substantial appearance. Before proceeding with the project, it is recommended to create a detailed sketch or 3D model to visualize the final product and ensure that the chosen dimensions are proportionate and aesthetically pleasing.
Moisture content is a critical factor that directly impacts the stability and longevity of the wood slab. Green or freshly cut wood contains a high moisture content, which causes significant shrinkage and warping as it dries. To prevent these issues, it is essential to use properly kiln-dried wood with a moisture content between 6% and 8%. This ensures that the wood is stable and less prone to movement after construction. A moisture meter can be used to accurately measure the moisture content of the wood before proceeding with the project.
A thorough inspection of the wood slab is necessary to identify any structural defects that may compromise its integrity. Look for signs of rot, insect damage, cracks, or significant warping. Minor imperfections, such as small knots or surface checks, can often be addressed during the finishing process, but major defects may render the slab unsuitable for use. If the slab has cracks, consider using a wood epoxy resin to fill and stabilize the cracks, adding to its character while improving its structural soundness.
Preparation and Flattening the Wood Slab
Once a suitable wood slab has been selected, the next step involves preparation and flattening. This stage ensures that the slab has a smooth, level surface suitable for attaching legs or other supporting elements. Achieving a flat surface is crucial for stability and prevents the table from rocking or wobbling.
Before beginning the flattening process, it is advisable to remove any loose bark or debris from the slab's surface. A drawknife or similar tool can be used to carefully remove bark while preserving the natural edge of the wood. Clean the surface thoroughly with a brush or vacuum to remove any remaining dust or dirt. This preparation ensures a clean and consistent surface for the flattening process.
There are several methods for flattening a wood slab, each with its advantages and disadvantages. One common technique involves using a router sled. This setup consists of a router mounted on a sled that rides along parallel rails. The router is used to remove material in successive passes, gradually leveling the surface of the slab. This method is effective for flattening large slabs and allows for precise control over the amount of material removed. Another approach involves using a hand plane, which requires more skill and physical exertion but offers a greater degree of control. Regardless of the chosen method, it is essential to work slowly and methodically, taking frequent measurements to ensure that the slab is being flattened evenly.
After flattening the top surface, flip the slab over and repeat the process to flatten the underside. It is important to ensure that both surfaces are parallel to each other to maintain stability and prevent warping. Use a straightedge or level to check for flatness and make adjustments as needed. This iterative process ensures a level and stable surface for the table.
Sanding the wood slab after flattening is critical for achieving a smooth, even surface. Start with a coarse grit sandpaper (e.g., 80 grit) to remove any remaining imperfections or unevenness from the flattening process. Gradually progress to finer grits (e.g., 120, 180, 220) to refine the surface and prepare it for finishing. Sanding should be performed in the direction of the grain to avoid scratching the wood. A random orbital sander is recommended for achieving a consistent and scratch-free surface. After each sanding pass, wipe the surface clean with a tack cloth to remove any dust or debris.
Attaching Legs and Applying the Finish
The final stages of constructing the wood slab side table involve attaching the legs and applying a protective finish. The choice of legs and finish significantly impacts the table's overall aesthetic and durability. Careful consideration should be given to selecting components that complement the wood slab and provide adequate support.
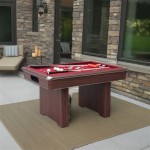
The selection of legs depends on the desired style and functionality of the side table. Metal legs, available in various designs such as hairpin legs, A-frame legs, or industrial-style legs, offer a modern and minimalist aesthetic. Wood legs, either custom-made or purchased prefabricated, provide a more traditional and cohesive look. The attachment method also depends on the leg style. Metal legs are typically attached using screws and mounting plates, while wood legs may be attached using screws, dowels, or mortise and tenon joints. Ensure that the legs are securely attached and that the table is stable and level before proceeding.
Before applying the finish, the wood slab should be thoroughly cleaned and sanded to remove any remaining dust or imperfections. Apply a pre-stain wood conditioner to ensure even stain absorption, particularly if using a softwood slab. This helps prevent blotchiness and ensures a uniform finish. Allow the wood conditioner to dry according to the manufacturer's instructions before proceeding with the stain or finish application.
The choice of finish depends on the desired aesthetic and the level of protection required. Oil-based finishes, such as tung oil or linseed oil, penetrate the wood and enhance its natural beauty. These finishes provide a warm, rich tone and are relatively easy to apply. However, they offer less protection against moisture and scratches compared to other options. Water-based finishes are more durable and environmentally friendly. They provide a clear, protective coating that resists moisture and scratches. Polyurethane finishes offer the highest level of protection and are resistant to water, chemicals, and abrasion. They are available in various sheens, from matte to glossy, allowing for customization of the final appearance. Apply the chosen finish according to the manufacturer's instructions, using a brush, roller, or spray gun. Multiple coats may be required for optimal protection and durability. Allow each coat to dry completely before applying the next, and lightly sand between coats for a smooth, even finish.
Once the final coat of finish has dried, allow the table to cure for the recommended period before placing it in its final location. This allows the finish to fully harden and provides maximum protection. Inspect the table for any imperfections or blemishes and touch up as needed. The completed wood slab side table is now ready for use and will provide years of enjoyment with proper care and maintenance.

Cherry Slab Coffee Table Diy Projects With Pete

My Diy Wood Slab Coffee Table I

My Diy Wood Slab Coffee Table I

One Day Build Live Edge Slab End Table

Diy Coffee Table With A Live Edge How To Make It From Raw Wood

Live Edge Coffee Table How To Flatten A Slab Woodworking

My Diy Wood Slab Coffee Table I

101 Simple Free Diy Coffee Table Plans Live Edge Wood Furniture Slab

Live Edge Coffee Table Diy Making Wood Slab Cookie

Stunning Diy Wood Slice Coffee Table With Ghost Legs
Related Posts