How To Refurbish a Table: A Comprehensive Guide
Refurbishing a table is a rewarding project that can breathe new life into a tired piece of furniture. It offers a cost-effective alternative to purchasing new furniture and provides an opportunity to customize a table to perfectly match a specific style or décor. This guide details the process of refurbishing a table, covering essential steps from preparation to finishing, ensuring a professional and long-lasting result.
Preparation and Assessment
The initial stage of table refurbishment involves careful preparation and a thorough assessment of the table's condition. This step is crucial for determining the scope of the project and identifying any potential challenges. Begin by cleaning the table surface with a mild detergent and water to remove dirt, grease, and any loose debris. Allow the table to dry completely before proceeding further.
Once the table is clean, conduct a detailed inspection. Look for signs of damage, such as scratches, dents, water rings, loose joints, or veneer damage. Evaluate the existing finish to determine its condition and composition. Consider whether the finish is varnish, lacquer, paint, or another type of coating. This information will inform the selection of appropriate stripping and sanding methods. Note any areas that require special attention, such as intricate carvings or delicate details.
Gather the necessary tools and materials. Essential tools include a screwdriver set (both Phillips and flathead), a putty knife, sandpaper in various grits (ranging from coarse to fine), a sanding block or orbital sander, safety glasses, a dust mask, chemical stripper (if necessary), and a tack cloth. Additional materials may include wood filler for repairing minor damage, wood glue for fixing loose joints, and a new finish product, such as paint, stain, or varnish.
Protect the work area by covering it with drop cloths or plastic sheeting. Ensure adequate ventilation, particularly when using chemical strippers or applying finishes. Consider setting up a makeshift spray booth if using spray paint or lacquer to minimize overspray and ensure a more even coating.
Stripping the Existing Finish
If the existing finish is damaged, heavily worn, or incompatible with the desired new finish, it will need to be removed. There are several methods for stripping a table's finish, including chemical stripping, sanding, and heat application. Chemical stripping is often the most effective method for removing multiple layers of old finish, particularly on intricately carved surfaces. However, caution is required when handling chemical strippers, as they can be hazardous.
When using a chemical stripper, carefully follow the manufacturer's instructions. Apply a thick, even coat of stripper to the table surface using a brush. Allow the stripper to dwell for the recommended amount of time, typically 15-30 minutes, or until the finish begins to blister or soften. Use a putty knife or scraper to carefully remove the softened finish. Work in the direction of the wood grain to avoid damaging the surface.
For stubborn areas or intricate details, use a smaller tool, such as a detail scraper or a toothbrush, to remove the finish. After removing the majority of the finish, clean the table surface with a solvent, such as mineral spirits or lacquer thinner, to remove any remaining stripper residue. Allow the table to dry completely before proceeding to the next step.
Sanding can be used as an alternative method for removing the finish, or as a supplementary step after chemical stripping. Start with a coarse-grit sandpaper (e.g., 80-grit) to remove the remaining finish and level the surface. Gradually progress to finer grits (e.g., 120-grit, 180-grit, 220-grit) to smooth the surface and remove any sanding marks. Use a sanding block or orbital sander for larger, flat surfaces, and hand-sand intricate details to avoid damaging them.
Heat guns can also be used to soften and remove old finishes, particularly on flat surfaces. However, caution is required to avoid scorching the wood. Heat the finish evenly and carefully scrape it away with a putty knife. This method is best suited for experienced users.
Repairing Damage and Sanding the Surface
After stripping the finish, address any damage to the table's surface. Minor scratches and dents can be repaired with wood filler. Apply the wood filler to the damaged area using a putty knife, slightly overfilling the depression. Allow the filler to dry completely according to the manufacturer's instructions. Once dry, sand the filler smooth with fine-grit sandpaper, blending it seamlessly with the surrounding wood surface.
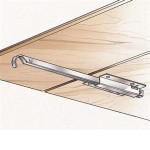
For larger dents or gouges, multiple applications of wood filler may be necessary. Allow each layer to dry completely before applying the next. For loose joints, disassemble the table if possible and clean the old glue from the joint surfaces. Apply fresh wood glue to the joint surfaces and reassemble the table. Clamp the joints securely and allow the glue to dry completely according to the manufacturer's instructions. If disassembling the table is not feasible, inject wood glue into the loose joint using a syringe and clamp the joint until the glue dries.
Once all repairs have been made, thoroughly sand the entire table surface. Start with a medium-grit sandpaper (e.g., 120-grit) to remove any remaining imperfections and smooth the surface. Gradually progress to finer grits (e.g., 180-grit, 220-grit) to achieve a smooth, even surface. Sand in the direction of the wood grain to avoid creating scratches. Pay particular attention to edges and corners, sanding them lightly to avoid rounding them over.
After sanding, remove all dust from the table surface using a tack cloth or vacuum cleaner. A clean surface is essential for achieving a smooth, even finish. Inspect the table carefully for any remaining imperfections or sanding marks. If necessary, repeat the sanding process until the surface is completely smooth and uniform.
Applying the New Finish
The final step in refurbishing a table is applying the new finish. The choice of finish will depend on the desired aesthetic and the intended use of the table. Common finish options include paint, stain, varnish, lacquer, and oil-based finishes. Before applying the finish, it is essential to prime the table surface. Primer creates a smooth, uniform base for the finish and helps to improve adhesion.
For painted finishes, apply a coat of primer that is compatible with the chosen paint. Allow the primer to dry completely according to the manufacturer's instructions. Lightly sand the primed surface with fine-grit sandpaper to remove any imperfections and create a smooth surface for the paint. Apply two or more coats of paint, allowing each coat to dry completely before applying the next. Use a high-quality brush or roller for even application. Consider using spray paint for a smoother, more professional finish.
For stained finishes, apply a wood conditioner before staining to ensure even absorption of the stain. Apply the stain to the table surface using a brush or cloth, following the manufacturer's instructions. Allow the stain to penetrate the wood for the recommended amount of time, then wipe off the excess stain with a clean cloth. Apply multiple coats of stain to achieve the desired color intensity. Allow each coat to dry completely before applying the next.
After staining, apply a clear topcoat, such as varnish or lacquer, to protect the stain and provide a durable finish. Apply the topcoat in thin, even coats, allowing each coat to dry completely before applying the next. Lightly sand between coats with fine-grit sandpaper to remove any imperfections. Oil-based finishes can also be used as a topcoat, providing a natural, matte finish.
For varnish or lacquer finishes, apply multiple thin coats using a brush or spray gun. Allow each coat to dry completely before applying the next. Lightly sand between coats with fine-grit sandpaper to remove any imperfections and create a smooth, even finish. A spray gun will generally provide a smoother, more professional finish than a brush.
Once the final coat of finish has dried completely, inspect the table carefully for any imperfections. If necessary, lightly sand the surface with ultra-fine sandpaper (e.g., 400-grit) and apply a final coat of finish. Allow the finish to cure completely before using the table. Curing times can vary depending on the type of finish used, so consult the manufacturer's instructions.

How To Refinish A Table Sand And Sisal

How To Refinish A Worn Out Dining Table

How To Refinish A Dining Table Shades Of Blue Interiors

10 Things I Wish Knew Before My Kitchen Table Refinish Silly S

How To Refinish A Table Sand And Sisal

How To Refinish A Dining Table Without Stripping The Original Coat

How To Refinish A Table Farmhouse Style My 100 Year Old Home

How To Refinish A Table That Is Not Real Wood Entri Ways

Naperville Kitchen Table Refinishing Projects Wehrli Furniture

How To Refinish Your Kitchen Table Sustainable Dish