How To Build A Baby Changing Table Dresser With Drawers And Shelves
Constructing a baby changing table dresser with drawers and shelves is a practical and economical solution, especially considering the relatively short lifespan of commercially produced changing tables. By combining a dresser with a changing table, a single furniture piece serves multiple purposes as the child grows. This article provides a comprehensive guide on building such a functional and adaptable piece of furniture, encompassing design considerations, material selection, construction steps, and safety implementations.
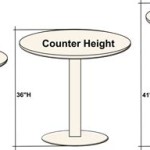
The initial phase involves careful planning and design. The dimensions of the dresser should be determined based on the available space in the nursery and the anticipated storage needs for baby clothes, diapers, and other essentials. A standard changing table surface is typically around 34-36 inches high, which provides a comfortable height for most adults to change a baby without straining their back. The depth should be at least 17 inches, optimally closer to 30 inches, to provide adequate space for the changing pad and necessary supplies within reach. The width will be dependent on the size of the changing pad and drawer configuration.
Drawers are essential for storing clothing and other items. The number and size of drawers can be customized according to individual requirements. Shelves, either open or enclosed, offer additional storage options for items that require easy access, such as diapers, wipes, and lotions. Incorporating both drawers and shelves ensures a well-organized and functional piece of furniture.
Once the dimensions and layout are finalized, a detailed plan should be drawn, either manually or using computer-aided design (CAD) software. This plan should include precise measurements for all components, including the frame, drawers, shelves, and changing table top. A cut list should also be created, which outlines the quantity and dimensions of each piece of lumber required. This will streamline the material procurement process and minimize waste.
Selecting appropriate materials is crucial for the durability and safety of the changing table dresser. Solid wood is generally preferred for the frame and drawer boxes, as it offers superior strength and stability. Pine, poplar, or maple are common choices due to their affordability and workability. For the drawer fronts and shelves, plywood or medium-density fiberboard (MDF) can be used, as they provide a smooth surface for painting or finishing. All materials should be free of harmful chemicals and formaldehyde, ensuring a safe environment for the baby.
Hardware selection is equally important. Drawer slides should be sturdy and capable of supporting the weight of the drawers when fully loaded. Soft-close drawer slides are recommended to prevent the drawers from slamming shut, which can be disruptive and potentially hazardous. Knobs or pulls should be chosen based on aesthetic preference and ease of use. Ensure that all hardware is securely fastened and free of sharp edges or protrusions that could pose a safety risk.
Key Point 1: Building the Dresser Frame
The dresser frame serves as the structural foundation of the entire unit. Construction typically begins by assembling the side panels, which are usually made from solid wood or plywood. These panels should be joined using screws and glue for maximum strength and stability. Pocket hole joinery is a popular method for connecting the panels, as it provides a clean and concealed connection.
Once the side panels are assembled, the top and bottom supports can be attached. These supports should be made from solid wood and should extend the full width of the dresser. They should be securely fastened to the side panels using screws and glue. The top support provides a solid surface for attaching the changing table top, while the bottom support provides stability and prevents the dresser from wobbling.
A back panel should also be attached to the frame. This panel provides additional stability and prevents the dresser from racking or twisting. Plywood or hardboard can be used for the back panel. It should be securely fastened to the frame using screws or nails.
Internal supports should be added to the frame to provide support for the drawers and shelves. These supports can be made from solid wood or plywood and should be spaced evenly throughout the frame. They should be securely fastened to the frame using screws and glue. The placement of these supports will dictate the layout of the drawers and shelves, so careful planning is essential.
Key Point 2: Constructing the Drawers and Installing Shelves
The drawers should be constructed using solid wood or plywood for the sides, front, back, and bottom. The drawer sides should be joined to the front and back using dovetail joints, rabbet joints, or butt joints with screws and glue. Dovetail joints are the strongest and most aesthetically pleasing, but they require more skill and specialized tools to create.
The drawer bottom should be made from plywood or hardboard and should be inserted into a groove in the drawer sides, front, and back. It should be securely fastened with nails or screws. The drawer front should be attached to the drawer box using screws and glue. The drawer front should be slightly larger than the drawer box to conceal the edges of the drawer opening.
Once the drawers are assembled, the drawer slides can be installed. The drawer slides should be mounted on the inside of the dresser frame and on the sides of the drawers. Ensure that the drawer slides are properly aligned and lubricated for smooth operation.
The shelves can be made from solid wood, plywood, or MDF. They should be cut to the appropriate size and shape and should be supported by shelf supports or cleats attached to the inside of the dresser frame. The shelves can be either fixed or adjustable. Adjustable shelves offer greater flexibility in terms of storage options.
If enclosed shelves are desired, doors can be constructed from solid wood or plywood and attached to the dresser frame using hinges. The doors should be fitted with knobs or pulls for easy opening and closing. Magnetic catches can be installed to keep the doors securely closed.
Key Point 3: Building and Securing the Changing Table Top
The changing table top is the most important safety feature of the entire unit. It should be constructed from solid wood or plywood and should be strong enough to support the weight of the baby and any supplies placed on it. The top should be attached to the dresser frame using screws and glue. It is crucial to ensure that the top is securely fastened to prevent it from detaching or tipping over.
The changing table top should have raised sides or a lip around the perimeter to prevent the baby from rolling off. The sides should be at least 4 inches high and should be securely attached to the top. The edges of the top and sides should be rounded or softened to prevent injury.
A changing pad should be placed on top of the changing table top. The changing pad should be securely fastened to the top using straps or fasteners to prevent it from sliding around. The changing pad should be made from a waterproof material that is easy to clean.
To further enhance safety, the changing table dresser should be securely anchored to the wall using anti-tip hardware. This will prevent the dresser from tipping over if the baby pulls on it or if someone leans on it. The anti-tip hardware should be installed according to the manufacturer's instructions.
Once the construction is complete, the entire unit should be sanded smooth and finished with a non-toxic paint or sealant. The finish should be durable and easy to clean. Ensure that the finish is completely dry and cured before using the changing table dresser.
Consider adding decorative elements to personalize the changing table dresser. This could include painting the dresser in a specific color, adding decorative trim, or stenciling designs on the drawer fronts. These details can enhance the aesthetic appeal of the furniture and make it a unique addition to the nursery.
Regular maintenance is essential to ensure the longevity and safety of the changing table dresser. Periodically inspect the hardware to ensure that it is securely fastened. Clean the surfaces regularly with a mild detergent and water. Avoid using abrasive cleaners or solvents, as they can damage the finish.
With careful planning, meticulous construction, and diligent safety measures, building a baby changing table dresser with drawers and shelves provides a cost-effective, personalized, and enduring solution for nursery needs. The adaptability of this furniture piece allows for continued use beyond the diaper-changing years, transforming into a functional dresser as the child grows.

Diy Changing Table Dresser Kreg Tool
:max_bytes(150000):strip_icc()/38465-25020590e6184d249b9edf732c1e3e81.jpg?strip=all "Double Duty Changing Table Dresser For All Ages Woodworking Plan")
Double Duty Changing Table Dresser For All Ages Woodworking Plan

Building A Changing Table Frugal Living

8 Changing Table Ideas You Ll Want To Copy Mommyhooding

Free Baby Changing Table Woodworking Plans

Baby Changing Table With Drawers And Topper Ana White

How To Diy Baby Changing Topper And Display Shelf Remodelaholic Woodwork

How To Build Storkcraft Modern Nursery Changing Table Dresser Wood Knobs Step By Assembly

Baby Changing Table Nursery Furniture Woodworking Plans Diy Dresser Room Storage

Diy Baby Changing Table Desk To Great Way Repurpose Old And Hopefully
Related Posts