```html
How To Make a Plywood Table: A Comprehensive Guide
Plywood, a versatile and readily available engineered wood product, offers an excellent and cost-effective option for furniture construction. Its strength, stability, and relatively smooth surface make it particularly well-suited for table tops and bases. This article provides a detailed guide on how to construct a plywood table, covering material selection, cutting techniques, assembly methods, and finishing options.
Key Point 1: Planning and Material Selection
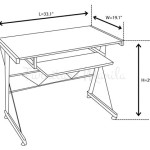
Before commencing any construction project, meticulous planning is essential. This phase involves determining the table's desired dimensions, including height, width, and length. Consider the intended use of the table and the space it will occupy. A dining table, for example, will require different dimensions than a side table.
Once the dimensions are finalized, a scaled drawing or sketch of the table is highly recommended. This visual representation aids in visualizing the final product and facilitates accurate material calculations. Include all key dimensions and construction details in the drawing.
Selecting the appropriate plywood grade is crucial for achieving the desired aesthetic and structural integrity. Plywood is graded based on the quality of its face veneers. Common grades include A, B, C, and D, with A being the highest quality (most seamless and free of knots) and D being the lowest. For a table top, an A or B grade plywood is generally recommended to provide a smooth, aesthetically pleasing surface. Lower grades can be used for internal structural components if aesthetics are less critical.
The thickness of the plywood is another essential consideration. For table tops, a minimum thickness of ¾ inch (19mm) is typically recommended to prevent warping and provide adequate support. Thicker plywood, such as 1 inch (25mm) or more, can be used for larger tables or when a more robust appearance is desired. For structural components like legs or aprons, the thickness can be adjusted based on the design and load-bearing requirements.
In addition to plywood, other essential materials include wood glue, screws or nails, sandpaper (various grits), wood filler (if needed), and a suitable finish (e.g., polyurethane, varnish, paint). The type of fasteners (screws or nails) will depend on the construction method and the desired strength of the joints. Consider using pocket hole screws for creating strong and concealed joints.
Key Point 2: Cutting and Preparing the Plywood
Accurate cutting is paramount for achieving a professional-looking finished product. A circular saw or table saw is typically used for cutting plywood sheets. When using a circular saw, a straight edge guide clamped to the plywood helps ensure a straight and accurate cut. A table saw provides even greater precision and control.
To minimize splintering or tear-out, which is common when cutting plywood, several techniques can be employed. One method involves using a fine-tooth blade specifically designed for cutting plywood. Another technique is to apply masking tape along the cut line before sawing. This provides a temporary barrier that helps prevent the wood fibers from tearing.
After cutting the plywood to the required dimensions, the edges should be carefully sanded to remove any sharp edges or splinters. Start with a coarse-grit sandpaper (e.g., 80-grit) to smooth out any imperfections and then progress to finer grits (e.g., 120-grit, 220-grit) to achieve a smooth, even surface. A random orbital sander can significantly speed up the sanding process and produce a more consistent finish.
If there are any voids or imperfections in the plywood surface, such as knot holes or cracks, these can be filled with wood filler. Apply the filler according to the manufacturer's instructions and allow it to dry completely. Once the filler is dry, sand it smooth with fine-grit sandpaper to blend it seamlessly with the surrounding wood.
Before applying any finish, it is essential to thoroughly clean the plywood surface to remove any dust or debris. Use a tack cloth or a vacuum cleaner with a brush attachment to ensure that the surface is clean and free of contaminants. This will ensure that the finish adheres properly and produces a smooth, even result.
Key Point 3: Assembling and Finishing the Table
The assembly process will vary depending on the design of the table. However, some common techniques can be applied to most plywood table projects. Wood glue is an essential component for creating strong and durable joints. Apply a generous amount of glue to the mating surfaces and clamp the pieces together until the glue is dry.
Screws or nails can be used to reinforce the glued joints. When using screws, pre-drilling pilot holes is recommended to prevent the plywood from splitting. Pocket hole screws are particularly useful for creating strong and concealed joints, especially when attaching aprons to the table top or legs to the aprons.
For attaching legs to the table top, several options are available. One method is to attach aprons (horizontal supports) to the underside of the table top using glue and screws. The legs can then be attached to the aprons. Alternatively, the legs can be attached directly to the table top using metal brackets or other hardware. Ensure that the legs are securely attached and can support the weight of the table top.
Once the table is assembled, carefully inspect all joints for any gaps or imperfections. Fill any remaining gaps with wood filler and sand smooth. Before applying the final finish, it is recommended to apply a wood conditioner or sealer. This helps to prevent the plywood from absorbing the finish unevenly, resulting in a more consistent and professional-looking result.
Several finishing options are available for plywood tables, including paint, varnish, polyurethane, and oil-based finishes. The choice of finish will depend on the desired aesthetic and the level of protection required. Paint provides a wide range of color options and can be used to create a modern or contemporary look. Varnish and polyurethane offer excellent durability and protection against scratches and moisture. Oil-based finishes enhance the natural beauty of the wood and provide a warm, inviting appearance.
Apply the finish according to the manufacturer's instructions. Multiple coats are typically required, with light sanding between each coat to ensure a smooth and even finish. Allow the finish to dry completely before using the table. Consider applying a paste wax to the finished surface for added protection and a subtle sheen.
When selecting wood glue, consider a high-quality wood glue specifically designed for woodworking projects. These glues typically offer superior strength and water resistance compared to general-purpose adhesives. Follow the manufacturer's instructions regarding clamping time and drying time. Adequate clamping pressure is essential for creating strong and durable glue joints.
Proper ventilation is important when working with finishes. Many finishes contain volatile organic compounds (VOCs) that can be harmful if inhaled in large quantities. Work in a well-ventilated area or wear a respirator to protect yourself from harmful fumes. Dispose of used rags and containers properly to prevent fire hazards.
```
Build A Dining Table Out Of One Sheet Plywood Field Treasure Designs

Homemade Modern Ep41 The Easy Diy Table

Diy Plywood Desk From 1 Sheet Basic Tools How To

How To Make A Simple Plywood Desk Single Sheet Diy

How To Make A Diy Dining Table Using One Sheet Of Plywood

Diy Plywood Coffee Table Erin Spain

Build A Dining Table Out Of One Sheet Plywood Field Treasure Designs

Modern Plywood Dining Table Single Sheet Two Power Tools Paul Tran Diy

Build A Dining Table Out Of One Sheet Plywood Field Treasure Designs

Diy Plywood Modern Bench Design Mom
Related Posts