Building a Dining Room Table With Leaves
Constructing a dining room table with leaves is a woodworking project that offers both functionality and a sense of accomplishment. A table with leaves provides versatility, accommodating everyday meals and expanding to accommodate larger gatherings. The process involves careful planning, precise cutting, and thoughtful assembly, resulting in a durable and aesthetically pleasing piece of furniture.
This article will outline the fundamental steps involved in building a dining room table with leaves, covering aspects from material selection to finishing techniques. The focus is on providing a detailed guide that can be adapted based on individual preferences and skill levels. While this guide aims for a general framework, specific dimensions and design choices will need to be tailored to the desired outcome.
Planning and Material Selection
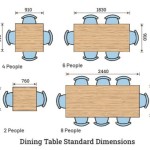
Before initiating the physical construction, a comprehensive plan is essential. This involves determining the desired dimensions of the table, both with and without the leaves inserted. Consider the space where the table will reside and the typical number of people it needs to accommodate. Decide on the number and size of the leaves, as this will influence the overall design and complexity of the build.
The choice of wood is crucial and will influence the table's appearance, durability, and cost. Hardwoods such as oak, maple, cherry, and walnut are popular choices for dining tables due to their strength and beauty. Softwoods like pine can also be used, but they are more susceptible to dents and scratches. Consider the grain pattern and color of the wood when making your selection. It may be beneficial to choose wood that complements the existing décor of the dining room.
Beyond the primary wood, other materials will be required. These include wood glue, screws, sanding paper (various grits), wood stain or finish, and possibly metal hardware for the leaf mechanism, depending on the design. It is recommended to acquire all necessary materials before beginning the construction process to avoid interruptions.
Having a detailed sketch or CAD drawing is extremely helpful. These drawings should include all dimensions, joinery details, and the placement of hardware. This visual representation serves as a roadmap throughout the project, minimizing errors and ensuring consistency.
Construction of the Table Components
The construction process typically begins with preparing the tabletop and leaf sections. This involves accurately cutting the wood to the specified dimensions. A table saw is ideal for this, but a circular saw with a guide can also be used. Precision is paramount to ensure that the leaves fit seamlessly with the main tabletop.
Once the wood is cut, the edges need to be joined together. Common joinery methods for tabletops include edge joining with glue and clamps, or using biscuits or dominoes for added strength and alignment. Ensure that the surfaces are perfectly flat before applying glue and clamping. Allow the glue to dry completely according to the manufacturer's instructions, which is typically 24 hours.
After the glue has dried, the tabletop and leaves need to be sanded smooth. Start with a coarser grit sandpaper (e.g., 80 grit) to remove any imperfections and then gradually move to finer grits (e.g., 120, 220) to achieve a smooth, even surface. A random orbital sander is recommended for this task, but hand sanding can also be used. Pay particular attention to the edges and corners, rounding them slightly for comfort and safety.
Next, the table's apron (the frame that supports the tabletop) needs to be constructed. The apron pieces are typically joined using mortise and tenon joints, or pocket hole screws. Mortise and tenon joints offer superior strength and durability, but require more skill to execute. Pocket hole screws are a simpler alternative, but may not be as aesthetically pleasing, depending on the design. Ensure that the apron is square and securely fastened to the tabletop.
The table legs can be constructed separately or purchased pre-made. If constructing the legs, consider using a lathe for turning decorative legs or creating tapered legs using a jig on a table saw. The legs are then attached to the apron using screws, dowels, or mortise and tenon joints. Ensure that the legs are securely attached and that the table is stable.
Integrating the Leaves and Finishing
The integration of the leaves is a critical step in the construction process. Several methods can be employed to attach the leaves, including drop-in leaves, butterfly leaves, and table slides. Drop-in leaves are the simplest to implement, as they simply rest on supports beneath the tabletop. Butterfly leaves are hinged and fold out from beneath the tabletop. Table slides use metal hardware to allow the leaves to slide into and out of position.
For drop-in leaves, construct supports that will hold the leaves in place when they are extended. The supports should be strong enough to bear the weight of the leaves and any items placed on them. For butterfly leaves, install hinges that allow the leaves to fold smoothly. For table slides, follow the manufacturer's instructions carefully to ensure that the slides are properly aligned and function smoothly.
Once the leaves are integrated, the entire table needs to be sanded again to ensure a consistent surface. Remove any dust or debris before applying the finish. The finish can be a stain, varnish, lacquer, or a combination of these. Stain can be used to enhance the color and grain of the wood, while varnish or lacquer provides a protective coating that is resistant to scratches and stains.
Apply the finish in thin, even coats, following the manufacturer's instructions. Allow each coat to dry completely before applying the next. Sand lightly between coats with fine-grit sandpaper to remove any imperfections and ensure a smooth finish. Several coats may be required to achieve the desired level of protection and appearance.
After the final coat of finish has dried, allow it to cure fully before using the table. This may take several days or even weeks, depending on the type of finish used. Once the finish has cured, the table is ready to be used. Regularly clean and maintain the table to ensure its longevity and beauty.
Safety is paramount throughout the construction process. Always wear appropriate safety gear, including safety glasses, ear protection, and a dust mask. Use power tools with caution and follow the manufacturer's instructions carefully. Work in a well-ventilated area to avoid inhaling harmful fumes from wood dust or finishing products.
Building a dining room table with leaves is a challenging but rewarding project that can provide years of enjoyment. By carefully planning, selecting quality materials, and executing the construction process with precision, a functional and beautiful piece of furniture can be created. The finished table will not only serve as a gathering place for meals and celebrations but also be a testament to the builder's skill and craftsmanship.

Diy Dining Table With Leaves Houseful Of Handmade

Diy Dining Table With Leaves Houseful Of Handmade

James Home Page Diy Dining Room Kitchen Table Farmhouse

How To Build Farmhouse Table With Extension Leaf Dining Room Rustic

Room Around The Table No Small Thing

Drop Leaf Dining Table Woodworking Plan Wood

Extendable Dining Tables With Leaves Solid Wood Amish

Diy Farmhouse Table With Extension Leaves Plans Sweet Tooth Life Dining

Humblenest Homestead Extendable Two Tone Dining Table With Leaf Com

7 Pc Dining Room Set Table With Leaf And 6 Chairs By East West Modish