DIY Butcher Block Kitchen Table: A Comprehensive Guide
A butcher block kitchen table presents a durable, aesthetically pleasing, and functional centerpiece for any kitchen. Its solid wood construction provides a robust surface for food preparation, dining, and gathering. Embarking on a DIY project to create a butcher block kitchen table offers a cost-effective alternative to purchasing a pre-made table and allows for customization to perfectly suit individual needs and preferences. This article provides a comprehensive guide, outlining the necessary materials, tools, and steps involved in crafting a durable and attractive butcher block kitchen table.
Before initiating the project, careful planning and consideration of several factors are crucial. These include the desired dimensions of the table, the type of wood to be used, the table leg style, and the overall aesthetic to be achieved. A clear understanding of these factors will contribute significantly to a successful and satisfying DIY experience. It is also important to research and comply with any local building codes or regulations pertaining to furniture construction, particularly if the table is intended for commercial use.
Key Point 1: Planning and Material Selection
The success of a DIY butcher block kitchen table project hinges on meticulous planning and the selection of appropriate materials. This phase involves defining the table's dimensions, determining the wood species, and acquiring the necessary hardware and finishing products.
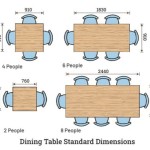
A. Table Dimensions: Determine the ideal length, width, and height of the table based on the size of the kitchen, the number of people it needs to accommodate comfortably, and the intended use. Measure the available space carefully, allowing for adequate clearance around the table for chairs and movement. Consider ergonomics to ensure a comfortable dining or working experience. For instance, a standard table height typically falls between 28 and 30 inches. Adjustments may be necessary for individuals with specific needs or preferences.
B. Wood Species: Selecting the right wood species is paramount. Hardwoods like maple, walnut, and cherry are popular choices for butcher block tables due to their durability, density, and attractive grain patterns. Maple is a common choice due to its affordability and workability. Walnut offers a rich, dark color and distinct grain. Cherry provides a warm, reddish hue and polishes well. Consider the wood’s hardness rating (Janka hardness scale) to gauge its resistance to dents and scratches. Softer woods like pine are not generally recommended for butcher block surfaces intended for heavy use, as they are more susceptible to damage. Furthermore, ensure the wood is kiln-dried to reduce the risk of warping or cracking.
C. Material Quantity Calculation: After deciding on the wood type and dimensions, calculate the required amount of lumber. Account for waste due to cutting, milling, and potential imperfections in the wood. It is prudent to purchase slightly more lumber than the calculated amount to mitigate any unforeseen issues. Additionally, consider the thickness of the butcher block. A thicker block provides greater stability and longevity. Typically, butcher blocks range from 1.5 to 4 inches in thickness.
D. Table Legs and Hardware: A wide variety of table legs are available, ranging from simple wooden legs to more elaborate metal designs. Select legs that complement the overall style of the table and are capable of supporting the weight of the butcher block. Consider factors such as height adjustability, stability, and ease of installation. Acquire the necessary screws, bolts, and other hardware for attaching the legs to the butcher block. Using high-quality hardware is essential to ensuring the table's structural integrity and longevity.
E. Finishing Products: Choose a food-safe finish that protects the wood from moisture, stains, and bacteria. Mineral oil, beeswax, and specialized butcher block oils are common options. These finishes penetrate the wood, creating a water-resistant barrier while remaining safe for food contact. Avoid using varnishes or polyurethane coatings, as they can chip or crack over time and are not food-safe. Additionally, gather sandpaper in various grits for smoothing the wood surface.
F. Required Tools: This project requires various woodworking tools. A jointer and planer are useful for flattening and smoothing the wood boards before gluing them together. A table saw or circular saw is needed for cutting the boards to the desired dimensions. A router with various bits can be used for creating decorative edges or shaping the table top. Clamps are essential for holding the boards together during the gluing process. A sander, both orbital and hand sander, allows for a smooth surface. A drill and screwdriver are needed for attaching the table legs. Safety equipment, including safety glasses, a dust mask, and ear protection, is crucial for protecting oneself during the woodworking process.
Key Point 2: Butcher Block Assembly and Gluing
The core of the DIY project involves assembling the butcher block by carefully gluing the individual wood boards together. This process demands precision and attention to detail to ensure a strong, durable, and visually appealing surface.
A. Wood Preparation: Prior to gluing, ensure that all wood boards are clean, dry, and free from any debris. Use a jointer to flatten one face of each board and a planer to bring the opposite face to the desired thickness. This ensures that the boards are uniform and will create a flat, level surface when glued together. Accuracy in this step is essential for preventing gaps and unevenness in the final butcher block.
B. Glue Selection and Application: Select a high-quality, waterproof wood glue specifically designed for butcher block applications. These glues possess superior bonding strength and resistance to moisture, ensuring the longevity of the table. Apply the glue evenly and generously to the edges of each board. A brush, roller, or glue spreader can be used for even application. Avoid applying excessive glue, as this can result in squeeze-out and require extra cleanup.
C. Clamping Technique: After applying the glue, carefully align the boards side by side to form the desired butcher block pattern. Use clamps generously to apply even pressure across the entire surface. Stagger the clamps to distribute the force effectively. The number of clamps required will depend on the size of the butcher block. Ensure the clamps are tightened sufficiently to create a tight bond between the boards. Place cauls (straight pieces of wood) between the clamps and the butcher block to prevent the clamps from marring the surface and to distribute the pressure more evenly.
D. Curing and Glue Removal: Allow the glue to cure completely according to the manufacturer's instructions. This typically takes 24 to 48 hours. Once the glue is fully cured, remove the clamps and carefully scrape away any excess glue squeeze-out using a chisel or scraper. Avoid using excessive force to prevent damaging the wood surface. A sharp chisel, carefully angled and used along the grain, will effectively remove dried glue.
E. Flattening and Smoothing: After the glue has cured, the butcher block surface may require further flattening and smoothing. A hand plane can be used to remove any significant irregularities. An orbital sander with progressively finer grits of sandpaper (e.g., 80 grit, 120 grit, 180 grit, and 220 grit) can be used to create a smooth, even surface. Sand in the direction of the grain to avoid creating scratches. Thorough sanding is crucial for achieving a professional-looking finish.
Key Point 3: Finishing and Table Leg Attachment
The final stages involve applying a protective finish to the butcher block and attaching the table legs. These steps are essential for protecting the wood from damage and ensuring the table's stability and functionality.
A. Final Sanding and Surface Preparation: Before applying the finish, perform a final sanding with a fine-grit sandpaper (e.g., 220 grit or higher) to create an exceptionally smooth surface. Remove all sanding dust with a tack cloth or vacuum. Ensure the surface is completely clean and dry before proceeding with the finishing process. This step is crucial for achieving an even and flawless finish.
B. Applying the Food-Safe Finish: Apply several thin coats of a food-safe finish, such as mineral oil, beeswax, or a specialized butcher block oil. Follow the manufacturer's instructions carefully. Apply the finish evenly using a clean cloth or brush. Allow each coat to dry completely before applying the next. Between coats, lightly sand the surface with a fine-grit sandpaper to remove any imperfections and ensure optimal adhesion. Typically, three to four coats of finish are recommended for adequate protection.
C. Attaching the Table Legs: Position the butcher block upside down on a clean, protected surface. Determine the optimal placement for the table legs, ensuring they are evenly spaced and provide adequate support. Pre-drill pilot holes for the screws or bolts that will be used to attach the legs. This prevents the wood from splitting. Attach the legs securely using the appropriate hardware and tools. Ensure the legs are level and stable. If using metal legs, consider using threaded inserts in the wood to provide a stronger and more durable connection.
D. Leveling and Stability Check: After attaching the legs, flip the table upright and check for levelness and stability. Use shims under the legs if necessary to correct any unevenness. Ensure the table is stable and does not wobble. A stable and level table is essential for safe and comfortable use.
E. Final Inspection and Maintenance: Perform a final inspection of the table, ensuring that all screws are tight, the finish is even, and the surface is smooth. Regularly clean the butcher block surface with a damp cloth and a mild detergent. Reapply the food-safe finish periodically to maintain its protective properties. Avoid using harsh chemicals or abrasive cleaners, as these can damage the wood and the finish. Proper maintenance will ensure the longevity and beauty of the butcher block kitchen table.

Diy Dining Table 5 You Can Make Bob Vila

Diy Dining Table 5 You Can Make Bob Vila

30 Minutes To Make This Diy Butcher Block Table With Hairpin Legs Hometalk

Butcher Block Dining Table Diy Kitchen Building A

Diy Butcher Block Patio Table Ultimate Instructions By Cam Harris Art

Diy Butcher Block Dining Table Evan Katelyn Home Tutorials

Kitchen Table Redo Part 2 Butcher Block Hometalk

How To Make A Butcher Block Table Simplified Building

How To Build A Butcher Block Table Out Of 2x4

5 Modern Diy Dining Room Tables Built With Industrial Pipe Simplified Building