DIY Farmhouse Table with Extensions: A Comprehensive Guide
The farmhouse table, with its rustic charm and sturdy construction, has become a staple in many homes. A DIY farmhouse table offers not only a cost-effective alternative to purchasing a pre-made table but also allows for customization to perfectly fit the desired space and aesthetic. Adding extensions to a farmhouse table further enhances its functionality, providing flexibility for accommodating larger gatherings and varying needs. This article provides a detailed guide on constructing a DIY farmhouse table with extensions, outlining the necessary materials, tools, and steps involved in the process.
Planning and Design Considerations
Before commencing the construction of a farmhouse table with extensions, careful planning and design considerations are crucial. This stage involves determining the desired dimensions of the table, the type of wood to be used, the style of the legs and apron, and the mechanism for the extensions. These choices directly impact the overall aesthetic and functionality of the final product.
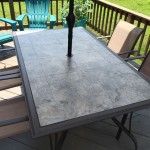
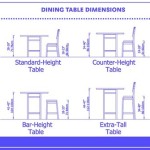
Table Dimensions: The dimensions of the table should be determined based on the available space and the number of people it is intended to accommodate. A standard farmhouse table typically ranges from 6 to 8 feet in length and 3 to 4 feet in width. The height is usually around 30 inches. For extension tables, consider the additional length provided by each extension leaf. A common extension leaf size is 12 to 18 inches, allowing for increased seating capacity when needed.
Wood Selection: The choice of wood significantly impacts the table's appearance and durability. Popular options for farmhouse tables include pine, oak, maple, and reclaimed wood. Pine is a cost-effective option known for its knots and character. Oak provides greater durability and a classic look. Maple offers a smooth, consistent grain and is suitable for painting or staining. Reclaimed wood brings a unique, rustic aesthetic but may require more preparation and careful selection to ensure structural integrity.
Leg and Apron Style: The legs and apron contribute significantly to the table's overall style. Options for legs include turned legs, tapered legs, and square legs. Turned legs offer a traditional, decorative look, while tapered legs provide a more modern and streamlined appearance. Square legs are a simple, versatile option that can be customized with various edge details. The apron, which connects the legs and supports the tabletop, can be designed with straight edges, curved details, or decorative carvings.
Extension Mechanism: Several extension mechanisms can be incorporated into a farmhouse table. Common types include drop-leaf extensions, butterfly leaf extensions, and slide-out extensions. Drop-leaf extensions involve hinged leaves that are folded down when not in use and raised to extend the table. Butterfly leaf extensions feature leaves that are stored beneath the tabletop and unfold to provide additional surface area. Slide-out extensions utilize a mechanism that allows the tabletop to be separated, with extension leaves inserted in the middle. The choice of extension mechanism depends on the desired ease of use, storage space, and overall design.
Materials and Tools Required
The following is a comprehensive list of materials and tools necessary for constructing a DIY farmhouse table with extensions. The specific quantities and dimensions may vary depending on the chosen design and dimensions.
Materials:
- Lumber for the tabletop (e.g., pine, oak, maple, reclaimed wood)
- Lumber for the legs (e.g., 4x4 posts)
- Lumber for the apron (e.g., 1x4 or 1x6 boards)
- Lumber for the extension leaves (matching the tabletop wood)
- Wood glue
- Screws (various sizes for different connections)
- Pocket hole screws
- Wood filler
- Sandpaper (various grits)
- Stain or paint (optional)
- Polyurethane or other sealant
- Extension mechanism (e.g., table slides, hinges)
- Hardware (e.g., screws, bolts, nuts)
Tools:
- Measuring tape
- Pencil
- Safety glasses
- Ear protection
- Circular saw or table saw
- Miter saw
- Drill
- Pocket hole jig
- Sander
- Clamps
- Router (optional, for decorative edges)
- Paintbrushes or spray gun
Ensuring that all materials and tools are readily available before commencing the project streamlines the construction process and minimizes potential delays.
Step-by-Step Construction Process
The construction process for a DIY farmhouse table with extensions involves several key steps, each requiring precision and attention to detail. The following outlines the process in a logical sequence, from preparing the lumber to installing the extension mechanism.
Preparing the Lumber: Begin by selecting and preparing the lumber for the tabletop, legs, apron, and extension leaves. Ensure that the wood is dry and free of significant defects. Cut the lumber to the desired dimensions using a circular saw or table saw. For the tabletop, the boards can be joined together using wood glue and clamps to create a solid surface. Allow the glue to dry completely before proceeding.
Constructing the Tabletop: Once the glue has dried, sand the tabletop to create a smooth, even surface. Start with a coarser grit sandpaper (e.g., 80 grit) to remove any imperfections and then progress to finer grits (e.g., 120 grit, 220 grit) for a smooth finish. If desired, use a router to create decorative edges on the tabletop.
Building the Apron: The apron provides structural support for the tabletop and serves as a connection point for the legs. Cut the apron pieces to the appropriate length and create pocket holes on the inside faces using a pocket hole jig. Attach the apron pieces to the underside of the tabletop using wood glue and pocket hole screws. Ensure that the apron is square and properly aligned before tightening the screws.
Attaching the Legs: Attach the legs to the apron using screws, bolts, or mortise and tenon joints. If using screws, pre-drill pilot holes to prevent splitting the wood. If using bolts, ensure that the holes are accurately aligned. Mortise and tenon joints provide a stronger and more traditional connection but require more advanced woodworking skills. Secure the legs to the apron, ensuring that they are square and stable.
Creating the Extension Leaves: Cut the lumber for the extension leaves to the desired dimensions, matching the width and thickness of the tabletop. Sand the extension leaves to a smooth finish, similar to the tabletop. If using a slide-out extension mechanism, ensure that the edges of the extension leaves are precisely aligned with the tabletop when installed. For drop-leaf or butterfly leaf extensions, prepare the hinges and hardware necessary for attaching the leaves.
Installing the Extension Mechanism: Install the chosen extension mechanism according to the manufacturer's instructions. For slide-out extensions, attach the table slides to the underside of the tabletop and the apron, ensuring that they are properly aligned and secure. For drop-leaf or butterfly leaf extensions, attach the hinges to the extension leaves and the tabletop, allowing the leaves to fold down or unfold smoothly. Test the extension mechanism to ensure that it functions correctly and that the extension leaves are securely supported.
Finishing the Table: Once the construction is complete, apply a finish to protect the wood and enhance its appearance. This may involve staining or painting the table, followed by applying several coats of polyurethane or other sealant. Sand lightly between coats to achieve a smooth, durable finish. Allow the finish to dry completely before using the table.
By following these steps meticulously, a durable and visually appealing farmhouse table with functional extensions can be successfully constructed.
Key Points for Ensuring a Successful Project
Several key points can contribute to the success of a DIY farmhouse table project. These include proper material selection, accurate measurements and cuts, and secure assembly techniques. Paying attention to these details can significantly impact the final result and ensure a long-lasting, functional piece of furniture.
Material Selection and Preparation: The quality of the lumber used directly affects the durability and appearance of the table. Selecting high-quality lumber that is free of significant defects is essential. Proper drying and preparation of the wood, including planing and sanding, ensures a smooth and stable surface for construction. When using reclaimed wood, carefully inspect the wood for structural integrity and remove any nails, screws, or other debris.
Accurate Measurements and Cuts: Accurate measurements and precise cuts are crucial for ensuring that the tabletop, legs, apron, and extension leaves fit together seamlessly. Use a high-quality measuring tape and a sharp saw to make accurate cuts. Double-check all measurements before cutting the lumber to avoid costly mistakes. When joining boards for the tabletop, ensure that the edges are straight and square to create a tight, seamless joint.
Secure Assembly Techniques: Secure assembly techniques are essential for creating a strong and stable farmhouse table. Use wood glue in conjunction with screws, bolts, or mortise and tenon joints to create strong connections between the various components. When using screws, pre-drill pilot holes to prevent splitting the wood. When using bolts, ensure that the holes are accurately aligned. Clamps should be used to hold the pieces together while the glue dries and the screws are tightened. Regularly check the alignment and squareness of the table during assembly to ensure that it is properly constructed.
By adhering to these key points, a robust and aesthetically pleasing farmhouse table with functional extensions can be created, serving as a centerpiece for gatherings and daily use.

Diy Farmhouse Table With Extension Leaves Plans Sweet Tooth Life

Diy Farmhouse Table With Extension Leaves Plans Sweet Tooth Life

Diy Farmhouse Table With Extension Leaves Plans Sweet Tooth Life Dining

Diy Farmhouse Table With Extensions Addicted 2

Diy Farmhouse Table With Extension Leaves Plans Sweet Tooth Life

Extensions For Your Farmhouse Table Diy Plans Dining

Diy Farmhouse Table With Extensions Addicted 2

How To Make A Diy Farmhouse Dining Room Table Restoration Hardware Knockoff Tips For

Best Homemade Table How To Make Your Own Extending Dining Diy

Diy Farmhouse Table With Extension Leaves Plans Sweet Tooth Life
Related Posts