DIY L-Shaped Craft Table: A Comprehensive Guide to Building Your Ideal Workspace
Crafting requires space: space for cutting, gluing, painting, sewing, and all the other processes involved in bringing creative visions to life. A well-designed craft table becomes the epicenter of these activities, and an L-shaped configuration offers an efficient solution for maximizing workspace, especially in smaller rooms or dedicated crafting areas. Constructing an L-shaped craft table as a DIY project allows for customization to meet specific needs, budget constraints, and aesthetic preferences. This article provides a detailed guide to planning, designing, and building a personalized L-shaped craft table.
Planning and Design Considerations
Before commencing the actual build, careful planning is paramount. This stage involves assessing space availability, determining optimal dimensions, and selecting appropriate materials. Failing to thoroughly plan may result in a table that is unsuitable for the intended purpose or does not fit comfortably within the designated area.
First, accurately measure the available space where the L-shaped craft table will be situated. Note the length of each wall along which the table will extend. Consider any obstructions such as windows, doors, radiators, or electrical outlets. These measurements will define the maximum possible size of the table and inform subsequent design decisions.
Next, determine the desired height of the table. The ideal height depends on the intended use and the user's body measurements. A comfortable height will prevent strain and fatigue during prolonged crafting sessions. A standard height for a craft table is typically between 30 and 36 inches. Consider if the table will be primarily used while standing, sitting, or both. Adjustable legs can be incorporated for greater flexibility.
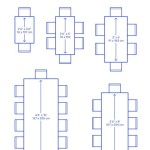
The depth, or width, of the table surface is another key consideration. A greater depth provides more working space but also requires more reach. A depth of 24 to 30 inches is generally sufficient for most crafting activities. The length of each leg of the "L" should be determined based on the specific needs of the crafter. One leg might be longer for cutting fabric, while the other might be shorter for computer work. Consider the flow of work and how different tasks will be distributed across the table surface.
Consider incorporating storage solutions into the design. Built-in drawers, shelves, or cubbies can help organize tools, supplies, and works in progress. This will reduce clutter and improve efficiency. Plan the location and size of storage compartments based on the types of items to be stored. For example, drawers can be sized to accommodate standard storage containers.
Finally, choose the appropriate materials. Common choices include plywood, solid wood, MDF (medium-density fiberboard), and reclaimed lumber. Plywood is a cost-effective option that is relatively lightweight and easy to work with. Solid wood offers greater strength and durability but is typically more expensive. MDF provides a smooth surface ideal for painting but is susceptible to damage from moisture. Reclaimed lumber adds character and is an environmentally friendly choice, although it may require more preparation and cleaning.
Construction Process
The construction process can be broken down into several key steps: cutting the materials, assembling the frame, attaching the tabletop, adding storage (if desired), and finishing the surface.
Begin by cutting all the materials to the specified dimensions based on the design plan. Use a circular saw, jigsaw, or table saw for straight cuts. Ensure the cuts are accurate and clean to ensure a professional-looking finished product. It is beneficial to cut all pieces at once before assembling the table frame. This ensures measurements stay consistent throughout the project.
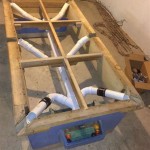
The frame provides structural support for the tabletop. Typically, it consists of legs, aprons (horizontal supports connecting the legs), and possibly a central support beam for added stability. Assemble the frame using wood screws, wood glue, and clamps. Predrill pilot holes to prevent the wood from splitting. Ensure that the frame is square and level before proceeding to the next step. Clamps are essential for holding the pieces together while the glue dries. Use corner clamps for ensuring accurate 90-degree angles.
Attach the tabletop to the frame using wood screws. Ensure that the tabletop is aligned correctly before securing it to the frame. Predrill pilot holes into the frame to prevent the wood from splitting when the screws are inserted. Use countersinking screws to create a flush surface. For larger tabletops, consider using construction adhesive in addition to screws for added stability.
If incorporating storage solutions, such as drawers or shelves, construct these separately and then attach them to the frame. Drawers can be built using plywood or solid wood. Use drawer slides to ensure smooth operation. Shelves can be attached to the frame using shelf pins or brackets. Ensure that the storage compartments are properly aligned and securely fastened.
Once the table is fully assembled, sand the surface to create a smooth finish. Remove any sharp edges or splinters. Apply wood filler to any gaps or imperfections. Sand the wood filler smooth after it has dried. Cleaning the table with a tack cloth prepares the surface for finishing.
Apply a finish to protect the wood and enhance its appearance. Options include paint, stain, varnish, or polyurethane. Choose a finish that is appropriate for the intended use and the type of wood used. Apply multiple coats of finish, allowing each coat to dry completely before applying the next. Lightly sand between coats for a smoother finish. Polyurethane offers a durable, water-resistant finish, ideal for a crafting workspace.
Customization and Enhancements
One of the advantages of building a DIY craft table lies in the ability to customize it to meet specific needs and preferences. This can involve adding features such as adjustable legs, built-in lighting, or specialized storage solutions.
Adjustable legs allow the table height to be adjusted to accommodate different users or tasks. This is particularly useful if the table will be used by multiple people or for activities that require different working heights. Adjustable legs can be purchased from hardware stores or online retailers and are relatively easy to install.
Built-in lighting can improve visibility and reduce eye strain. Consider incorporating LED strip lights under the tabletop or installing a task light that can be easily adjusted. Adequate lighting is crucial for detailed crafting work. LED lights consume less energy and generate less heat compared to traditional incandescent bulbs.
Specialized storage solutions can be designed to accommodate specific types of craft supplies. For example, a dedicated rack for storing rolls of fabric, a shelf for storing paint bottles, or a drawer for storing small tools and accessories. Consider the types of supplies that will be used most frequently and design storage solutions that make them easily accessible and organized.
Adding a power strip with USB ports to the table can be a convenient way to charge electronic devices such as smartphones, tablets, or laptops. Mount the power strip under the tabletop or on the side of the frame. This eliminates the need for extension cords and keeps the workspace tidy.
Consider adding a cutting mat to the tabletop. If the table will be used for activities that involve cutting, such as sewing or paper crafting, a self-healing cutting mat will protect the surface and provide a convenient cutting area. Cutting mats are available in various sizes and can be easily replaced when they become worn.
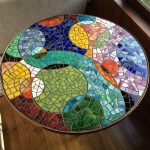
Finally, personalize the craft table with decorative elements that reflect individual style. This can involve painting the table in a favorite color, adding decorative hardware, or incorporating mosaic tiles into the tabletop. These touches elevate the function with an element of style and make the table a reflection of the user's personality.

Diy Craft Table L Shape With Lots Of Storage Diycrafttable Cubestorage

L Shaped Desk For Craft Room Office Combo Sewing Design Diy

The Best Craft Room Tables And Desks Ideas Jennifer Maker

Incredible Diy Craft Desk 5 Things You Need To Know Room Crafts Design

Craft Desk Build

Diy L Shaped Desk Home Office Makeover Girl Just

Easy Diy Craft Desk Ugly Duckling House

Clever Diy Craft Desks The Scrap Pe

Diy L Shaped Desk

L Shaped Corner Desks To Diy Or Buy
Related Posts