DIY Refinishing Your Dining Room Table Top: A Comprehensive Guide
Refinishing a dining room table top is a rewarding DIY project that can breathe new life into a tired piece of furniture. It allows for personalization, cost savings compared to purchasing a new table, and the satisfaction of restoring a cherished item. This guide outlines the necessary steps, materials, and techniques for successfully refinishing a dining room table top, transforming it from worn and dated to a stunning centerpiece.
Before embarking on this project, it is crucial to assess the existing condition of the table top. Factors to consider include the type of finish (varnish, lacquer, polyurethane, etc.), the presence of deep scratches or dents, and the overall stability of the table. Different finishes require varying removal methods, and significant damage may necessitate more extensive repairs. A thorough assessment will inform the choice of tools, materials, and techniques used throughout the refinishing process.
Key Point 1: Preparation and Stripping the Old Finish
The initial stage of refinishing involves meticulous preparation. This includes creating a dedicated workspace, gathering the required tools and materials, and protecting the surrounding area. A well-ventilated room is essential, as chemical strippers can release harmful fumes. Cover the floor with drop cloths and wear appropriate personal protective equipment (PPE), such as gloves, eye protection, and a respirator, to safeguard against potential hazards.
The next step is stripping the old finish. There are several methods for removing the existing finish, including chemical stripping, sanding, and heat gun application. Chemical stripping is often the preferred method for intricate surfaces or when the finish is particularly thick. It involves applying a chemical stripper to the surface, allowing it to dwell for the recommended time, and then scraping away the softened finish with a plastic scraper. Multiple applications may be necessary to remove all traces of the old finish.
When using a chemical stripper, choose a product appropriate for the existing finish. Follow the manufacturer's instructions carefully regarding application, dwell time, and disposal of waste. It is important to neutralize the surface after stripping to remove any residual stripper, which can interfere with the adhesion of the new finish. A recommended neutralizing agent is mineral spirits, applied with a clean cloth.
Sanding can be used as an alternative or supplementary method to chemical stripping. Start with a coarse grit sandpaper (e.g., 80-grit) to remove the bulk of the old finish. Progress gradually to finer grits (e.g., 120-grit, 180-grit, 220-grit) to smooth the surface and prepare it for staining or finishing. Always sand in the direction of the wood grain to avoid creating unsightly scratches. Dust thoroughly between each sanding pass using a tack cloth or a vacuum cleaner with a brush attachment.
A heat gun can be used to soften the old finish, making it easier to scrape away. This method is best suited for flat surfaces and requires careful technique to avoid scorching the wood. Move the heat gun slowly and evenly across the surface, keeping it at a safe distance to prevent overheating. Scrape away the softened finish with a plastic scraper as it bubbles up.
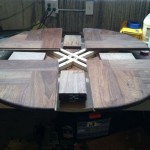
After removing the old finish, thoroughly inspect the table top for any imperfections, such as dents, scratches, or gouges. These imperfections should be addressed before proceeding to the next step. Small dents can often be raised by applying a damp cloth and heat from an iron. Deeper imperfections may require wood filler or patching compound.
Wood filler is used to fill small holes and cracks. Apply the filler with a putty knife, pressing it firmly into the imperfection. Allow the filler to dry completely according to the manufacturer's instructions, then sand it smooth with fine-grit sandpaper. For larger areas of damage, a patching compound may be necessary. This type of compound is typically stronger and more durable than wood filler.
Key Point 2: Staining and Sealing the Wood
Once the table top is smooth and free of imperfections, the next step is to apply a stain, if desired. Staining enhances the natural grain of the wood and adds color. Choose a stain that complements the existing decor and the type of wood. Test the stain on an inconspicuous area of the table top or a scrap piece of wood to ensure the desired color is achieved. Water-based or oil-based stains are common choices; both offer different characteristics in terms of drying time and application.
Apply the stain evenly using a brush, cloth, or sponge. Work in the direction of the wood grain and avoid applying too much stain at once. Allow the stain to dwell for the recommended time, then wipe away any excess with a clean cloth. The longer the stain remains on the surface, the darker the color will be. Multiple coats of stain can be applied for a deeper color, but allow each coat to dry completely before applying the next.
After the stain has dried completely, it is crucial to seal the wood to protect it from moisture, scratches, and other damage. A sealant also provides a smooth, even surface for the final finish. Common sealants include shellac, lacquer, and sanding sealer. Sanding sealer is often preferred as it fills the pores of the wood and creates a smooth base for the finish coat. Apply the sealant according to the manufacturer's instructions, typically with a brush or spray gun. Allow the sealant to dry completely before proceeding to the next step.
After the sealant dries, lightly sand the surface with fine-grit sandpaper (e.g., 220-grit or 320-grit) to remove any imperfections and create a smooth surface for the final finish. Dust thoroughly with a tack cloth or vacuum cleaner before applying the finish coat.
Key Point 3: Applying the Final Finish and Buffing
The final finish is the protective layer that provides durability and enhances the appearance of the table top. Common finish options include polyurethane, varnish, and lacquer. Polyurethane is a popular choice due to its durability and resistance to water and scratches. Varnish provides a traditional look and is available in various sheen levels. Lacquer dries quickly and provides a hard, durable finish, but it requires specialized equipment for application.
Apply the finish in thin, even coats using a brush, spray gun, or cloth. Work in a well-ventilated area and follow the manufacturer's instructions carefully. Multiple coats are typically required for optimal protection and appearance. Allow each coat to dry completely before applying the next. Lightly sand the surface with fine-grit sandpaper between coats to remove any imperfections and create a smooth surface for the subsequent coat.
When using a brush, choose a high-quality brush designed for the specific type of finish. Apply the finish in long, even strokes, overlapping each stroke slightly. Avoid applying too much finish at once, as this can lead to drips and runs. If drips or runs occur, remove them immediately with a clean brush or cloth.
A spray gun provides a more even and consistent finish than a brush. However, it requires specialized equipment and technique. Follow the manufacturer's instructions carefully regarding the type of spray gun, spray pressure, and nozzle settings. Practice spraying on a scrap piece of wood before applying the finish to the table top.
After the final coat of finish has dried completely, buff the surface to enhance the sheen and remove any imperfections. Use a soft cloth or buffing pad and a rubbing compound or polishing compound. Apply the compound to the surface and buff in circular motions. Start with a coarser compound and gradually move to finer compounds for a higher sheen. Be careful not to apply too much pressure, as this can damage the finish.
After buffing, clean the table top with a soft, damp cloth to remove any residual compound. Allow the table top to cure completely before placing objects on it. The curing process can take several days or weeks, depending on the type of finish used. Avoid placing hot or wet items directly on the table top, as this can damage the finish. Use coasters and placemats to protect the surface from scratches and stains.
Regular cleaning and maintenance will help to preserve the beauty and durability of the refinished table top. Wipe the surface with a soft, damp cloth to remove dust and dirt. Avoid using harsh chemicals or abrasive cleaners, as these can damage the finish. Apply a furniture polish or wax periodically to protect the surface and enhance the sheen. With proper care and maintenance, a refinished dining room table top can provide years of enjoyment.

Diy Refinished Dining Table Top Redhead Can Decorate

Diy Refinished Dining Table Top Redhead Can Decorate

Refinishing A Dining Table Diy Beautify Creating Beauty At Home

Diy Refinished Dining Table Top Redhead Can Decorate

How To Easily Redo A Dining Room Table Let S Paint Furniture

Diy Refinished Dining Table Top Redhead Can Decorate

How To Refinish A Table Sand And Sisal Kitchen Makeover Redo Refinishing Furniture

Refinishing A Dining Table Diy Beautify Creating Beauty At Home

Refinishing A Dining Table Diy Beautify Creating Beauty At Home

Dining Room Table Makeover Refinishing A Wood Veneer Stacy Risenmay