Drop Leaf Table Hinge Installation: A Comprehensive Guide
Drop leaf tables, characterized by their hinged leaves that can be lowered or raised, offer a versatile solution for optimizing space and adapting to varying needs. A crucial component in the functionality of these tables is the drop leaf hinge. Proper installation of these hinges ensures smooth operation, stability, and longevity of the table. This article provides a detailed guide to the key considerations and steps involved in drop leaf table hinge installation.
Before embarking on the installation process, understanding the different types of drop leaf hinges available is essential. Common types include continuous hinges (also known as piano hinges), butt hinges, and specialized drop leaf hinges designed with specific angles or features. The selection of the appropriate hinge depends on the table's design, the desired aesthetic, and the weight the hinges will bear. Factors such as the leaf's thickness, the table's overall size, and the intended use are critical in determining the optimal hinge type.
Furthermore, the necessary tools and materials must be gathered before commencing the installation. A basic toolkit should include a measuring tape, pencil, drill with appropriate drill bits, screwdriver (both Phillips head and flathead, depending on the hinge screw type), wood chisel, hammer, safety glasses, and potentially a countersinking bit. The quality of the screws used to secure the hinges is also paramount; select screws of appropriate length and gauge that are specifically designed for wood application. Using the wrong type of screw can lead to stripping, splitting of the wood, or inadequate holding power.
Preparation of the table and leaf surfaces is another important step. The surfaces where the hinges will be mounted should be clean, smooth, and free of any debris or existing finishes that could interfere with the hinge's proper seating. Light sanding of the surfaces may be necessary to ensure a flush and even contact between the hinge and the wood. Accuracy in this preparation stage directly influences the stability and functionality of the drop leaf mechanism.
Key Point 1: Precise Measurement and Marking
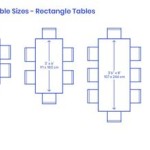
Accurate measurement and marking are fundamental to a successful drop leaf hinge installation. The placement of the hinges significantly impacts the alignment and smoothness of the leaf's movement. Begin by measuring the distance between the edges of the table and the leaf where the hinges will be positioned. This measurement should be consistent for all hinges to ensure uniform weight distribution and prevent warping or binding.
Using a pencil, carefully mark the locations for the hinges on both the table and the leaf. These markings should indicate the exact placement of the hinge's body and the screw holes. For continuous hinges, the marking process involves drawing a straight line along the entire length of the hinge placement on both surfaces. For butt hinges or specialized drop leaf hinges, individual markings are needed for each hinge. It is advisable to double-check these markings to ensure they are accurate and aligned before proceeding further.
Consider using a marking gauge to create a consistent and parallel line for the hinge placement. A marking gauge ensures that the hinge is installed at a uniform distance from the edge, contributing to a professional and aesthetically pleasing result. The depth of the hinge recess, if required, should also be marked accurately. A sharp chisel can then be used to create the recess, ensuring that the hinge sits flush with the surface of the wood.
Pilot holes are crucial for preventing the wood from splitting when the screws are driven in. Use a drill bit that is slightly smaller than the screw's diameter to create pilot holes at each marked screw location. The depth of the pilot holes should be sufficient to accommodate the screw's length without bottoming out. Ensure that the pilot holes are drilled straight and perpendicular to the surface of the wood. Angled pilot holes can compromise the screw's holding power and lead to instability.
When installing multiple hinges, it is beneficial to create a simple jig or template. A jig can be made from a piece of scrap wood with accurately drilled holes corresponding to the hinge screw locations. The jig is then clamped to the table and leaf surfaces, allowing for consistent and precise pilot hole drilling. This method not only improves accuracy but also speeds up the installation process, particularly when dealing with a large number of hinges.
Key Point 2: Hinge Installation and Alignment
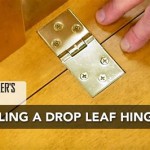
Once the measurements are taken and the pilot holes are drilled, the actual installation of the hinges can begin. Start by positioning the hinges on the marked locations, aligning them carefully with the pilot holes. Secure the hinges using the appropriate screws. It is important to avoid overtightening the screws, as this can strip the screw holes or damage the wood. The screws should be snug but not forced.
For butt hinges or specialized drop leaf hinges, it is often best to install one hinge at a time, checking the alignment of the leaf after each hinge is installed. This allows for minor adjustments to be made if necessary. If the leaf is not aligning properly, loosen the screws slightly and make small adjustments to the hinge's position until the leaf is flush and level with the table surface.
Continuous hinges require a slightly different approach. Begin by aligning the hinge along the marked line on both the table and the leaf. It is helpful to clamp the hinge in place to prevent it from shifting during installation. Start by securing the hinge with a few screws at each end, then gradually work your way towards the middle, ensuring that the hinge remains straight and aligned. Check the leaf's alignment frequently during the installation process.
After all the hinges are installed, thoroughly inspect the leaf's movement. It should swing freely and smoothly without any binding or resistance. If the leaf is sticking or difficult to move, carefully examine the hinge alignment and the spacing between the table and the leaf. Minor adjustments to the hinge positions may be necessary to achieve optimal performance.
Consider using a countersinking bit to create a recess for the screw heads. This ensures that the screw heads are flush with the surface of the hinge, preventing them from interfering with the leaf's movement. Countersinking also provides a cleaner and more professional finish. Be careful not to countersink too deeply, as this can weaken the screw's holding power.
Key Point 3: Troubleshooting and Fine-Tuning
Even with careful planning and execution, minor issues can arise during drop leaf hinge installation. One common problem is leaf misalignment, where the leaf does not sit flush with the table surface when in the closed position. This can be caused by inaccurate hinge placement, uneven surfaces, or warping of the wood.
To correct leaf misalignment, begin by loosening the screws on the affected hinges. Use shims, thin pieces of wood or cardboard, to adjust the height of the hinge. Place the shims between the hinge and the wood surface to raise the hinge slightly. This can help to compensate for uneven surfaces or warping. Tighten the screws gradually, checking the leaf's alignment after each adjustment.
Another potential issue is binding, where the leaf is difficult to move or sticks in certain positions. This is often caused by hinges that are too tight or are not properly aligned. Loosen the screws on the affected hinges and check the spacing between the table and the leaf. Ensure that there is sufficient clearance for the leaf to move freely. Lubricating the hinges with a small amount of oil or silicone spray can also help to reduce friction and improve movement.
If the screws are stripping or not holding properly, consider using longer screws or screws with a larger diameter. You can also try using wood glue in the screw holes to provide additional holding power. Apply a small amount of wood glue to the inside of the screw hole and then insert the screw. Allow the glue to dry completely before using the table.
Finally, if the hinges are damaged or worn, they may need to be replaced. Remove the old hinges and install new ones following the same procedures outlined above. When replacing hinges, it is important to choose hinges that are the same size and type as the original ones to ensure proper compatibility.
Regular maintenance of drop leaf hinges is essential for ensuring their longevity and optimal performance. Periodically check the screws to ensure they are tight and lubricate the hinges as needed. Clean the hinges with a damp cloth to remove any dirt or debris. By following these simple maintenance tips, you can keep your drop leaf table functioning smoothly for years to come.

How To Install A Drop Leaf Hinge Woodworking Blog S Plans

How To Install Drop Leaf Table Hinges Woodworking

Drop Leaf Table Hinge And Hardware Kits

How To Install Drop Leaf Table Hinges Woodworking

Drop Leaf Hinges For Straight Edges Yellow Zinc Plated Rockler Woodworking And Hardware

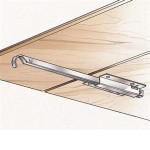
Metal Drop Leaf Support Pair Rockler Woodworking And Hardware

Drop Leaf Table Support Paxton Hardware

Drop Leaf Table Hinge And Hardware Kits

Drop Leaf Cherry Table Hinges And Miter Step 6

Tkb Drop Leaf Table Fitting 20kg B K Services