Graco 4-in-1 Crib with Changing Table: Assembly and Usage Guide
The Graco 4-in-1 Crib with Changing Table is a versatile piece of nursery furniture designed to adapt to a child's growth from infancy through toddlerhood. This combination unit serves as a crib, a changing table, a toddler bed, and eventually, a full-size bed, offering long-term value and convenience. This article provides comprehensive instructions and guidelines for assembling and utilizing each of the crib's configurations safely and effectively.
Prior to beginning assembly, it is crucial to inventory all components against the parts list included in the packaging. This step ensures that all necessary parts are present and facilitates a smoother assembly process. Familiarize yourself with the various hardware items, such as bolts, screws, and dowels, as they will be referenced throughout the instructions. A Phillips head screwdriver, a wrench (often included), and potentially a rubber mallet will be required for assembly. Avoid using power tools, as over-tightening can damage the crib's components.
Assembling the Crib Configuration
The initial configuration of the Graco 4-in-1 Crib is as a standard crib. This involves connecting the headboard and footboard to the side rails. Begin by attaching the side rails to the headboard. The side rails typically connect using bolts and barrel nuts or a similar fastening system. Ensure that the side rails are securely attached and that the connections are flush. Repeat this process for the footboard.
Once the frame is assembled, install the mattress support. The mattress support is usually adjustable to multiple heights, allowing it to be lowered as the child grows. Refer to the manufacturer's instructions for the proper procedure for adjusting the mattress support height. Secure the mattress support using the appropriate hardware, ensuring it is level and stable.
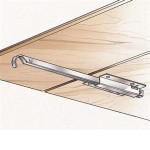
The changing table component is integrated into one end of the crib. Typically, it consists of several shelves or drawers for storing diapers, wipes, and other baby essentials. The changing table section needs to be attached securely to the crib frame. Following the instructions provided, align the changing table components and attach them using bolts and screws. Ensure that the connections are tight and that the changing table is stable and does not wobble.
Finally, install the teething rails or guards along the top edges of the side rails. These rails protect the crib's wood finish from the child's teething and provide a comfortable surface for the child to grip. Teething rails are typically attached using adhesive strips or small screws. Ensure that the rails are securely attached and that there are no gaps between the rails and the side rails.
After the crib assembly is complete, thoroughly inspect all connections to ensure they are secure. Check for any sharp edges or loose parts that could pose a safety hazard. Install a crib mattress that fits snugly within the crib frame, leaving no gaps larger than two fingers between the mattress and the crib sides. This prevents the risk of entrapment.
Converting to a Toddler Bed
As the child grows and becomes more active, the crib can be converted into a toddler bed. This configuration allows the child to climb in and out of bed independently while still providing a safe and secure sleeping environment. Converting the crib to a toddler bed typically involves removing one of the side rails and replacing it with a toddler rail. The toddler rail is shorter than the full side rail and provides an opening for the child to enter and exit the bed.
To begin the conversion, remove the mattress and detach one of the side rails from the headboard and footboard. Retain all hardware, as it will be needed to attach the toddler rail. Following the manufacturer's instructions, attach the toddler rail to the headboard and footboard using the original hardware. Ensure that the toddler rail is securely attached and that there are no gaps between the rail and the headboard or footboard.
Lower the mattress support to its lowest position to provide a stable base for the toddler bed. This also reduces the risk of the child climbing out of the bed and falling. Reinstall the mattress and ensure that it fits snugly within the frame. Before allowing the child to use the toddler bed, thoroughly inspect all connections and ensure they are secure. Check for any sharp edges or loose parts that could pose a safety hazard.
It is recommended to introduce the toddler bed to the child gradually. Start by allowing the child to play in the bed during the day and gradually transition to sleeping in the bed at night. Provide positive reinforcement and encouragement to help the child adjust to the new sleeping arrangement. Use a nightlight to provide a sense of security and comfort.
Transforming into a Full-Size Bed
When the child outgrows the toddler bed, the Graco 4-in-1 Crib can be converted into a full-size bed. This configuration provides a larger sleeping surface and can accommodate the child until adulthood. Converting the crib to a full-size bed typically requires the purchase of additional components, such as full-size bed rails and a box spring or foundation. The original headboard and footboard can be used as the headboard and footboard of the full-size bed.
To begin the conversion, disassemble the toddler bed configuration. Remove the mattress and detach the toddler rail and side rails from the headboard and footboard. Retain all hardware, as some of it may be needed to attach the full-size bed rails. Following the instructions provided with the full-size bed rails, attach the rails to the headboard and footboard. Ensure that the rails are securely attached and that they are properly aligned.
Install a box spring or foundation within the full-size bed frame. The box spring or foundation provides support for the mattress and helps to distribute weight evenly. Place a full-size mattress on top of the box spring or foundation. Ensure that the mattress fits snugly within the frame and that there are no gaps between the mattress and the side rails.
After the full-size bed assembly is complete, thoroughly inspect all connections to ensure they are secure. Check for any sharp edges or loose parts that could pose a safety hazard. Ensure that the bed is stable and does not wobble. Use a bed skirt to conceal the box spring or foundation and to add a decorative touch. Coordinate bedding and accessories to create a comfortable and inviting sleeping environment.
The changing table component can be used separately as a dresser or storage unit once the crib is converted to a full-size bed. This provides continued functionality and extends the lifespan of the furniture. Ensure that the changing table is placed on a level surface and that it is securely anchored to the wall to prevent tipping.
The Graco 4-in-1 Crib with Changing Table is designed to provide years of use and convenience. By following the assembly instructions carefully and adhering to safety guidelines, parents can ensure that the crib is used safely and effectively in each of its configurations. Regular maintenance, such as tightening loose hardware and cleaning the surfaces, will help to prolong the lifespan of the crib and keep it in good condition.

Graco Hadley Pebble Gray 4 In 1 Convertible Crib And Changer With Drawer 04586 70f The Home Depot

Graco Hadley Espresso 4 In 1 Convertible Crib And Changer With Drawer 04586 709 The Home Depot

Graco Hadley 4 In 1 Convertible Crib Changer W Drawer Assembly How To Assemble Baby

Graco Benton White 4 In 1 Convertible Crib And Changer 04586 641 The Home Depot

How To Build Graco Remi Convertible Crib Changer Assembly For Model Number Ft

Graco Woodbridge 4 In 1 Crib Changer Combo Espresso Com

Graco Hadley 4 In 1 Convertible Crib With Drawer Espresso 04521 709 The Home Depot

Graco Benton Black 4 In 1 Convertible Crib And Changer 04586 64b The Home Depot

Graco Solano 4 In 1 Convertible Crib And Changer With Drawer Pebble Gray Com

Graco Hadley 5 In 1 Convertible Crib With Drawer Target