Homemade Computer Table Design Plans
Building a custom computer table offers several advantages, from cost savings and personalized dimensions to perfectly matching a room's aesthetic. This article explores various design plans for homemade computer tables, catering to different skill levels and needs.
Before initiating any project, gather necessary tools and materials. Essential tools commonly include a measuring tape, saw (circular, miter, or hand saw), drill, screwdriver, sander, and safety glasses. Materials typically involve wood (plywood, MDF, or solid wood), screws, wood glue, and finishing supplies (paint, stain, or varnish).
Simple Rectangular Table:
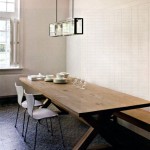
This design caters to beginners, offering a straightforward construction process. Begin by determining the desired table dimensions. Cut the wood pieces for the tabletop, sides, and supporting frame according to these measurements. Assemble the frame using screws and wood glue, ensuring square corners. Attach the tabletop securely to the frame. Finally, sand and finish the table according to preference.L-Shaped Computer Table:
Maximizing corner space, the L-shaped design provides ample surface area. Plan the dimensions carefully, considering the available corner space and desired legroom. Construct two rectangular frames, one for each section of the "L." Connect these frames securely using screws and wood glue. Attach the tabletops to the frames, ensuring a flush and level surface. Sanding and finishing complete the process.Computer Table with Drawers:
Adding drawers enhances storage capacity. Plan the drawer placement and dimensions during the initial design phase. Construct drawer boxes using appropriate joinery techniques, such as dovetail or dado joints. Install drawer slides onto the table frame and attach the drawer fronts. Ensure smooth drawer operation. Complete the table construction as outlined in the previous designs, adding the drawer assembly during the frame construction.Computer Table with Keyboard Tray:
A keyboard tray enhances ergonomics and frees up desk space. Determine the desired placement and dimensions of the keyboard tray. Construct a sliding mechanism using drawer slides or a hinged system. Attach the tray mechanism to the underside of the tabletop. Ensure smooth and stable tray operation. Complete the table construction following the basic rectangular or L-shaped design, incorporating the keyboard tray installation.Elevated Computer Table with Monitor Shelf:
Raising the monitor to eye level promotes better posture. Design a shelf or platform into the table structure to elevate the monitor. Determine the optimal height and dimensions of the shelf based on ergonomic considerations. Integrate the shelf supports into the table frame during construction. Secure the shelf platform to the supports. Complete the table construction according to the chosen basic design (rectangular or L-shaped), incorporating the monitor shelf.Gaming Computer Table:
Gaming tables prioritize functionality and cable management. Consider incorporating features like cable grommets, elevated platforms for multiple monitors, and integrated lighting. Plan the layout to accommodate gaming peripherals and ensure sufficient space for comfortable gameplay. Adapt the basic rectangular or L-shaped design to include these specialized features during the construction process.Standing Desk Converter:
For those preferring a standing desk option, a converter can be built to sit atop an existing table. Design a platform with two levels: one for the keyboard and mouse, and a higher level for the monitor. Ensure stable construction and appropriate height adjustments for ergonomic comfort. This design allows for transitioning between sitting and standing without requiring a completely new desk.Material Considerations:
Plywood offers a cost-effective solution for table construction, while MDF provides a smooth surface for finishing. Solid wood offers durability and aesthetic appeal but comes at a higher cost. Choose the material that best suits the project budget and desired aesthetic.Finishing Techniques:
Sanding the completed table surface ensures a smooth finish. Applying paint, stain, or varnish adds protection and enhances the appearance. Consider using a sealant for added durability, particularly for tabletops exposed to frequent use.
Customization Options:
Personalize the design further by incorporating features like built-in speakers, USB hubs, or custom cable management solutions. Adapt the chosen design plan to accommodate these additions during the construction process.Building a homemade computer table provides a rewarding experience and allows for complete customization. Carefully plan the design, select appropriate materials, and follow construction best practices to create a functional and aesthetically pleasing workspace.

21 Ultimate List Of Diy Computer Desk Ideas With Plans

Build Your Own Diy Computer Gaming Desk Simplified Building

Easy Diy Desk For 40 And Just 4 Tools Free Plans

32 Best Diy Desk Plans Build Tutorials
:max_bytes(150000):strip_icc()/more-like-home-free-desk-plans-582dda015f9b58d5b17cb899.jpg?strip=all "16 Free Diy Desk Plans You Can Build Today")
16 Free Diy Desk Plans You Can Build Today

21 Ultimate List Of Diy Computer Desk Ideas With Plans
:max_bytes(150000):strip_icc()/thenavagepatch-c0bd801a4dc44cd4ae1b2da6e8b3de37.jpg?strip=all "19 Simple Diy Desk Ideas For Any Room")
19 Simple Diy Desk Ideas For Any Room

Step By Diy Plan For A Computer And Work Desk Customize Your Design With Side Bookshelf

More Like Home Day 2 Build A Casual Desk With 2x4s

Top 10 Diy Desk Plans Back To School Furniture Projects The Design Confidential