How to Build a Harvest Table
A harvest table, with its sturdy construction and generous size, is a timeless centerpiece for gatherings, meals, and family memories. Building your own harvest table allows you to personalize the design, choose high-quality materials, and create a unique piece that reflects your style and craftsmanship. This article will guide you through the process of constructing a stunning harvest table, covering essential steps from planning to finishing.
Step 1: Planning and Design
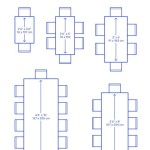
Before diving into construction, meticulous planning is key. Start by determining the desired dimensions of your table. Consider the size of your dining space and the number of people you wish to seat. Standard harvest tables often range from 6 to 10 feet in length, with a width of 3 to 4 feet. The height should be comfortable for your guests, typically around 30 inches.
Next, choose a suitable wood species. Hardwoods like oak, maple, and cherry offer durability and visual appeal. Softwoods, such as pine or cedar, can be more affordable but might require more maintenance. Consider the desired color, grain pattern, and resistance to scratches and dents.
Research different table designs. Classic harvest tables feature sturdy legs and a top made from multiple planks joined together. Explore various leg styles, like traditional farmhouse legs, tapered legs, or pedestal bases. Consider adding decorative elements such as aprons, carvings, or a live edge top.
Step 2: Gathering Tools and Materials
Once the design is finalized, gather the necessary tools and materials. Tools include a miter saw, table saw, drill, sander, clamps, and finishing supplies. Woodworking safety gear, such as safety glasses, gloves, and a dust mask, is also essential.
Materials will vary depending on your chosen design. Common materials include: *
Wood:
Lumber for the tabletop, legs, aprons, and other components. *Fasteners:
Wood screws, bolts, or dowels for joining parts. *Wood glue:
High-quality glue for strong bonds. *Finish:
Stain, paint, or oil to protect and enhance the wood.Ensure that all materials are adequately seasoned and free from defects.
Step 3: Building the Tabletop
The tabletop is the foundation of your harvest table. Begin by cutting the planks for the top to the desired length and width. Jointing the edges of each plank ensures a smooth surface. Using a router, create a cove molding along the edges of each plank for a decorative touch and to reinforce the tabletop.
Assemble the planks by carefully aligning them, using wood glue and clamps to secure them together. Alternatively, mortise and tenon joints can be used for a sturdier construction. Allow the glue to fully dry before proceeding.
Step 4: Constructing the Legs and Aprons
The legs provide stability and support to the table. Cut the leg pieces to the desired length and join them using mortise and tenon joints, or simply secure them with wood glue and screws.
Aprons, the horizontal pieces that connect the legs, add structural integrity and visual appeal. Cut aprons to the desired length and width. Attach the aprons to the legs using wood glue and screws, ensuring they are level and flush.
Step 5: Assembling the Table
With the tabletop and the leg assembly complete, the final step is assembling the table. Place the leg assembly on top of the tabletop, ensuring the legs are aligned and spaced evenly. Secure the legs to the tabletop using wood glue and screws, creating a strong and lasting bond.
Step 6: Finishing Touches
Once the table is assembled, it is time for the finishing touches. Sand the entire table surface thoroughly, removing any roughness or imperfections. Apply a stain or paint to achieve the desired color and finish. Multiple coats of sealant can be applied to protect the wood from scratches, spills, and water damage.
Consider adding decorative details such as carving, distressing, or distressing to personalize the table.
Step 7: Enjoy Your Harvest Table
The final step is to enjoy the fruits of your labor! Gather friends and family around your handcrafted harvest table, celebrating meals, laughter, and shared moments. Your custom-built harvest table will surely become a cherished family heirloom for generations to come.

Build A Patio Harvest Table Canadian Woodworking

Harvest Table Diy

Soulemama Our Harvest Table

Harvest Table Diy

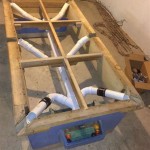
How To Build A Harvest Table Using Pipes

How To Build A Farmhouse Table

Build A Patio Harvest Table Diy Outdoor

How To Build A Farmhouse Table

Let Me Build You A Harvest Table I Also Live On Farm

How To Build A Harvest Table Using Pipes
Related Posts