How to Build a Metal Table
Metal tables are a versatile and durable addition to any space, be it indoors or outdoors. They offer a sleek and modern aesthetic, and their strength makes them ideal for high-traffic areas. Building a metal table yourself not only saves money but also provides a rewarding sense of accomplishment. This guide will outline the steps involved in constructing a sturdy and elegant metal table.
Step 1: Design and Planning
The first step in building a metal table is to create a design plan. This involves determining the desired dimensions, shape, and style of the table. Consider the intended use of the table and the accompanying chairs, if any. A sketch or a computer-aided design (CAD) program can be helpful in visualizing the final product.
Next, choose the appropriate metal for your project. Steel is a popular choice due to its strength and durability. Other options include aluminum, which is lighter and more corrosion-resistant, and wrought iron, known for its decorative qualities. The thickness of the metal will also influence the overall stability and weight of the table.
Step 2: Gathering Materials and Tools
Once you have finalized the design, gather the necessary materials and tools. These will vary depending on the size and complexity of the table. Generally, you will need:
- Metal tubing or sheet metal
- Cutting and welding tools
- Measuring tape and level
- Drilling machine and bits
- Screws, bolts, and nuts
- Protective gear, including gloves, eye protection, and respiratory mask
If you are unfamiliar with welding, consider seeking assistance from a professional or enrolling in a welding course. Proper safety precautions should be taken at all times when handling tools and working with metal.
Step 3: Cutting and Shaping the Metal
Using a metal saw, chop saw, or plasma cutter, cut the metal to the desired lengths based on your design. Once the pieces are cut, use a grinder or sander to smooth the edges and remove any sharp burrs. For intricate designs, a metal bending brake can be used to form curves and angles.
Step 4: Assembling the Table Base
The table base typically consists of a frame and legs. Use welding to join the metal pieces together, ensuring the joints are strong and secure. If you are not welding, consider using metal brackets or connectors for joining the pieces. When welding, ensure the pieces are properly aligned and clamped together before applying heat. After welding, allow the joints to cool completely before proceeding.
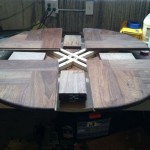
Step 5: Attaching the Tabletop
Once the base is assembled, attach the tabletop. The tabletop can be made from various materials, including wood, glass, or metal. If using a wooden tabletop, secure it to the base using screws or bolts. With a glass or metal tabletop, consider using brackets or clamps for a secure connection. For metal tabletops, welding can also be used to attach them permanently to the base.
Step 6: Finishing Touches
After the table is fully assembled, give it a final polish. This may involve sanding, painting, or applying a protective coating. If using paint, consider applying a primer first for better adhesion and durability. To protect the metal from rust and corrosion, apply a rust-resistant coating or sealant. You can also add decorative elements such as metal accents or a custom finish for a unique touch.

How To Build A Wood And Metal Dining Table Fixthisbuildthat

Welding Project How To Create Your Own Metal End Table Millerwelds

How To Build A Welding Table Basic Metal Project Good For Any Diy Garage Instructions Steel Fabrication Fixture Assembly Plans

How To Build A Massive Metal Table 600 Lbs

Build Your Own Diy Welding Table Askforney

How To Build A Metal And Wood Coffee Table Beginner Welding Project Diy

How To Build A Basic Welding Table From Scrap

How To Build A Wood And Metal Dining Table Fixthisbuildthat

How To Build A Wood Dining Table With Metal Legs Flowyline Design

Building A Modern Metal Table Base Custom Dining