How To Build Table Leg Supports: A Comprehensive Guide
Constructing a stable and aesthetically pleasing table requires careful attention to the leg supports. These supports, often overlooked, are crucial for ensuring the table's structural integrity, preventing wobble, and enhancing its overall design. A well-built table leg support system distributes weight evenly, minimizing stress on the legs and tabletop. This article provides a detailed guide on how to build various types of table leg supports, covering essential considerations such as material selection, design options, and construction techniques.
Before embarking on the construction process, it is imperative to define the table's intended use and stylistic preferences. This will influence the choice of materials, support design, and overall construction approach. Consider the weight the table is expected to bear, the desired aesthetic (modern, rustic, traditional), and the available tools and skill level of the builder. Proper planning is the foundation for a successful and durable table.
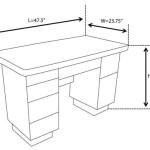
Accurate measurements are also critical. Precise measurements ensure that all components fit together seamlessly, leading to a stable and visually appealing final product. A slight miscalculation can result in instability or an uneven table surface. It is recommended to double-check all measurements before cutting any materials.
Key Point 1: Material Selection and Preparation
The choice of material for table leg supports significantly impacts the table's strength, durability, and aesthetic appeal. Hardwoods such as oak, maple, and walnut are popular choices due to their inherent strength and attractive grain patterns. Softwoods like pine and fir can also be used, particularly for more rustic or painted table designs. Metal, particularly steel, provides exceptional strength and is often chosen for modern or industrial-style tables.
Wood selection should consider the grain direction. Ideally, the grain should run along the length of the support to maximize its resistance to bending and breaking. Inspect the wood for any defects, such as knots, splits, or warping, which can compromise its structural integrity. It is prudent to select wood that is straight and free of significant imperfections.
Metal supports, typically made from steel, can be purchased as pre-fabricated components or custom-fabricated to specific dimensions. Welding is often required for joining metal pieces, demanding specialized equipment and skills. Pre-fabricated metal supports often come with mounting hardware and instructions, simplifying the construction process.
Prior to assembly, all materials require thorough preparation. Wood surfaces need to be sanded smooth to remove any rough spots or splinters. The level of sanding should be determined by the desired finish; finer sanding is required for a smoother, more polished appearance. Sharp edges should be eased with sandpaper or a router to prevent injuries and enhance the overall aesthetic. Metal surfaces should be cleaned to remove any rust, grease, or other contaminants. A primer should be applied to metal supports to prevent corrosion and improve paint adhesion.
Wood should be properly acclimated to the environment in which the table will reside. Allowing the wood to sit in the room for several days before construction helps it adjust to the humidity levels, minimizing the risk of warping or cracking after the table is assembled. This step is especially important for hardwoods, which are more prone to dimensional changes.
Key Point 2: Designing and Cutting Table Leg Supports
Several design options exist for table leg supports, each offering unique structural and aesthetic characteristics. The simplest design involves aprons, which are horizontal pieces of wood that connect the legs and provide support to the tabletop. More complex designs incorporate angled braces, corner blocks, or metal brackets for added strength and stability. The choice of design depends on the size and weight of the table, as well as the desired aesthetic.
Aprons are typically attached to the legs using screws, dowels, or mortise and tenon joints. Screws are the simplest and most common method, but they may not provide the strongest connection. Dowels offer a cleaner look and greater strength. Mortise and tenon joints are the most robust option, but they require more advanced woodworking skills. The thickness of the apron should be proportional to the size of the table; thicker aprons provide greater support. The height of the apron should be carefully considered as it can impact legroom under the table.
Angled braces, also known as corner braces, provide additional support by connecting the legs to the apron at an angle. These braces help to distribute weight more evenly and prevent racking, which is the tendency of the table to wobble. Angled braces can be made from wood or metal and are typically attached using screws or bolts. The angle of the brace should be chosen to maximize its effectiveness; a 45-degree angle is often used.
Corner blocks are small blocks of wood that are glued and screwed into the corners where the legs meet the aprons. These blocks provide extra support and prevent the corners from flexing. Corner blocks are particularly useful for tables with heavy tops or tables that are subjected to frequent use. The size and shape of the corner blocks can be customized to suit the table's design.
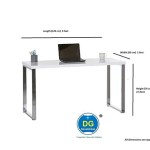
Metal brackets offer a quick and easy way to attach legs to a tabletop. These brackets are typically made from steel and are screwed into both the legs and the tabletop. Metal brackets provide a strong and stable connection, but they may not be as aesthetically pleasing as other options. They are often used for tables with simple designs or tables where the leg supports are not intended to be a prominent feature.
Accurate measurements and precise cuts are essential for ensuring that the table leg supports fit together properly. A miter saw or table saw can be used to cut the pieces to the correct length and angle. It is crucial to use sharp blades to prevent splintering and ensure clean cuts. Clamps should be used to hold the pieces securely in place while cutting.
Key Point 3: Assembling and Securing the Table Leg Supports
The assembly process involves joining the various components of the table leg supports using appropriate fasteners and adhesives. When using screws, it is essential to pre-drill pilot holes to prevent the wood from splitting. The size of the pilot hole should be slightly smaller than the diameter of the screw. Screws should be tightened securely, but not over-tightened, as this can strip the threads or damage the wood.
When using dowels, the dowel holes should be drilled accurately and aligned properly. The dowels should be glued into place using wood glue and clamped until the glue has dried. Excess glue should be wiped away with a damp cloth. Dowels provide a strong and durable connection, but they require careful planning and execution.
Mortise and tenon joints are the strongest type of wood joint, but they require specialized tools and skills to create. The mortise is a hole cut into one piece of wood, and the tenon is a projecting piece of wood that fits into the mortise. The tenon is typically glued into place and secured with pegs or wedges. Mortise and tenon joints provide a very strong and durable connection, but they are more time-consuming to create than other types of joints.
Wood glue should be used in conjunction with fasteners to create a stronger and more durable connection. Wood glue should be applied to all mating surfaces before the components are joined. Clamps should be used to hold the components together until the glue has dried. Excess glue should be wiped away with a damp cloth. Different types of wood glue are available, each with its own specific properties. It is important to choose the right type of glue for the application.
Once the table leg supports are assembled, they should be carefully inspected for any gaps or misalignments. Any imperfections should be corrected before proceeding to the next step. Shims can be used to level the table legs if necessary. Clamping the assembled supports during glue drying helps ensure a tight and square construction.
Attaching the completed leg support structure to the tabletop is the final step. This can be accomplished using screws, bolts, or specialized table fasteners. The choice of attachment method depends on the type of tabletop and the design of the leg supports. Screws should be used with caution, as they can split the wood if they are not installed properly. Bolts provide a stronger connection, but they require drilling holes through the tabletop. Table fasteners are designed specifically for attaching table legs to tabletops and offer a secure and easy-to-use solution.
Ensuring proper alignment between the leg supports and the tabletop is crucial for achieving a stable and visually appealing table. Before securing the supports, it is recommended to dry-fit them to the tabletop to check for any misalignments. Adjustments can be made as needed to ensure that the legs are perfectly aligned and that the table is level. Once the supports are properly aligned, they can be securely fastened to the tabletop. The completed table should be inspected for stability and any necessary adjustments should be made.

These Brackets Are Not Big Enough For 4x4 Table Legs So I Installed 2x6 Blocking Diy Furniture Farmhouse Wood Shelves

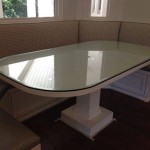
Farmhouse Table Diy With Removable Legs Angela Marie Made

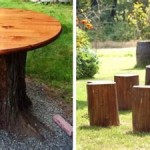
Note The 4x4 Legs Are Plenty Strong To Support This 4x6 Table Without Typical Bracing On Low Diy Farmhouse Garden Furniture Kitchen

Diy Kids Table With Trapezoid Legs Brepurposed

Table Leg Bracket Build Diy Tables Easily Self Made Brackets Legs

Farmhouse Table Diy With Removable Legs Angela Marie Made

How To Build A Farmhouse Table

Advice Horizontal Support On Table Legs Finewoodworking

Simple Versatile Bracket System To Build Tables Design Milk Diy Furniture Easy

Assembling A Kotatsu Table With Leg Supports