How to Build Your Own Pool Table
Building a pool table is a challenging yet rewarding project for experienced woodworkers. This undertaking requires meticulous planning, precise measurements, and specialized tools. The following guide outlines the necessary steps and considerations for constructing a custom pool table.
Planning and Design
Before beginning construction, detailed planning is essential. Determining the table's dimensions is the first step. Standard sizes range from 7 feet to 9 feet in length, with proportional widths. Consider the available space and desired playing experience when selecting the size. Creating a scale drawing or using CAD software can help visualize the final product and identify potential issues before they arise.
Choosing the appropriate materials is crucial for a durable and high-quality table. Hardwoods like maple, oak, or cherry are preferred for the frame and legs due to their strength and stability. Slate is the industry standard for the playing surface due to its flatness and consistent play. The thickness of the slate will depend on the table size, with thicker slate generally providing a more level playing surface. Quality felt, cushions, and pockets are essential for optimal gameplay.
A comprehensive list of necessary tools should be compiled. This list will include woodworking tools like a table saw, router, planer, and various clamps. Specialized tools for working with slate, such as a diamond wet saw, may be necessary depending on whether the slate is pre-cut. Safety equipment, including eye protection, hearing protection, and dust masks, should always be used.
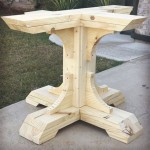
Constructing the Frame and Base
The frame provides the foundation and support for the slate bed. It needs to be exceptionally sturdy to withstand the weight of the slate and the forces exerted during gameplay. Constructing the frame typically involves joining thick hardwood beams using mortise and tenon joints or other robust joinery methods. Precise measurements and careful assembly are critical to ensure a level and square frame. Leveling the frame is essential for a true playing surface and can be achieved using shims and a level.
The table's legs are attached to the frame, providing stability and support. The legs should be securely fastened to the frame using strong joinery techniques. Consider the aesthetic appeal of the legs when choosing a design. Turned legs or more contemporary designs can be incorporated depending on the desired style. The base often includes crossbeams or other reinforcements to further enhance the table's structural integrity. These supports distribute the weight evenly and prevent warping or sagging over time.
Installing the Slate and Felt
Preparing the slate for installation is a crucial step. If the slate is not pre-cut, it will need to be carefully measured and cut using a diamond wet saw. The edges of the slate should be smooth and even to ensure a seamless fit within the frame. Leveling the slate is paramount to achieving a true playing surface. This can be done using shims and a precision level. Securing the slate to the frame is typically accomplished using adhesive and screws. Properly securing the slate prevents movement and maintains the level playing surface.
Stretching and attaching the felt to the slate requires patience and precision. The felt should be carefully centered and stretched tautly over the slate before being secured with staples or adhesive. Wrinkles or uneven tension in the felt will negatively impact gameplay. Trimming the excess felt around the pockets and edges provides a clean and professional finish.
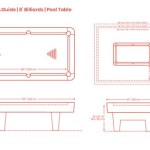
Assembling the Rails and Pockets
Attaching the rails to the frame completes the playing surface boundary. The rails should be securely fastened to the frame using screws or bolts. Ensure the rails are aligned correctly with the slate to maintain consistent cushion response. Installing the cushions involves carefully stretching and attaching them to the rails. Proper cushion installation is essential for accurate ball rebound and consistent gameplay.
Mounting the pockets requires precise alignment and secure fastening. Pocket designs can vary, from simple drop pockets to more elaborate ball return systems. Choose a pocket style that complements the overall table design. Ensure the pockets are securely attached to the frame and rails to prevent them from loosening during gameplay.
Final adjustments and finishing touches complete the project. Carefully inspect the entire table for any imperfections or inconsistencies. Leveling adjustments can be made if necessary. Applying a protective finish to the wooden components enhances the table's durability and aesthetic appeal. Regular maintenance and care will ensure the longevity and enjoyment of the custom-built pool table.

Build Your Own Billiard Table Works

The Process Of Building Pool Tables At Quedos

How To Build A Pool Table Diy Guide For Players

How To Build A Diy Pool Table 9 Steps Make Your Custom Big Cat Cues

Building A Pool Table Billiard Top

Pool Table Renovation Rogue Engineer

How To Build A Pool Or Billiards Table Plans Your Own

25 Free Diy Pool Table Plans Build Your Own

I Can T Believe It S Done Pool Table Build

How To Build A Pool Table Guide Century Billiards