How to Disassemble an Olhausen Pool Table
Olhausen pool tables are renowned for their craftsmanship and durability, but even the most robust tables may require disassembly for relocation, maintenance, or repair. Disassembling an Olhausen pool table can seem daunting, but with the right tools and a systematic approach, the process can be manageable. This article will guide you through the steps involved in safely and efficiently disassembling your Olhausen pool table.
Prepare for Disassembly
Before starting the disassembly process, gather the necessary tools and materials to ensure a smooth and efficient operation. You will need:
- A set of Allen wrenches
- A Phillips head screwdriver
- A hammer
- A rubber mallet
- A level
- A tape measure
- Protective gear (gloves, safety glasses)
- A helper (recommended for heavier components)
It is also advisable to take pictures of the table's assembly before disassembling it. These photographs will serve as a visual reference during the reassembly process, ensuring that all parts are installed correctly.
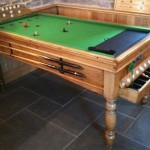
Disassemble the Tabletop
The first step is to dismantle the table's playing surface. This typically involves the following procedures:
- Remove the cloth: Carefully detach the felt or cloth from the slate using a utility knife or a seam ripper. Start from one corner and work your way around the table, ensuring that the fabric is not ripped or damaged.
- Loosen the screws: Locate the screws securing the slate to the table frame. These screws are usually located around the perimeter of the slate. Use a Phillips head screwdriver to loosen the screws, but do not completely remove them.
- Separate the slate: With the screws loosened, gently lift the slate off the table frame. It is essential to lift the slate evenly to avoid damaging the frame or cracking the slate. A helper can assist in this step, particularly for heavier slate panels.
- Remove the rails: Once the slate is removed, the rails can be detached. These are the wooden beams surrounding the table's playing surface. Locate the screws securing the rails to the frame and remove them using a Phillips head screwdriver.
- Separate the rails: Once the screws are removed, gently lift the rails off the frame. Be careful not to damage the felt or any other parts of the table.
The slate and rails are the heaviest components of the table. Handle them with care to avoid injury or damage. Once removed, these components can be packed and transported separately.
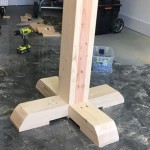
Disassemble the Frame and Legs
The next step involves taking apart the frame and legs of the table. This often involves the following steps:
- Remove the legs: Locate the screws or bolts securing the legs to the frame. Unscrew these fasteners using a Phillips head screwdriver or an Allen wrench, depending on the type of screws used in your table.
- Detach the frame sections: Most Olhausen tables have a sectional frame. The sections are usually connected by bolts or screws. Use a wrench or screwdriver to detach these sections, ensuring that you do not lose any nuts or bolts.
- Remove the cross-braces: Some frames also feature support cross-braces for added strength. Remove these bracers by carefully removing the screws or bolts that connect them to the frame.
After removing the frame and leg components, be sure to label them clearly to ensure proper reassembly. Place the parts in a safe place to prevent them from getting damaged or lost.
Reassemble the Table
When you're ready to reassemble the table, follow these steps:
- Reattach the frame sections: Align the frame sections and secure them back together with the bolts or screws. Ensure that the frame is perfectly square by checking the corners with a level.
- Reattach the cross-braces: If your table has cross-braces, install them securely by fastening them to the frame with screws or bolts.
- Attach the legs: Align the legs with the frame and screw them in place using the appropriate hardware. Ensure that the legs are level and evenly spaced.
- Place the slate: Carefully lower the slate onto the frame, ensuring that it is centered and level. Make sure to align the slate with the rails and any other components.
- Screw in the slate: Secure the slate to the frame by tightening the screws that were previously removed. Do not tighten the screws too forcefully, as this could crack the slate.
- Reattach the rails: Align the rails with the slate and screw them in place. Ensure that the rails are flush with the slate and that they are securely attached to the frame.
- Reinstall the cloth: Carefully stretch the cloth over the slate and secure it to the rails. Make sure that the cloth is taut and that it is properly centered on the table.
Take your time during reassembly and make sure that all parts are properly aligned and securely fastened. It is advisable to test the table's stability and playability after reassembly.

How To Disassemble A Pool Table 11 Steps With S

Steps To Disassemble Pool Table

How To Disassemble A Pool Table 11 Steps With S

Pool Table Construction Olhausen Billiards

How To Disassemble A Slate Pool Table Mp4

How To Dissemble And Move A Pool Table Prevent Slate Damage

How To Disassemble A Pool Table 11 Steps With S

How To Disassemble A Pool Table The Right Way

Pool Table Dismantling

How To Disassemble A Pool Table 11 Steps With S