How to Make an Extendable Table
An extendable table offers the versatility of a smaller table for everyday use, combined with the capability to expand and accommodate larger gatherings. Constructing an extendable table is a challenging yet rewarding project, requiring careful planning, precise measurements, and a solid understanding of woodworking techniques. This article details the process of making an extendable table, outlining the steps involved and providing insights into the necessary considerations.
Before embarking on this project, assess the available workspace, tools, and woodworking experience. This project demands precision cutting, joining, and finishing, therefore ensuring these resources and understanding of the techniques are readily available is essential. It is also essential to decide on the type of extension mechanism the table will use, as this directly impacts the design and construction process.
Planning and Design
The first step in constructing an extendable table involves meticulous planning and design. This stage determines the table's final dimensions, aesthetic style, and the type of extension mechanism employed. A well-defined plan not only guides the construction process but also reduces the risk of errors and material wastage.
Begin by determining the desired dimensions of the table in both its collapsed and extended states. Consider the typical number of users the table will accommodate in its standard configuration and the maximum number of users when fully extended. This dictates the length and width of the table’s main sections and extension leaves. It is essential to allow enough space per user which is approximately 24 inches in width.
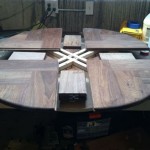
Next, select an extension mechanism. Common options include the drop-leaf mechanism, the butterfly leaf mechanism, and the standard leaf mechanism with table slides. The drop-leaf mechanism is suitable for smaller tables where the leaves are hinged and fold down. The butterfly leaf mechanism has a leaf that folds in half and stores within the table. The standard leaf mechanism utilizes separate leaves that insert into the center of the table when it is pulled apart, supported by table slides. Each mechanism has its own advantages and disadvantages in terms of ease of use, storage requirements, and structural complexity. The standard leaf mechanism with table slides tends to be more robust and adaptable to varying table sizes, but it requires more precision in construction.
Once the extension mechanism is chosen, develop a detailed design encompassing all components of the table, including the tabletop sections, extension leaves, table legs, and the support structure. Create a sketch or use computer-aided design (CAD) software to visualize the table and ensure that all dimensions are accurate. Pay close attention to the joinery methods to be employed to ensure structural integrity. Common joinery options include mortise and tenon joints, dowel joints, and biscuit joints. Mortise and tenon joints are the strongest option, but they are also the most complex to execute. Dowel joints and biscuit joints are simpler to construct but may not be as strong.
Determine the type of wood used in the construction. Hardwoods like maple, oak, or walnut offer durability and aesthetic appeal making them suitable for tabletops and legs. Softwoods can be used for hidden structural components, but care needs to be taken to maintain the overall stability of the table.
Construction Process
With the design finalized, the construction process can commence. This involves cutting the wood to the specified dimensions, preparing the joinery, assembling the components, and integrating the extension mechanism.
Begin by cutting the tabletop sections, extension leaves, and table legs to the dimensions specified in the design. Use a table saw or circular saw to ensure accurate and straight cuts. For curved components, use a bandsaw or jigsaw. Sand all surfaces to remove any rough edges and imperfections. It is essential to take safety precautions. Wear safety glasses and a dust mask during cutting and sanding. A well-ventilated workspace will also ensure that dust is not accumulating in the air.
Next, prepare the joinery for connecting the table legs to the tabletop and for joining the tabletop sections. For mortise and tenon joints, cut the mortises in the table legs and the tenons on the tabletop frame. For dowel joints, drill holes in the mating surfaces and insert dowels. For biscuit joints, use a biscuit joiner to cut slots and insert biscuits with glue. Ensure that all joints are precisely aligned and securely fastened. This ensures a strong and stable table.
Assemble the table frame by gluing and clamping the table legs to the tabletop frame. Use wood glue designed for furniture construction, and apply clamps to hold the pieces together until the glue is fully cured. After the glue has dried, remove the clamps and inspect the joints for any gaps or imperfections. Fill any gaps with wood filler and sand smooth.
Install the table's extension mechanism. This involves attaching the table slides to the underside of the tabletop sections. Ensure that the slides are aligned correctly and that they move smoothly. If using a drop-leaf or butterfly leaf mechanism, install the hinges and locking devices according to the manufacturer’s instructions. Double-check that the leaves extend and retract smoothly and that they lock securely in both the open and closed positions.
Construct the extension leaves by cutting the wood to the specified dimensions and shaping the edges. Ensure that the extension leaves fit flush with the tabletop sections when inserted. Attach any necessary hardware, such as dowels or cleats, to help align and secure the extension leaves. Sand the extension leaves to match the finish of the rest of the table.
Finishing and Assembly
The final stage involves sanding, staining, and applying a protective finish to the table. The finishing process enhances the aesthetic appeal of the table and protects the wood from moisture and wear and tear.
Begin by sanding all surfaces of the table with progressively finer grits of sandpaper, starting with 120-grit and ending with 220-grit. This creates a smooth and even surface for the finish to adhere to. Remove all sanding dust with a tack cloth or vacuum cleaner. A perfectly smooth surface will improve the aesthetic of the finish.
Apply stain to the table. Choose a stain color that complements the wood and the surrounding environment. Apply the stain evenly with a brush or cloth, and allow it to penetrate the wood for the specified time. Wipe off any excess stain with a clean cloth. Allow the stain to dry completely before applying the finish.
Apply a protective finish to the table. Varnish, lacquer, and polyurethane are common options. Each finish has its own advantages and disadvantages in terms of durability, ease of application, and aesthetic properties. Apply the finish in thin, even coats with a brush or spray gun. Allow each coat to dry completely before applying the next coat. Sand lightly between coats with fine-grit sandpaper to remove any imperfections. Three or more coats of finish are recommended for maximum protection.
Once the finish has dried completely, assemble the table by attaching the table legs to the tabletop. Secure the legs with screws or bolts. Ensure that the legs are level and stable. If necessary, add adjustable feet to the legs to compensate for uneven floors. Inspect the table for any imperfections or issues. Make any necessary adjustments or repairs.
Finally, test the extension mechanism by extending and retracting the table several times. Ensure that the extension leaves fit properly and that the table is stable in both the extended and collapsed positions. Make any necessary adjustments to the extension mechanism to ensure smooth and reliable operation.
The completed extendable table will provide years of enjoyment, offering flexibility for both everyday meals and larger gatherings. The process requires careful planning and skilled execution, but the resulting table is a unique and functional piece of furniture.

Making A Table Expand Finewoodworking

How To Make An Extendable Dining Table With Solid Maple Tiny Apartment Build Ep 8

Diy Farmhouse Table With Extension Leaves Plans Sweet Tooth Life

How To Make A Desk From An Extendable Table So Much Better With Age

How To Make A Desk From An Extendable Table So Much Better With Age

Build An Expandable Dining Table That Can Seat Ten And Fit In A Closet Chairs Diy

How To Make An Extendable Dining Table With Solid Maple Tiny Apartment Build Ep 8

Making An Extendable Dining Table Using Sliding Dovetails Sorta

Diy Farmhouse Table With Extension Leaves Plans Sweet Tooth Life

Extension Dining Table Finewoodworking
Related Posts