How To Make a Small Pool Table at Home Easily
Constructing a small pool table at home represents a manageable do-it-yourself project, offering a personalized addition to any recreation room or entertainment space. The process involves careful planning, precise measurements, and a selection of appropriate materials. While the project requires a degree of skill and patience, the resulting miniature pool table can provide hours of enjoyment.
This article outlines the steps necessary to build a small, functional pool table. It details the material requirements, the construction process, and essential considerations for optimizing the table's playability. The guide aims to provide a clear and comprehensive overview of the project, enabling individuals with varying levels of woodworking experience to undertake the construction.
Material Acquisition and Preparation
The initial stage of the project involves procuring the necessary materials. Key components include a sheet of plywood for the table bed, lumber for constructing the frame and rails, felt for the playing surface, rubber bumpers for the rails, pockets, screws, wood glue, and paint or varnish for finishing. Obtaining high-quality materials is crucial for ensuring the durability and longevity of the pool table.
The plywood used for the table bed should be at least ¾ inch thick to provide a stable and level playing surface. Thicker plywood is preferable if available, as it reduces the likelihood of warping or sagging over time. The lumber for the frame should be straight and free from knots, ensuring a solid foundation for the table.
The felt covering is a critical element that affects the ball's roll and overall playing experience. Billiard cloth, typically made from wool or a wool-nylon blend, is recommended for its smooth surface and durability. The rubber bumpers, also known as cushions, should be of suitable quality and profile to provide accurate ball rebound. Various profiles are available, each affecting the play characteristics differently.
Before commencing construction, it is essential to prepare the materials. The plywood and lumber should be cut to the desired dimensions. It is advisable to use a table saw or circular saw for accurate cuts. Sanding the materials is also necessary to ensure smooth surfaces and prevent splinters. Any imperfections or knots in the wood should be filled with wood filler and sanded smooth.
Constructing the Frame and Bed
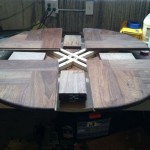
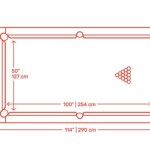
The frame serves as the structural support for the pool table. It should be constructed from sturdy lumber and securely fastened together. The frame's dimensions will determine the overall size of the pool table. A typical small pool table might measure 4 feet by 2 feet, but the dimensions can be adjusted to suit individual preferences.
The frame is typically constructed by joining four pieces of lumber to form a rectangular shape. The joints can be reinforced with screws, wood glue, and corner braces to ensure maximum stability. It is crucial to ensure that the frame is perfectly square, as any deviation from squareness will affect the table's playability.
After the frame is assembled, the plywood bed can be attached. The plywood should be centered on the frame and secured with screws and wood glue. It is important to use enough screws to prevent the bed from warping or shifting over time. The screws should be countersunk to ensure that the felt covering will lie flat.
Once the bed is attached, the surface should be checked for levelness using a spirit level. Any unevenness should be corrected by shimming the frame or by using a sanding block to even out the plywood surface. A perfectly level playing surface is essential for accurate ball roll.
Attaching the Rails, Bumpers, and Pockets
The rails are the wooden strips that surround the playing surface and provide a surface for the bumpers to be attached. The rails are typically made from the same lumber as the frame. The rails should be cut to the appropriate length and mitered at the corners to create a seamless appearance.
Before attaching the rails, the rubber bumpers should be glued to the inside edges. The bumpers should be aligned precisely with the playing surface to ensure accurate ball rebound. Specialized billiard bumper adhesive is recommended for a secure and long-lasting bond.
After the bumpers are attached, the rails can be fastened to the frame and bed. The rails should be screwed into the frame from the underside, ensuring that the screws are countersunk. The rails should be flush with the playing surface and perfectly aligned with the bumpers.
The pockets are the openings in the rails where the balls are pocketed. The pockets can be purchased pre-made or constructed from leather or fabric. The pockets should be attached to the rails using screws or staples. The placement of the pockets is critical for the playability of the table. They should be positioned symmetrically and at the correct height to allow the balls to enter easily.
Applying Felt and Finishing
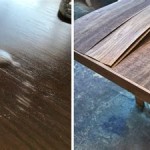
Applying the felt is a crucial step in the construction process. The felt should be cut to a size slightly larger than the playing surface to allow for overlap. The felt should be stretched taut over the bed and secured to the underside of the rails using staples or adhesive.
When stretching the felt, start from the center of the bed and work towards the edges. It is important to ensure that the felt is smooth and wrinkle-free. Any wrinkles or creases in the felt will affect the ball's roll. Specialized billiard felt stretchers can be used to achieve a consistently taut surface.
After the felt is applied, the excess material can be trimmed away using a sharp knife or scissors. Care should be taken to avoid cutting the felt too close to the rails, as this can cause it to fray. A small overlap of felt is desirable to provide a clean and finished edge.
The final step in the construction process is to finish the pool table. This involves sanding the frame and rails smooth and applying several coats of paint or varnish. The finish will protect the wood from moisture and wear and tear and enhance the table's appearance. Multiple coats of finish are recommended, with light sanding between coats, to achieve a smooth and durable surface.
Ensuring Playability and Maintenance
After the pool table is constructed, it is essential to ensure that it is playable. This involves checking the levelness of the playing surface, the accuracy of the bumpers, and the proper functioning of the pockets. The table may require minor adjustments to optimize its playability.
The levelness of the playing surface can be checked using a spirit level. Any unevenness should be corrected by shimming the frame or by using a sanding block to even out the plywood surface. The accuracy of the bumpers can be tested by rolling balls along the rails and observing their rebound. Any inconsistencies in the rebound should be corrected by adjusting the position of the bumpers or by replacing them if necessary.
Regular maintenance is necessary to keep the pool table in good condition. This includes cleaning the felt surface with a billiard brush to remove dust and debris. The felt should be brushed in the direction of the nap to prevent damage. Spills should be cleaned up immediately to prevent staining. The bumpers should be inspected regularly for wear and tear and replaced as needed.
By following these steps, it is possible to construct a small, functional pool table at home. With careful planning, precise measurements, and a commitment to quality, the resulting pool table can provide years of enjoyment. The project embodies the principles of do-it-yourself craftsmanship and offers a rewarding and personalized addition to any recreational space.

How To Make Cardboard Mini Pool Table Easy Diy Miniature Billiards At Home

How To Level A Pool Table With S

Create An Awesome Home Game Room With These 26 Ideas Extra Space Storage

How To Level A Pool Table With S

How To Disassemble A Pool Table 11 Steps With S

Create An Awesome Home Game Room With These 26 Ideas Extra Space Storage

How To Set Up A Pool Table Correctly And Rack The Balls Updated 2025 Sam Leisure

31 Game Room Ideas For Basement Garage And Small Rooms

How To Set Up A Pool Table Correctly And Rack The Balls Updated 2025 Sam Leisure

How To Level A Pool Table With S
Related Posts