How to Make Table Skirts
Table skirts, also known as tablecloths, are fabric coverings that drape over the sides of tables, concealing legs and creating a more polished and aesthetically pleasing presentation. They can be used for various purposes, from enhancing the décor of a dining room to adding a touch of elegance to a special event. Making a table skirt is a relatively simple project that can be accomplished with basic sewing skills and readily available materials. This article provides a step-by-step guide to creating your own custom table skirt.
1. Gather the Necessary Materials
Before embarking on the table skirt making process, it's essential to gather all the necessary materials. Start with the following:
- Fabric: Choose a fabric appropriate for the intended use and aesthetic. Consider factors such as durability, wrinkle resistance, and desired style. Popular choices include cotton, linen, velvet, or even burlap for a rustic look.
- Measuring Tape: An accurate measuring tape is crucial for ensuring the table skirt fits perfectly.
- Scissors: Sharp scissors are essential for precise cutting and trimming of the fabric.
- Sewing Machine: A sewing machine streamlines the process, although you can also hand-sew the skirt if desired.
- Sewing Thread: Choose thread that matches the fabric color or complements the overall design.
- Iron and Ironing Board: Ironing the fabric before and after sewing helps prevent wrinkles and ensures a crisp finish.
- Safety Pins: Safety pins are useful for temporarily holding fabric pieces together during the sewing process.
- Fabric Glue or Adhesive: For securing fabric edges or delicate details, fabric glue or adhesive can be helpful.
2. Measuring and Cutting the Fabric
The success of any table skirt hinges on accurate measurements. Take careful measurements of the table to determine the required fabric dimensions. Here's a detailed guide:
- Measure the table's circumference: Use the measuring tape to measure the perimeter of the tabletop, going around all four sides. Add a few extra inches to the circumference for seam allowances and desired drape. For example, for a 30-inch diameter table, the circumference would be 94.25 inches (30 x 3.14). Add an additional 6-8 inches to the circumference for the pleats and seam allowances, resulting in a fabric length of 100-102 inches.
- Determine the desired drop length: The drop length refers to the distance the fabric will hang down from the tabletop. Measure the desired drop length, considering the size of the table and the overall aesthetic. For example, a 30-inch table with a 12-inch drop would require a fabric width of 30 inches + 12 inches + 12 inches = 54 inches.
- Cut the fabric: Once you have determined the required fabric dimensions, cut the fabric accordingly. It's recommended to use a rotary cutter and ruler for precise cutting, although scissors can also be used. For the example mentioned above, you would cut a rectangular piece of fabric measuring 100-102 inches in length and 54 inches in width.
3. Hemming the Fabric
Hemming is the process of finishing the edges of fabric to prevent fraying and create a clean, polished look. Here's how to hem the table skirt fabric:
- Fold and iron the edges: Fold the raw edges of the fabric inward by 1/2 inch and iron to create a crease. Fold the edges again by another 1/2 inch and iron once more. This double-fold hem provides a strong finish.
- Pin the hem in place: Pin the folded edges of the fabric in place using safety pins. Ensure the pins are evenly spaced and the hem is smooth and even.
- Sew the hem: Using a sewing machine or by hand, sew along the pinned edge of the hem. Select a stitch length and tension suitable for the chosen fabric. If hand-sewing, use a blind stitch to minimize visibility.
- Iron the hem: After stitching, iron the hem to remove any creases and create a crisp finish.
4. Creating the Table Skirt
Once the fabric is hemmed, it's time to assemble the table skirt. There are several methods to create the skirt, including pleating, gathering, or simply creating a smooth, draped effect. Following are detailed steps for different techniques:
4.1. Pleated Table Skirt
- Mark pleat positions: Divide the fabric's length by the number of pleats desired. For example, for a 100-inch fabric length and 10 pleats, the pleat spacing would be 10 inches. Use a tailor's chalk or fabric marker to mark the pleat positions on the fabric, ensuring even spacing.
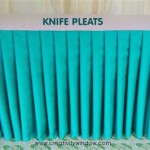
- Fold and pin the pleats: Fold the fabric at each marked position to create the desired pleat depth. Pin the pleats in place to secure their shape. Choose between box pleats, knife pleats, or inverted pleats depending on the desired style.
- Sew the pleats: Once the pleats are pinned, sew them in place, either by hand or with a sewing machine. For a more secure finish, sew across the back of the pleats, or use a zig-zag stitch to prevent fraying.
- Adjust the pleat spacing: Once the pleats are sewn, adjust the spacing as needed to ensure a symmetrical and aesthetically pleasing look.
4.2. Gathered Table Skirt
- Sew a gathering stitch: Using a long stitch length on the sewing machine, sew a line of stitching along the top raw edge of the fabric, leaving long thread tails at the beginning and end.
- Gather the fabric: Pull on the thread tails gently to gather the fabric, creating a ruffled effect. Adjust the gathering until the fabric fits snugly around the table.
- Secure the gathering: Once the desired gathering is achieved, tie the thread tails together to secure the fabric in place. You can also use a needle and thread to sew the gathers in place.
4.3. Draped Table Skirt
A draped table skirt offers a simple and elegant look. It involves simply draping the hemmed fabric over the table without any pleats or gathers.
- Position the fabric: Center the fabric over the table, ensuring it evenly drapes down all sides.
- Secure the fabric: Use safety pins or fabric weights to hold the fabric in place, preventing it from slipping or shifting.
- Adjust the drape: Adjust the fabric to create a smooth and even drape around the table. Ensure the fabric hangs evenly from all sides.
5. Finishing Touches
After the table skirt is assembled, add finishing touches to enhance its beauty and personalize its look. This could involve:
- Adding embellishments: Incorporate embellishments like ribbons, lace, or buttons to create a unique and personalized touch.
- Adding a decorative trim: Sew a contrasting trim around the bottom edge of the skirt to enhance its visual appeal.
- Ironing for a crisp finish: Iron the finished table skirt to remove any wrinkles and ensure a crisp, polished look.
Once the table skirt is complete, it can be used for various purposes. It can elevate the style of a dining table, transform a plain coffee table, or add a touch of elegance to a special event. The versatility of table skirts, coupled with the ease of making them, allows for endless possibilities to enhance the beauty and functionality of various spaces.

How To Do Basic Table Skirting

10 Simple Table Skirting Styles For Beginners Basic Part 1

How To Make Tulle Table Skirts Elevate Your Party Decoration

10 Simple Table Skirting Styles For Beginners Basic Part 1

No Sew Tulle Table Skirt Tutorial W Ribbons Easy Press Print Party

Making A Table Skirt For My Classroom Make Diy Skirts

10 Simple Table Skirting Styles For Beginners Basic Part 1

How Table Skirts Make Wedding Planning Easier

Diy How To Make A No Sew Ruffle Tablecloth For Less Than 10 Ruffled Baby Stuff

Diy Quick Tip Ruffle Table Skirt For Under 10
Related Posts