How To Make Your Own Kitchen Table
Creating a kitchen table is a rewarding project that allows for customization and personalization to perfectly suit a given space and aesthetic preferences. This article provides a comprehensive guide on constructing a durable and aesthetically pleasing kitchen table, covering essential materials, tools, and step-by-step instructions.
Planning and Design
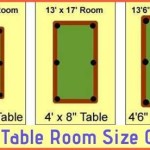
The initial phase of any woodworking project involves meticulous planning. This includes defining the table's dimensions, selecting the wood type, and choosing a suitable design style. The size of the table should be determined by the number of people it needs to accommodate regularly and the available space in the kitchen. Standard kitchen table heights generally range from 29 to 30 inches. Width and length are more flexible, depending on individual requirements.
Wood selection is crucial, influencing both the appearance and the durability of the table. Hardwoods like maple, oak, and cherry are known for their strength and resilience, making them ideal choices for a kitchen table that will withstand daily use. These hardwoods also provide a beautiful grain pattern that can be enhanced with stains and finishes. Softwoods, such as pine, are more affordable and easier to work with, but they are more susceptible to scratches and dents. The wood chosen should be sourced from a reputable supplier to ensure quality and consistency.
Design considerations encompass the table’s overall shape and style. A rectangular table is a classic and versatile choice, suitable for most kitchen layouts. Round tables foster a more intimate and conversational atmosphere, while square tables are well-suited for smaller spaces. The design should also take into account the leg style. Straight legs offer a clean and modern look, while tapered legs provide a more refined and elegant aesthetic. A sketch or digital rendering can be helpful in visualizing the finished product and ensuring that the design aligns with the desired look and feel.
Once the design is finalized, a detailed cut list should be created. This list specifies the dimensions of each individual piece of wood required for the project, including the tabletop, legs, aprons (the supporting frame underneath the tabletop), and any additional structural elements. Accurate measurements are essential for ensuring that all components fit together seamlessly.
Materials and Tools
The necessary materials for constructing a kitchen table include the chosen wood for the tabletop, legs, and aprons; wood glue; screws or bolts; sandpaper in various grits (e.g., 80, 120, 220); wood stain (optional); and a protective finish such as polyurethane or varnish. The specific quantity of each material will depend on the size and design of the table.
A well-equipped workshop is also essential. Essential tools include a table saw (for cutting large pieces of wood accurately), a miter saw (for making precision angled cuts), a circular saw (for general cutting tasks), a sander (for smoothing surfaces), a drill (for creating pilot holes and driving screws), a router (for shaping edges and creating decorative details), a measuring tape, a level, clamps (for holding pieces together while glue dries), and safety glasses and ear protection.
For those without access to a full range of power tools, many lumberyards and woodworking shops offer cutting services. This can be a cost-effective alternative, allowing individuals to obtain precisely cut pieces of wood without investing in expensive equipment. However, access to at least a drill, sander, and clamps is still recommended for assembly and finishing.
Construction Process
The construction process begins with preparing the wood. The wood should be inspected for any defects, such as knots or cracks, and any necessary repairs should be made. The wood should then be cut to the dimensions specified in the cut list. Accuracy in cutting is paramount to ensure that all pieces fit together properly.
The next step is to assemble the table's frame or apron. The aprons are typically attached to the legs using wood glue and screws or bolts. Pilot holes should be drilled before inserting screws to prevent the wood from splitting. Clamps should be used to hold the pieces together tightly while the glue dries. The frame should be square and level to ensure that the tabletop will sit evenly.
Once the frame is assembled, the tabletop can be attached. There are several methods for attaching the tabletop, including using wood glue and screws, using pocket screws, or using table clips. Regardless of the method chosen, it is important to allow for wood movement. Wood expands and contracts with changes in humidity, and if the tabletop is rigidly attached to the frame, it can crack or warp over time. Table clips are especially useful for allowing wood movement.
After the tabletop is attached, the entire table should be thoroughly sanded. Start with a coarse grit sandpaper (e.g., 80 grit) to remove any imperfections and then gradually move to finer grits (e.g., 120 grit, 220 grit) to create a smooth, even surface. Sanding should be done in the direction of the wood grain to avoid creating scratches.
Once the sanding is complete, the table can be stained or finished. Staining is optional and depends on the desired aesthetic. If staining, apply the stain evenly and allow it to dry completely before applying a finish. A protective finish, such as polyurethane or varnish, is essential for protecting the wood from moisture and wear. Apply several coats of finish, allowing each coat to dry completely before applying the next. Lightly sand between coats to create a smooth, durable surface.
Leg Attachment Methods
Different methods exist for attaching the legs to the table frame, each offering varying degrees of strength and aesthetic appeal. Threaded inserts and bolts provide a robust and easily removable option. The threaded inserts are embedded into the underside of the tabletop or the inside of the apron, and bolts are then used to secure the legs. This method is particularly useful for tables that need to be disassembled for transport or storage.
A traditional method involves mortise and tenon joints. These joints offer exceptional strength and durability, but they require more advanced woodworking skills and specialized tools. A mortise is a rectangular hole cut into one piece of wood (typically the apron), and a tenon is a corresponding projection cut onto the other piece of wood (the leg). The tenon is inserted into the mortise, creating a strong, interlocking joint. Glue and wedges can be used to further strengthen the joint.
Another common method involves using angled brackets. These brackets are attached to the inside of the apron and then screwed into the legs. This method is relatively simple and requires minimal woodworking skills, but it is not as strong as mortise and tenon joints or threaded inserts and bolts. Angled brackets are best suited for smaller tables or tables that will not be subjected to heavy use.
Finishing Touches and Maintenance
The final stages of the project involve adding finishing touches and establishing a routine maintenance plan. Edge profiling, achieved with a router, can significantly enhance the table's aesthetic appeal. Options range from simple roundovers to more elaborate decorative profiles. Precise and controlled router techniques are essential for achieving a consistent and professional finish. Following the router work, a final sanding is necessary to smooth any imperfections created during the profiling process.
The application of a high-quality finish is paramount for protecting the wood and enhancing its natural beauty. Polyurethane is a popular choice due to its durability and resistance to scratches, stains, and moisture. However, other finishes, such as varnish, lacquer, or oil-based finishes, may be preferred depending on the desired aesthetic and level of protection required. Multiple coats of finish are generally recommended, with light sanding between coats to ensure a smooth and even surface.
Regular cleaning and maintenance are essential for preserving the table's appearance and longevity. Avoid using harsh chemicals or abrasive cleaners, as these can damage the finish. A damp cloth and mild soap are typically sufficient for removing spills and dirt. Periodically applying a furniture polish or wax can help to protect the finish and keep the wood looking its best. Additionally, using placemats and coasters can prevent scratches and stains from occurring.

25 Diy Dining Tables Bob Vila

How To Build A Farmhouse Kitchen Table Complete And Easy Plan

20 Gorgeous Diy Dining Table Ideas And Plans The House Of Wood

10 Diy Dining Table Ideas Build Your Own Room

Diy Dining Table Pottery Barn Inspired Farmhouse

How To Build A Farmhouse Table For Your Home Diy Projects Craft Ideas S Decor With

Diy Farmhouse Bench Love Grows Wild

How To Build A Table Top With Old Wood

40 Diy Farmhouse Table Plans Ideas For Your Dining Room Free

Diy Farmhouse Table Bench Happiness Is Homemade