How to Make Your Own Pool Table Light
A well-lit pool table is essential for a comfortable and accurate game. Commercial pool table lights can be expensive, however, building your own is a viable and cost-effective alternative. This article provides a comprehensive guide on constructing a custom pool table light, covering the necessary materials, tools, and step-by-step instructions for a successful project.
Before commencing the project, careful consideration should be given to safety. Working with electricity requires precision and adherence to safety protocols. Disconnecting power sources, using insulated tools, and understanding basic electrical principles are paramount to preventing accidents. It is always recommended to consult with a qualified electrician if any aspects of the electrical wiring are unclear or cause for concern.
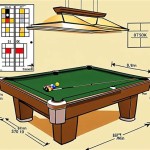
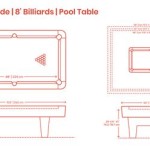
The design of the pool table light is a crucial initial step. Factors to consider include the size of the pool table, the desired aesthetic, and the available space above the table. A standard 7-foot pool table generally requires a light fixture approximately 54 inches long, while a 9-foot table might necessitate a fixture around 72 inches. The height of the light fixture above the table should be between 30 and 36 inches to adequately illuminate the playing surface without obstructing players' views. The design can range from a simple linear fixture with multiple lamps to a more elaborate design incorporating shades, reflectors, or decorative elements.
Planning and Material Selection
The first key point revolves around meticulously planning and selecting the appropriate materials. A bill of materials should be created outlining all the components needed for the project. This includes the structural materials for the fixture, the electrical components, and any decorative elements. Careful selection of materials ensures the durability, safety, and aesthetic appeal of the finished product.
For the structural frame, options include wood, metal, or a combination of both. Wood provides a classic and warm aesthetic, while metal offers a more modern and industrial look. Aluminum is a lightweight and rust-resistant metal option that is easy to work with. The choice of material depends on the desired aesthetic and the builder's skill level. The dimensions of the frame should be determined based on the size of the pool table and the number of lights to be installed.
The electrical components include the light sockets, wiring, junction boxes, a power cord, and optionally, a dimmer switch. The choice of light sockets depends on the type of bulbs to be used. Standard incandescent bulbs, energy-efficient LED bulbs, or halogen bulbs are all viable options. LED bulbs are generally the preferred choice due to their energy efficiency, long lifespan, and low heat output. The gauge of the wiring should be appropriate for the amperage of the chosen bulbs. A 14-gauge wire is typically sufficient for most pool table lights. Junction boxes are necessary for making safe and secure electrical connections.
Decorative elements can include lamp shades, reflectors, chains, or decorative hardware. Lamp shades can diffuse the light and create a softer, more comfortable illumination. Reflectors can focus the light and increase its intensity on the playing surface. Chains are used to suspend the light fixture from the ceiling. Decorative hardware can add a touch of personality to the finished product. The selection of decorative elements should complement the overall design of the pool table light and the surrounding room.
Construction and Assembly
The second key point involves the construction and assembly of the pool table light fixture. This phase requires precision and attention to detail to ensure the structural integrity and electrical safety of the finished product. Following a detailed plan and using appropriate tools are critical for success.
The construction process typically begins with building the frame. If wood is used, the pieces should be cut to the appropriate dimensions and joined together using screws, nails, or wood glue. If metal is used, the pieces can be welded together or connected using screws and brackets. The frame should be sturdy and able to support the weight of the electrical components and decorative elements. The frame should be sanded and finished to create a smooth and aesthetically pleasing surface.
Once the frame is complete, the electrical components can be installed. The light sockets should be mounted securely to the frame. The wiring should be routed through the frame and connected to the light sockets and junction boxes. All electrical connections should be made using wire connectors and insulated with electrical tape. The power cord should be connected to the junction box and properly grounded. If a dimmer switch is being used, it should be wired into the circuit according to the manufacturer's instructions. Safety is paramount during this stage. Double-checking all connections and ensuring proper insulation is crucial to prevent electrical hazards.
After the electrical components are installed, the decorative elements can be added. Lamp shades should be attached to the light sockets. Reflectors should be mounted around the bulbs. Chains should be attached to the frame for suspending the light fixture from the ceiling. Decorative hardware can be added to enhance the aesthetic appeal of the finished product. The placement of the decorative elements should be carefully considered to ensure that they do not obstruct the light or create any safety hazards.
Installation and Wiring
The third key point focuses on the proper installation and wiring of the completed pool table light. This stage requires careful planning and adherence to safety regulations. Incorrect wiring can result in electrical shock or fire hazards. If unsure about any aspect of the installation, it is always best to consult with a qualified electrician.
Before installing the light fixture, the power to the circuit should be turned off at the breaker box. A voltage tester should be used to confirm that the power is off. The location for the light fixture should be carefully determined, ensuring it is centered above the pool table and at the appropriate height. The weight of the light fixture should be considered when selecting the mounting hardware for the ceiling. Using appropriate anchors for the ceiling type (drywall, plaster, or concrete) is critical.
The wiring of the light fixture to the existing electrical circuit should be done in accordance with local electrical codes. Typically, the black wire from the light fixture is connected to the black wire in the ceiling, the white wire from the light fixture is connected to the white wire in the ceiling, and the green or bare copper wire from the light fixture is connected to the ground wire in the ceiling. Wire connectors should be used to make secure connections, and the connections should be wrapped with electrical tape for added insulation. The light fixture should be securely mounted to the ceiling using the appropriate mounting hardware. After installation, the power should be turned back on at the breaker box, and the light fixture should be tested.
Troubleshooting any issues that arise is important. If the light fixture does not turn on, check the breaker, the wiring connections, and the bulbs. If the light fixture flickers, check the wiring connections and the dimmer switch (if applicable). If there is any sign of electrical shock or overheating, immediately turn off the power and consult with a qualified electrician. Regular maintenance, such as cleaning the light fixture and replacing bulbs, will help to ensure its continued performance and safety.
By carefully following these steps and prioritizing safety, a custom pool table light can be constructed that provides adequate illumination, enhances the aesthetic appeal of the game room, and saves significant money compared to purchasing a commercially available product. The satisfaction of building a functional and attractive fixture from scratch is an added benefit to this rewarding project.

How To Build A Custom Pool Table Light

Making A Brunswick Style Pool Table Light

Diy How To Make A Pool Table Led Light For I Still Suck At Woodworking

Homemade Pool Table Lights Azbilliards Forums

Custom Diy Pool Table Light Wilker Do S

Custom Pool Table Light

Building A Homemade Pool Table Light Page 2 Azbilliards Forums

Pool Table Light Bowhunter Com Community Discussion Forums

Pool Table Light Project I Just Completed Very Happy With The Results And So Was My Bea Lighting Rustic Lights Modern

Jameson Irish Whiskey Pool Table Light Room Lighting Diy