How to Mark Out a 7ft Pool Table
Setting up a pool table in your home or game room involves more than just finding the right spot. To ensure optimal play and enjoyment, accurately marking out the table's dimensions before installation is crucial. This process guarantees the table is level and centered, allowing for precise cue ball and ball movement, ultimately enhancing your game. Below, we'll guide you through the process of marking out the space for a 7ft pool table.
1. Determine the Necessary Space
A 7ft pool table requires a significant amount of clear space, not just to accommodate the table itself but also to allow for comfortable player movement and cue swings. To determine the necessary space, consider the following factors:
Table Dimensions:
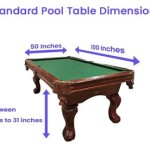
A 7ft pool table measures 7ft long and 3.5ft wide.Playing Clearance:
A minimum of 4ft of clearance is recommended on all sides of the table to allow players adequate room to move around and aim their shots.Doorway Clearance:
Ensure the table can be transported through doorways and hallways without obstructions.
By adding the table dimensions to the recommended clearances on each side, you'll arrive at the minimum space you need to accommodate a 7ft pool table. In this case, you'll need a space of approximately 15ft wide x 11ft long.
2. Utilize Measuring Tools and Markings
Once you've determined the necessary space for your pool table, it's time to mark out the area precisely. Using the guidelines below, you'll ensure the table is positioned correctly and level.
Measuring Tape:
Use a measuring tape to accurately measure the necessary dimensions.Chalk Line:
A chalk line will enable you to create straight, visible lines on the floor, marking the outer edges of the pool table.Level:
A level will ensure the table is positioned on a perfectly level surface, crucial for accurate ball movement.
Begin by using the measuring tape to determine the exact center point of the intended table area. Next, use the chalk line to mark two parallel lines across the floor, representing the width of the pool table (3.5ft). These lines should be spaced evenly on either side of the center point. Finally, use the chalk line to mark two vertical lines across the floor, representing the length of the pool table (7ft). These lines should also be spaced evenly on either side of the center point.
3. Double-Check Measurements and Position
Before you begin installing your pool table, it's crucial to double-check your markings. Ensure all lines are straight, parallel, and accurately represent the dimensions of the 7ft pool table.
It's also important to consider the orientation of the table. Determine whether you want the table to be positioned lengthwise or widthwise within the marked area. This decision depends on your preferred layout and available space.
Using a level, make sure the floor surface is level within the marked area. If not, you may need to adjust the positioning of the table slightly to compensate for any inclines or declines.
By carefully marking out the space for your 7ft pool table, you will set the stage for a successful installation and many enjoyable games.

Pool Table Layout Dynamic Billiard Mississauga

Welcome To Fcsnooker Snooker Tables Markings For The D Baulk Line And All Coloured Ball Spots

Layout Of A Pool Table Billiards Snooker And Darts Te Ara Encyclopedia New Zealand

Welcome To Fcsnooker Snooker Tables Markings For The D Baulk Line And All Coloured Ball Spots

How To Mark Your Pool Table For Snooker Full Diy Guide

How To Mark Your Pool Table Head Spot Foot And Line Full Diy Guide

How To Measure A Pool Table Billiards Direct

The Pool Table Space Requirement Guide Men S Cave

Can You Play Snooker On A Pool Table Home Leisure Direct

How To Mark Measurements On A Pool Table Ehow