How To Set Up a Pool Table: A Comprehensive Guide
Setting up a pool table is a meticulous process that requires precision and attention to detail. A properly assembled and leveled table ensures optimal gameplay and longevity. This guide provides a step-by-step approach to installing a pool table, covering everything from site preparation to final adjustments.
1. Preparing the Playing Area
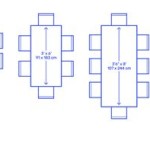
Before any assembly begins, the designated area must be adequately prepared. Insufficient space can hinder gameplay, while an uneven floor can significantly impact the table’s performance. The first step is to determine the appropriate room size. As a general rule, leave at least 5 feet of space between the table and any wall or obstruction on all sides. This allows for comfortable cueing and maneuverability.
Measure the room carefully, accounting for any potential obstacles such as pillars, doors, or furniture. Consider the length of pool cues used; shorter cues may be necessary in smaller spaces. Standard pool cues are typically 57 or 58 inches long. A 7-foot table usually requires a minimum of 13 feet by 16 feet, while an 8-foot table demands 13.5 feet by 17.5 feet, and a 9-foot table necessitates 14 feet by 18 feet. These dimensions represent the bare minimum; adding even a foot or two on each side greatly enhances the playing experience.
Once the space is confirmed, evaluate the flooring. The floor must be level and capable of supporting the weight of the pool table, which can range from 700 to 1,000 pounds or more, depending on the size and materials. Use a carpenter's level to check for any unevenness. Significant discrepancies require correction before proceeding. Options include using shims to level the table legs (discussed later) or, in severe cases, leveling the floor itself. Uneven floors can lead to inaccurate ball rolls and premature wear on the table components.
Protect the flooring by using a drop cloth or blankets during the assembly process. This prevents scratches and damage from tools and components. Furthermore, ensure adequate lighting is available. Proper illumination is crucial for accurate aiming and enjoyable gameplay. Overhead lighting fixtures directly above the table are optimal, providing consistent and even illumination across the playing surface. Consider installing a dedicated pool table light fixture designed specifically for this purpose.
2. Assembling the Frame and Legs
The first physical step involves assembling the table's frame and attaching the legs. Unpack all components carefully and inventory them based on the manufacturer’s instructions. Pool tables typically consist of a frame, legs, slate bed, rails, pockets, and various hardware. Consult the assembly guide for specific instructions related to the model.
The frame serves as the foundation for the entire table. Position the frame upside down on the protected flooring. Carefully align the leg mounting plates or brackets with the corresponding locations on the frame. Secure the legs to the frame using the provided bolts and washers. Tighten the bolts evenly and snugly, but avoid over-tightening, which can strip the threads or damage the frame. If the table uses leg levelers, ensure they are retracted fully before attachment.
Once all legs are attached, carefully flip the table upright. This step requires at least two people to prevent damage. Ensure the table is placed in the desired location on the prepared floor. At this point, precise leveling becomes crucial. Begin by placing a carpenter's level on the slate bed, checking for levelness along the length and width of the table. Adjust the leg levelers (if equipped) until the table is as level as possible.
If the table does not have leg levelers, use shims. Shims are thin pieces of wood or plastic that can be inserted under the legs to compensate for unevenness. Gradually add shims under the appropriate legs until the table is level in all directions. Use multiple levels strategically placed on the slate to ensure accuracy. Continuous monitoring during this process is essential for an acceptable playing surface.
3. Installing the Slate Bed and Cloth
The slate bed forms the playing surface and delivers the characteristic ball roll. Slate is heavy and fragile; handling it requires extreme care. Most pool tables use either one-piece or three-piece slate beds. Three-piece slate beds are easier to maneuver and install, but require precise alignment and securing.
Before installing the slate, inspect it for any damage. Check for cracks, chips, or warps. Any imperfections can affect the ball's trajectory and require professional repair or replacement. Carefully lift the slate pieces (if applicable) onto the frame, aligning them according to the manufacturer’s instructions. Three-piece slate beds typically have dowel pins or alignment marks to ensure proper positioning.
Secure the slate to the frame using screws. The screw holes are usually pre-drilled in the frame. Tighten the screws evenly, but avoid over-tightening. Over-tightening can crack the slate or strip the screw holes. After securing the slate, check the seams between the slate pieces (if applicable). The seams should be flush and smooth. Use beeswax or seam filler specifically designed for pool tables to fill any gaps or imperfections. Scrape away any excess filler and allow it to dry completely.
Once the slate is securely installed and the seams are filled, it’s time to install the billiard cloth. The cloth provides the smooth, consistent surface necessary for accurate ball movement. Start by centering the cloth over the slate bed. Ensure there is an equal amount of overhang on all sides. Secure the cloth to one end of the slate with staples or tacks, using a staple gun or tack hammer. Pull the cloth taut across the slate and secure the opposite end.
Continue stapling or tacking the cloth along the remaining sides, working gradually from the center outwards. Maintain consistent tension as you proceed. Wrinkles or slackness in the cloth can affect ball roll. After securing the cloth, trim any excess material from the edges. Use a sharp utility knife or scissors for a clean, even cut. Tuck the edges of the cloth under the slate bed for a neat and professional finish. Specialty tools can assist with this process if the table design accommodates it.
4. Attaching the Rails and Pockets
The rails provide the rebounding surface and house the pockets. They consist of wooden backers and the rubber cushions. Attach the rails to the slate bed using bolts. The bolt holes are typically pre-drilled in both the rails and the slate. Align the rails with the slate and insert the bolts. Tighten the bolts evenly, ensuring the rails are securely attached and flush with the slate surface. Correct rail installation is critical to proper ball rebound and performance.
Before attaching the rails permanently, verify the alignment of the cushions. The cushions should be positioned at the correct height and angle to ensure accurate ball rebound. Manufacturers typically provide specific guidelines for cushion placement. Any misalignment can affect the ball's trajectory and reduce the table's playability. Adjust cushions, or occasionally replace them if necessary, to ensure accurate play.
After the rails are secured, install the pockets. Pockets are typically made of leather or plastic and attach to the rails. The method of attachment varies depending on the table design. Some pockets slip over the rails, while others are screwed or bolted in place. Ensure the pockets are securely attached and properly aligned. The pocket openings should be consistent and free from obstructions. Inspect the pockets for defects. Any tears or defects must be addressed to prevent balls from falling through.
5. Final Adjustments and Maintenance
Once the pool table is fully assembled, perform a final inspection. Check for any loose bolts, screws, or staples. Ensure the slate bed is level and smooth. Verify the alignment of the rails and pockets. Address any issues before beginning to play.
Fine-tuning the level of the table is an ongoing process. Over time, the table may settle or shift, requiring adjustments. Regularly check the level and adjust the leg levelers or shims as needed. A slightly unlevel table can noticeably affect gameplay.
Maintaining the pool table is essential for preserving its condition and performance. Regularly brush the billiard cloth to remove dust and debris. This prevents the cloth from becoming soiled and affecting ball roll. Use a pool table brush specifically designed for this purpose. Avoid using harsh chemicals or abrasive cleaners, which can damage the cloth.
Periodically inspect the cushions for wear and tear. Replace worn or damaged cushions to maintain accurate ball rebound. Clean the pockets regularly to remove chalk dust and debris. Protect the table from direct sunlight and extreme temperatures, which can damage the wood and cloth. Dust the frame and legs regularly to keep the table looking its best. Cover the table when not in use to protect it from dust and spills. A well-maintained pool table provides years of enjoyment.

How To Rack A Pool Table 10 Steps With S Wikihow Balls

How To Rack A Pool Table

How To Rack Up Pool And Snooker Hamilton Billiards Blog
Rack Em Up The Correct Way To Set Pool Balls Coach

Eight Ball Wikipedia

How To Master Racking Up Pool Balls

How To Rack Up Balls Set A Pool Or Snooker Table Liberty

How To Rack In 8 Ball Professionally 6 Steps For Setup

How To Rack A Pool Table The Proper Way Balls Home Billiards S

The Official 8 Ball Rack Setup Proper Way Explained