The Kreg Jig Revolution: Building Strong, Seamless Table Tops
The Kreg Jig, often referred to as a pocket-hole jig, has fundamentally altered the landscape of woodworking, offering both amateur and professional woodworkers a fast, strong, and relatively simple method for joining wood. While its applications are vast, creating seamless and robust table tops is one area where the Kreg Jig truly shines. This article will delve into the process of constructing a table top using a Kreg Jig, exploring the necessary tools, materials, techniques, and considerations for achieving a professional-quality result.
Historically, joining boards for table tops relied heavily on traditional methods like tongue-and-groove, mortise-and-tenon, or biscuits, each requiring considerable skill and specialized tools. The Kreg Jig bypasses much of this complexity by creating angled pilot holes into which screws are driven, pulling the boards tightly together. This mechanical fastening, combined with wood glue, results in a joint that is stronger than many traditional methods and significantly easier to execute, especially for those new to woodworking.
The popularity of Kreg Jig joinery stems from its accessibility and efficiency. It eliminates the need for complex joinery skills and expensive equipment, making it an ideal solution for DIY enthusiasts and hobbyists. However, even experienced woodworkers appreciate the speed and strength that Kreg Jig joinery offers, allowing them to complete projects more quickly and efficiently.
Materials and Tools Required
Before embarking on the construction of a table top using a Kreg Jig, gathering the necessary materials and tools is paramount. The selection of wood, in particular, should be given careful consideration based on the desired aesthetic and intended use of the table. Softwoods like pine are easier to work with and more affordable, but hardwoods such as oak, maple, or walnut offer superior durability and a more refined appearance. The choice of wood will also impact the type and length of screws required.
The core tool is, of course, the Kreg Jig itself. Several models are available, ranging from basic, portable versions to more sophisticated benchtop models. The benchtop models, while more expensive, offer greater stability and precision, particularly when working with larger boards. In addition to the jig, a drill or impact driver is required to drive the screws. A drill is generally preferred for more delicate woods, while an impact driver provides more torque for harder materials.
Beyond the Kreg Jig and drill, several other tools are essential. A measuring tape and square are crucial for accurate measurements and ensuring the boards are aligned properly. Clamps are critical for holding the boards tightly together while the glue dries and the screws are driven. A sander, ideally an orbital sander, is needed to smooth the surface of the table top after assembly. Finally, a finishing product, such as varnish, polyurethane, or oil, is needed to protect the wood and enhance its natural beauty.
A comprehensive list of materials and tools includes:
- Kreg Jig (K4, K5, or Master System recommended for table tops)
- Drill or impact driver
- Kreg Jig screws (appropriate length and type for the wood being used)
- Wood glue (high-quality PVA glue)
- Wood of choice
- Measuring tape
- Square
- Clamps (bar clamps or pipe clamps are ideal)
- Sander (orbital sander recommended)
- Sandpaper (various grits)
- Finishing product (varnish, polyurethane, oil, etc.)
- Safety glasses
- Dust mask
The Process: Joining Boards with a Kreg Jig
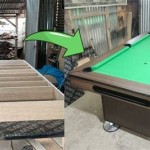
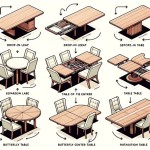
The process of joining boards to create a table top using a Kreg Jig involves several key steps, each requiring careful attention to detail. The first step is selecting and preparing the wood. This involves choosing boards that are straight and relatively free of knots or imperfections. The boards should be cut to the desired length and width, ensuring they are all the same thickness. It's crucial to allow the wood to acclimate to the environment where the table will be used for several days before beginning assembly to minimize warping or cracking later on.
Next, the Kreg Jig needs to be set up correctly. This involves adjusting the drill bit depth and the jig spacing based on the thickness of the wood being used. Incorrect settings can result in weak joints or screws that protrude through the surface of the wood. Consult the Kreg Jig's instruction manual for precise settings recommendations.
With the jig set up, the process of drilling pocket holes can begin. Typically, pocket holes are drilled on the underside of the table top, spaced approximately 6-12 inches apart. The number of pocket holes needed will depend on the length and width of the table top, as well as the type of wood being used. Softer woods will require more closely spaced pocket holes to ensure a strong joint.
Before driving the screws, it's essential to apply wood glue to the edges of the boards being joined. The glue serves as a lubricant during assembly, helping to create a tight, seamless joint and providing added strength. Apply a generous amount of glue to the edges of the boards, ensuring even coverage.
Once the glue is applied, the boards can be clamped together. Use bar clamps or pipe clamps to apply even pressure along the length of the boards, ensuring they are aligned flush with each other. It's crucial to check the alignment of the boards frequently during clamping, making adjustments as needed to ensure a perfectly flat surface.
After the boards are clamped tightly together, the screws can be driven into the pocket holes. Use the appropriate Kreg Jig screws for the type of wood being used, and drive the screws until they are flush with the surface of the wood. Avoid over-tightening the screws, as this can strip the threads and weaken the joint.
Allow the glue to dry completely before removing the clamps. The drying time will vary depending on the type of glue used, but typically 24 hours is sufficient. Once the glue is dry, the clamps can be removed, and the table top can be sanded to create a smooth, even surface.
Refining and Finishing the Table Top
After the glue has cured and the clamps have been removed, the table top will likely have some imperfections, such as slight misalignments or uneven surfaces. These imperfections can be easily addressed with sanding. Start with a coarse grit sandpaper (80-100 grit) to remove any major imperfections, then gradually work your way up to finer grits (120-180 grit, followed by 220 grit) to achieve a smooth, polished surface. An orbital sander is highly recommended for this step, as it will produce a more consistent and even finish.
Sanding should be done in stages, progressing through the grits in a logical order. Avoid skipping grits, as this will result in a less-than-perfect finish. After each sanding stage, wipe the table top clean with a tack cloth to remove any dust or debris. This will prevent the dust from being ground into the wood during the next sanding stage.
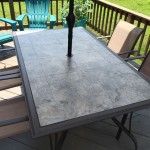
Once the table top is sanded smooth, it's time to apply a finish. The choice of finish will depend on the desired aesthetic and the intended use of the table. Varnish and polyurethane are durable finishes that provide excellent protection against scratches, stains, and water damage. Oil finishes, such as tung oil or linseed oil, enhance the natural beauty of the wood and provide a warm, rich tone. Wax finishes provide a soft, matte finish but offer less protection than varnish or polyurethane.
Regardless of the finish chosen, it's important to apply it in thin, even coats, following the manufacturer's instructions. Multiple coats are typically required to achieve the desired level of protection and aesthetic appeal. Allow each coat to dry completely before applying the next coat, and lightly sand between coats with fine-grit sandpaper (220 grit or higher) to remove any imperfections.
Proper ventilation is essential when applying finishes, as many finishes contain volatile organic compounds (VOCs) that can be harmful if inhaled. Wear a respirator and work in a well-ventilated area. Dispose of used rags and brushes properly to prevent spontaneous combustion.
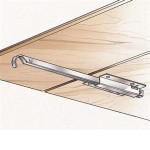
The final step is to attach the table top to a base or legs. This can be done using screws, bolts, or metal fasteners. Ensure the base or legs are securely attached to the table top, providing a stable and sturdy platform. Consider using a breadboard end or other joinery techniques to allow for wood movement and prevent warping or cracking over time.
By following these steps carefully and paying attention to detail, anyone can create a beautiful and durable table top using a Kreg Jig. The Kreg Jig simplifies the process of joining boards, making it accessible to woodworkers of all skill levels. The resulting table top will be a testament to the strength and versatility of Kreg Jig joinery.

Kitchen Tabletop Kreg Tool

How To Make A Table Top With Kreg Jig

How To Make A Table Top With Kreg Jig

How To Build A Wood Tabletop Using Pocket Holes

Diy Project How To Make A Dining Room Table With Pocket Holes

The Ultimate Guide To Pocket Holes Handyman S Daughter

How To Make A Table Top With Kreg Jig

Diy Farmhouse Table Top The Right Way Saws On Skates

Make 7 Simple Joints With Your Pocket Hole Jig Kreg Tool

Rustic Slide In End Table Kreg Tool
Related Posts