DIY Laundry Room Folding Table with Storage: A Practical Guide
Optimizing space in a laundry room is a common challenge for many homeowners. Integrating a folding table with built-in storage can significantly improve functionality and organization within this often-compact area. This article provides a comprehensive guide to creating a do-it-yourself (DIY) laundry room folding table with storage, outlining the necessary materials, tools, and step-by-step instructions to help readers efficiently manage their laundry needs.
Designing a folding table with storage involves careful consideration of several factors, including available space, desired dimensions, the type of storage required, and the overall aesthetic. Before commencing the project, a detailed plan should be formulated, specifying the exact measurements, materials, and construction techniques to be employed. This initial planning phase is crucial for ensuring a successful and functional outcome. Considerations also include matching the aesthetic of the table to the existing laundry room decor, selecting appropriate hardware, and determining the weight capacity of the folding mechanism.
Key Point 1: Planning and Design Considerations
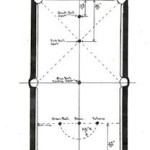
Effective planning is paramount for any DIY project, especially one involving space optimization and storage solutions. The first step involves accurately measuring the designated laundry area. This measurement will dictate the maximum dimensions of the folding table when both open and closed. Particular attention should be paid to door swings, appliance accessibility, and traffic flow within the room. The goal is to create a table that provides ample workspace when needed but folds away neatly when not in use, without obstructing movement or access to essential laundry appliances.
Next, the design must take into account the type and amount of storage required. Common storage options include shelves, drawers, and cabinets. Shelves are ideal for storing laundry detergent, fabric softener, and other frequently used items. Drawers are suitable for organizing smaller items such as socks, lint rollers, and cleaning supplies. Cabinets can be used for larger items or for concealing less aesthetically pleasing laundry necessities. The configuration of the storage components should be carefully planned to maximize space utilization and accessibility.
The choice of materials is another critical design consideration. Wood is a popular choice due to its durability, versatility, and aesthetic appeal. Plywood, MDF (medium-density fiberboard), and solid wood are all viable options, each with its own advantages and disadvantages. Plywood is strong and relatively inexpensive, but it may require sanding and finishing to achieve a smooth surface. MDF is smooth and easy to paint, but it is less resistant to moisture than solid wood. Solid wood offers superior durability and aesthetic appeal, but it is also the most expensive option. The selection of materials should be based on budget constraints, desired aesthetic, and the expected level of wear and tear.
Finally, the folding mechanism needs careful consideration. Several types of folding hardware are available, including hinges, folding brackets, and drop-leaf supports. Hinges are a simple and inexpensive option, but they may not provide the same level of stability as other types of hardware. Folding brackets are designed specifically for folding tables and provide a more secure and stable platform. Drop-leaf supports are typically used for extending the surface area of a table, but they can also be adapted for use in a folding table design. The choice of folding hardware should be based on the size and weight of the table, as well as the desired ease of operation.
The aesthetic design is an equally important consideration. Coordinate the materials and finishes used in the folding table with the existing decor. Paint, stain, and hardware selection can create a cohesive look. Consider incorporating design elements that complement the laundry room’s color scheme and overall style. This might involve matching the cabinet hardware, choosing a paint color that complements the walls, or adding decorative trim to the table.
Key Point 2: Materials, Tools, and Construction
After finalizing the design, the next step involves gathering the necessary materials and tools. The specific materials required will depend on the design, but a general list includes wood (plywood, MDF, or solid wood), screws, nails, wood glue, hinges or folding brackets, paint or stain, sandpaper, and finishing supplies. The tools needed will include a saw (circular saw or miter saw), drill, screwdriver, measuring tape, level, sander, clamps, and safety glasses. Investing in high-quality tools can make the construction process easier and more efficient.
The construction process typically begins with cutting the wood to the specified dimensions. Accurate measurements and precise cuts are essential for ensuring a well-fitting and structurally sound final product. A circular saw or miter saw can be used for making straight cuts, while a jigsaw can be used for making curved cuts. After cutting the wood, the edges should be sanded smooth to remove any splinters or rough spots. This step is particularly important for surfaces that will be painted or stained.
Once the wood has been cut and sanded, the next step is to assemble the storage components. This may involve constructing shelves, drawers, or cabinets. Shelves can be attached to the table frame using screws and wood glue. Drawers require more detailed construction, including building the drawer box, attaching the drawer slides, and installing the drawer front. Cabinets also require careful assembly, including attaching the cabinet sides, back, and door. Clamps should be used to hold the pieces together while the glue dries.
After the storage components have been assembled, the folding table surface can be attached. The folding mechanism should be installed according to the manufacturer's instructions. This typically involves attaching hinges or folding brackets to the table surface and the supporting structure. The folding hardware should be securely fastened to ensure that the table folds smoothly and remains stable when open. Verify the stability of the folding mechanism with the table open and closed. Reinforcements may be needed to improve strength.
Once the table has been assembled, it should be sanded again to prepare it for finishing. Sanding removes any imperfections and creates a smooth surface for the paint or stain to adhere to. A primer should be applied before painting or staining to ensure proper adhesion and coverage. Multiple coats of paint or stain may be necessary to achieve the desired color and finish. Allow each coat to dry completely before applying the next. After the paint or stain has dried, a clear coat of sealant can be applied to protect the surface from scratches and moisture.
Installing the finished table in the laundry room is simple. Mount the table to the wall, ensuring that it is level and securely attached. Test the folding mechanism and make any necessary adjustments. Fill the storage components with laundry supplies and enjoy the newly organized and functional laundry space. Periodically check the mounting and folding mechanisms and tighten or adjust as needed.
Key Point 3: Enhancing Functionality and Aesthetics
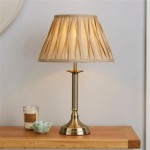
Beyond the basic construction of the folding table and storage components, several enhancements can further improve its functionality and aesthetic appeal. Adding a built-in ironing board, for example, can transform the table into a versatile laundry workstation. An ironing board can be attached to the underside of the table and folded down when needed. Another useful addition is a pull-out drying rack, which can be used for air-drying delicate items. A drying rack can be easily constructed from wood or metal and attached to the table frame with hinges or slides. Consider integrating lighting to improve visibility. A simple LED strip light mounted beneath a shelf or the tabletop can provide extra illumination when folding or ironing clothes.
Customizing the storage components to meet specific needs can also enhance functionality. Adding dividers to drawers can help organize smaller items, while adjustable shelves can accommodate items of different sizes. Baskets or bins can be used to store laundry supplies and keep the area clutter-free. Labeling the storage compartments can also help with organization and make it easier to find items quickly.
Enhancing the aesthetic appeal of the folding table can be achieved through various finishing techniques. Painting or staining the wood is a simple way to customize the look and match the existing decor. Applying decorative trim or molding can add visual interest and create a more polished appearance. Adding decorative hardware, such as knobs or pulls, can also enhance the overall aesthetic. Stencils, paint techniques, or decoupage can add a personal touc to the table. Select durable finishes designed for high-moisture environments to resist warping or peeling. Finally, consider adding a backsplash to the wall behind the table to protect it from splashes and spills.
Careful planning, precise construction, and thoughtful enhancements can transform a simple DIY project into a valuable asset in any laundry room. The ability to fold away when not in use maximizes space and organization. In addition, careful selection of materials, well-organized storage, and aesthetically pleasing finishes can make the laundry room a more pleasant and efficient space.

Diy An Oversized Table For The Laundry Room Under 100 Major Hoff Takes A Wife

The Best Diy Laundry Room Folding Station With Drying Racks

The Perfect Diy Laundry Folding Table Twelve On Main

Laundry Room Folding Table Countertop Makeover On A Budget

The Perfect Diy Laundry Folding Table Twelve On Main

Laundry Folding Table

The Best Diy Laundry Room Folding Station With Drying Racks

Diy Space Saving Laundry Station

The Perfect Diy Laundry Folding Table Twelve On Main

How To Make A Simple Laundry Room Fold Table Sunnyside Home