DIY Live Edge Dining Table: A Comprehensive Guide
The allure of a live edge dining table lies in its unique character and connection to nature. Each table, crafted from a single slab of wood retaining its natural edge, becomes a statement piece, introducing organic beauty and rustic charm into any dining space. While commercially available live edge tables can carry a hefty price tag, a do-it-yourself (DIY) approach offers a cost-effective and rewarding alternative, allowing for complete customization and a deeper appreciation for the craftsmanship involved. This article provides a comprehensive guide to constructing a live edge dining table, covering essential considerations, necessary tools and materials, and a step-by-step breakdown of the process.
Before embarking on this project, careful planning is crucial. The success of a DIY live edge dining table hinges on selecting the right slab, securing appropriate hardware, and mastering fundamental woodworking techniques. Attention to detail during each stage, from initial preparation to final finishing, guarantees a durable, aesthetically pleasing, and functional piece of furniture.
Selecting the Right Live Edge Slab
The selection of the live edge slab is the most critical aspect of the project. The slab dictates the table's overall size, shape, and aesthetic. Several factors warrant careful consideration during the selection process.
Wood Species: Different wood species offer varying degrees of hardness, durability, and aesthetic appeal. Popular choices include walnut, maple, oak, and cherry. Walnut is prized for its rich, dark color and beautiful grain patterns, while maple offers a lighter, more neutral tone and excellent durability. Oak is known for its strength and distinctive grain, and cherry develops a warm, reddish hue as it ages. The choice of wood species should align with the desired aesthetic and the intended use of the table. For instance, a table expected to endure heavy use might benefit from the greater hardness of oak or maple.
Slab Dimensions: The dimensions of the slab directly determine the size and seating capacity of the dining table. Measure the available space in the dining area and consider the desired number of seats. A typical dining table width ranges from 36 to 48 inches, while the length varies depending on the number of diners. Ensure that the slab provides sufficient width and length to accommodate the intended use. Also, consider the slab thickness. A thickness of at least 1.5 inches is generally recommended for structural stability.
Moisture Content: The moisture content of the wood is paramount for preventing warping, cracking, and other structural issues. Ideally, the slab should be kiln-dried to a moisture content of between 6-8%. Using a moisture meter is crucial to confirm the slab is properly dried. Untreated green wood will inevitably warp and crack as it dries, rendering the table unstable and aesthetically unappealing. Look for slabs from reputable suppliers who specialize in properly drying lumber.
Defects and Imperfections: Carefully inspect the slab for any existing defects, such as cracks, knots, insect damage, or rot. While minor imperfections can often be addressed during the preparation stage, significant defects may compromise the structural integrity of the table. Small cracks can be filled with epoxy resin, and loose knots can be stabilized with wood glue and clamps. However, extensive rot or significant cracks that run through the entire slab may necessitate choosing a different piece.
Live Edge Characteristics: The live edge itself is a defining characteristic of this type of table. Evaluate the shape, contour, and overall appeal of the natural edge. Look for a slab with a visually interesting and aesthetically pleasing edge profile. Consider whether the edge should be left entirely natural or slightly modified to enhance its appearance. Debarking the live edge is often necessary, and the bark itself can be a deciding factor in the slab's overall appeal. Loose bark should be removed to prevent future shedding.
Essential Tools and Materials
Constructing a live edge dining table requires a range of woodworking tools and materials. Having the right equipment ensures accuracy, efficiency, and a professional-looking result. The following list outlines the essential tools and materials needed for this project.
Woodworking Tools: A jointer and planer are essential for flattening and smoothing the slab. These tools create a perfectly flat surface for attaching the table legs. A power sander, with varying grits of sandpaper, is necessary for smoothing and polishing the table surface. A router, with various bits, can be used for creating decorative edges or routing out areas for inlays. A circular saw or track saw is needed for making straight cuts, and a jigsaw can be used for more intricate cuts. Clamps are indispensable for holding pieces together during gluing and assembly. Measuring tools, such as a tape measure, square, and level, are crucial for accuracy. Personal protective equipment (PPE), including safety glasses, a dust mask, and ear protection, is essential for safety. Finally, woodworking hand tools like chisels, hand planes, and rasps can be used for refining edges and details.
Fasteners and Adhesives: Wood glue is used for bonding the table top to any bracing or supports. Screws are used for attaching the table legs to the table top. Consider using threaded inserts for added strength and durability. Epoxy resin can be used to fill cracks and voids in the wood, creating a smooth and stable surface. Choose a high-quality epoxy resin that is specifically designed for woodworking applications. Wood filler can be used to fill minor imperfections and create a seamless finish.
Finishing Supplies: Sandpaper is necessary for smoothing the table surface before applying the finish. Start with a coarse grit sandpaper (e.g., 80 grit) and gradually work your way up to a finer grit (e.g., 220 grit). A wood finish, such as polyurethane, varnish, or oil, is used to protect the wood and enhance its natural beauty. Choose a finish that is appropriate for the intended use of the table. For example, a polyurethane finish is durable and water-resistant, making it a good choice for a dining table. Applying a wood conditioner before staining or finishing can ensure a more even and consistent result. Rags and applicators are needed for applying the finish.
Table Legs: A wide variety of table leg styles are available, ranging from hairpin legs to more traditional wooden legs. The choice of table legs should complement the overall aesthetic of the table. Metal legs offer a modern look, while wooden legs provide a more traditional feel. Consider the height and style of the table legs to ensure that they are appropriate for the intended use of the table. Ensure the legs are sturdy and capable of supporting the weight of the slab.
Step-by-Step Construction Process
The construction process involves several stages, from initial slab preparation to final finishing. Each stage requires careful attention to detail and adherence to best practices.
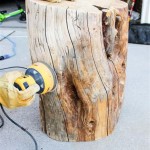
Slab Preparation: Begin by thoroughly cleaning the slab with a brush and removing any loose debris. If necessary, debark the live edge using a chisel or drawknife. Flatten the slab using a jointer and planer. This process ensures a perfectly flat surface for attaching the table legs and prevents warping. If a jointer and planer are not available, a router sled can be used to achieve a similar result. Fill any cracks or voids with epoxy resin. Mix the epoxy resin according to the manufacturer's instructions and pour it into the cracks. Allow the epoxy resin to cure completely before sanding it smooth. Sand the entire slab using a power sander, starting with a coarse grit sandpaper and gradually working your way up to a finer grit. This process creates a smooth and even surface for finishing.
Leg Attachment: Determine the desired placement of the table legs. Consider the overall stability and aesthetics of the table. Mark the locations of the leg attachment points. Drill pilot holes for the screws. This prevents the wood from splitting and ensures a secure attachment. Attach the table legs to the table top using screws. Consider using threaded inserts for added strength and durability. Ensure that the legs are securely attached and that the table is stable.
Finishing: Apply a wood conditioner to the table surface. This helps to ensure a more even and consistent finish. Stain the table, if desired. Choose a stain color that complements the wood species and the overall aesthetic of the table. Apply the stain evenly and allow it to dry completely. Apply a wood finish to the table surface. Polyurethane, varnish, or oil are all suitable options. Apply the finish in thin, even coats. Allow each coat to dry completely before applying the next coat. Sand lightly between coats to create a smooth and even finish.
Final Touches: Inspect the table for any imperfections. Touch up any areas that need attention. Apply a final coat of finish. Allow the finish to dry completely. Polish the table surface with a soft cloth. This enhances the shine and luster of the finish. Inspect the table legs for stability. Tighten any loose screws. Level the table. Use shims if necessary to ensure that the table sits flat on the floor.
Creating a DIY live edge dining table is a fulfilling project that combines woodworking skills with artistic expression. By carefully selecting the slab, mastering essential techniques, and paying attention to detail, individuals can craft a unique and beautiful piece of furniture that will be cherished for years to come. The resulting table will not only serve as a functional dining space but also as a conversation starter, showcasing the natural beauty of wood and the satisfaction of creating something with one's own hands.

Diy Live Edge Dining Table With Easy Ers

Diy Live Edge Dining Table With Easy Ers

Diy Live Edge Table With Steel Base Lemon Thistle

How To Build A Live Edge Table River Style Raddadbuilds

How To Build A Live Edge Table The Easy Way Diy Instructions

Diy Live Edge Table With Steel Base Lemon Thistle

Made From Scratch 25 Diy Dining Tables Room Table

How To Make A Live Edge Wooden Dining Table Diy Hometalk

Diy Live Edge Table With Steel Base Our Breakfast Me And Reegs

Raw Natural Goodness 50 Live Edge Dining Tables That Wow Decoist