Make Your Own Extendable Table: A Comprehensive Guide
An extendable table provides a versatile solution for homes that require flexible dining or workspace. It allows for a compact footprint during everyday use while offering additional surface area when needed for larger gatherings or projects. Constructing an extendable table offers significant advantages, including customization to specific dimensions, materials, and aesthetic preferences, and it can also be a more cost-effective alternative to purchasing a pre-made table, especially if one values high-quality materials and craftsmanship.
Before embarking on the construction process, careful planning is essential. This involves determining the desired dimensions of the table in both its collapsed and extended states, selecting appropriate materials, and choosing a suitable extension mechanism. A well-thought-out plan will minimize potential errors and ensure a structurally sound and aesthetically pleasing final product.
Key Point 1: Planning and Design Considerations
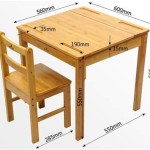
The initial stage involves defining the table's function and intended use. Consider the number of people the table needs to accommodate in both its regular and extended configurations. This will dictate the overall dimensions of the tabletop. Standard dining table heights typically range from 28 to 30 inches, but this can be adjusted based on individual preferences. The width and length of the table are primarily determined by the available space and the desired seating capacity. For instance, a table that comfortably seats six people might measure 60 inches long and 36 inches wide in its standard configuration, with the ability to extend to 84 inches or longer to accommodate eight or ten people. Accurately measuring available space is crucial to avoid creating a table that overwhelms the room.
Material selection significantly impacts the table's appearance, durability, and cost. Hardwoods such as maple, oak, and walnut are popular choices for their strength, stability, and attractive grain patterns. Softwoods like pine are less expensive but may be more susceptible to dents and scratches. Plywood or MDF (medium-density fiberboard) can be used for the tabletop substrate, providing a stable and flat surface, but they typically require a veneer or edging to achieve a finished look. The choice of finish also impacts the table's appearance and protection. Options include varnish, lacquer, polyurethane, and oil-based finishes, each offering varying degrees of durability and sheen.
Selecting an appropriate extension mechanism is essential for functionality. Several options are available, each with its own advantages and disadvantages. Drop-leaf extensions are simple and cost-effective, involving hinged leaves that fold down when not in use. However, they offer limited extension capacity. Butterfly leaf extensions feature a leaf that folds in half and stores beneath the tabletop, providing a more seamless extension. Draw-leaf extensions consist of leaves that slide out from beneath the tabletop, supported by runners. These are relatively easy to construct and offer a good balance of simplicity and extension capacity. Center-split extensions involve splitting the tabletop in the middle and inserting one or more leaves to increase its length. This type of extension requires more precise joinery and alignment but allows for significant extension. Telescopic table slides, often made of metal, provide smooth and stable operation for center-split extensions. Choosing the right mechanism depends on factors such as the desired extension length, budget, and skill level.
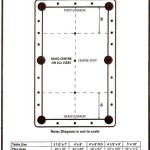
Before commencing construction, a detailed plan or drawing is imperative. This should include precise dimensions of all components, including the tabletop, legs, aprons, and extension mechanism. The plan should also outline the joinery methods to be employed, such as mortise and tenon joints, dowel joints, or pocket screws. Accurately depicting the table's construction in a plan will serve as a roadmap throughout the project and minimize the risk of errors.
Key Point 2: Construction Techniques and Joinery
Constructing the tabletop typically begins with preparing the lumber. This involves milling the lumber to the desired thickness and width, ensuring that it is flat and square. If using solid wood, it is important to allow the lumber to acclimate to the environment to minimize warping or cracking. The tabletop can be constructed by joining multiple boards edge-to-edge using glue and clamps. Alternatively, a plywood or MDF substrate can be used, with solid wood edging applied to create a more substantial appearance. When using plywood or MDF, ensure the edges are properly sealed to prevent moisture damage.
The table legs provide the structural support for the tabletop. They can be made from solid wood or metal. Traditional wood legs are often tapered or shaped for aesthetic appeal. Common joinery methods for attaching legs to the tabletop include mortise and tenon joints, which offer exceptional strength and stability. Dowel joints provide a simpler alternative, while pocket screws can be used for a quicker, though less robust, connection. For metal legs, welding or bolting are common methods of attachment. Regardless of the joinery method, it is essential to ensure that the legs are securely attached to the tabletop and that the table is stable and level.
The apron, also known as the skirt or rail, provides additional support to the tabletop and legs. It also serves as a mounting point for the table slides or extension mechanism. The apron is typically constructed from solid wood and attached to the legs using joinery methods similar to those used for the legs. The apron should be precisely aligned and securely fastened to ensure the tabletop remains flat and stable. The height of the apron can vary depending on the desired aesthetic and the type of extension mechanism used. Sufficient clearance must be provided for the legs and seating when the table is extended.
Installing the extension mechanism accurately is crucial for the smooth operation of the extendable table. For center-split extensions, telescopic table slides are typically attached to the apron. The slides must be properly aligned and lubricated to ensure they slide smoothly and effortlessly. The leaves for the extension can be constructed using similar techniques as the main tabletop. The leaves should be carefully fitted to the tabletop to ensure a seamless transition when the table is extended. Alignment dowels or latches can be used to secure the leaves in place and prevent them from shifting.
Key Point 3: Finishing and Assembly
Once the table is constructed, the finishing process enhances its appearance and protects it from wear and tear. Sanding is an essential step in preparing the table for finishing. Start with a coarse grit sandpaper to remove any imperfections, and gradually work up to a finer grit for a smooth surface. Thoroughly remove all sanding dust before applying the finish. The choice of finish will depend on the desired aesthetic and the intended use of the table. Varnish, lacquer, and polyurethane finishes provide a durable and water-resistant surface. Oil-based finishes offer a more natural look and feel, but they may require more frequent maintenance. Apply the finish evenly and in thin coats, allowing each coat to dry thoroughly before applying the next. Lightly sand between coats to ensure a smooth finish.
After the finish has dried completely, the table can be assembled. This involves attaching the legs and apron to the tabletop, if they were not already assembled. Ensure that all fasteners are tightened securely. Check the table for stability and levelness. If necessary, adjust the feet or add shims to level the table. Inspect the extension mechanism to ensure it operates smoothly and correctly. Make any necessary adjustments to ensure that the leaves align properly and are securely locked in place.
The project of building an extendable table can be tailored to individual skill levels and resources. Simpler designs utilizing readily available materials and straightforward joinery methods can be successfully executed by novice woodworkers. More complex designs involving intricate joinery and specialized extension mechanisms may require more advanced skills and tools. Regardless of the complexity, careful planning and execution are essential for achieving a successful outcome.
The completed extendable table offers a functional and aesthetically pleasing addition to any home. The ability to customize the table to specific dimensions, materials, and finishes allows for a unique and personalized piece of furniture. Furthermore, the satisfaction of building a functional and durable piece of furniture from scratch is a rewarding experience.

Diy Farmhouse Table With Extension Leaves Plans Sweet Tooth Life

Best Homemade Table How To Make Your Own Extending Dining Diy

How To Make An Extendable Dining Table With Solid Maple Tiny Apartment Build Ep 8

How To Make An Extendable Dining Table Transformer Diy Polkilo

Diy Farmhouse Table With Extension Leaves Plans Sweet Tooth Life

Diy Farmhouse Table With Extensions Addicted 2

Diy Farmhouse Table With Extension Leaves Plans Sweet Tooth Life

How To Make An Extendable Dining Table Transformer Diy Polkilo

Best Homemade Table How To Make Your Own Extending Dining Diy

Extendable Farmhouse Table