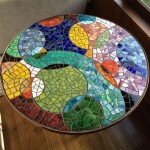
How to Make a Mosaic Table
A mosaic table is a stunning and unique piece of furniture that can add a touch of artistry and personality to any space. Whether you're a seasoned crafter or a beginner, creating a mosaic table is a rewarding project that allows you to unleash your creativity and transform a simple table into a captivating work of art. This article will guide you through the process of making a mosaic table, covering the materials, techniques, and steps involved in this captivating project.
1. Choosing the Right Materials
The first step in making a mosaic table is to choose the right materials. This involves selecting the table base, the mosaic tiles, and the adhesive. It's important to consider the style and theme you want to achieve, as well as the durability and practicality of the materials you choose.
Table Base
The table base can be made from a variety of materials, such as wood, metal, or concrete. Consider the size, shape, and style of the table you want to build, and select a base that complements your overall design. Existing tables can be repurposed for this project, adding a vintage charm to your creation.
Mosaic Tiles
Mosaic tiles are available in a wide range of materials, colors, shapes, and sizes. Common choices include ceramic, glass, marble, stone, and recycled materials. Explore the different options and select tiles that align with your aesthetic preferences and the overall design of your table.
Adhesive
The adhesive used to secure the mosaic tiles to the table base is crucial for the durability and longevity of your project. Choose a strong, water-resistant adhesive designed for use with mosaic tiles. Consult with a home improvement expert to select the appropriate adhesive for your chosen tile materials and table base.
2. Preparing the Table Base
Once you have gathered your materials, the next step is to prepare the table base for the mosaic. This involves cleaning the surface, sanding it smooth, and applying primer or paint, if desired.
Cleaning and Sanding
Clean the table base thoroughly with a mild detergent and water to remove any dirt, grease, or debris. Allow the table to dry completely. Sand the surface with fine-grit sandpaper to create a smooth and even texture for the adhesive to adhere to. This step is crucial for ensuring a strong bond between the tiles and the base.
Priming or Painting
If you plan to paint the table base before applying the mosaic, apply a primer to create a smooth and even surface for the paint to adhere to. Choose a primer that is compatible with the paint you will be using. Let the primer dry completely before applying the paint. If you want a natural wood finish, consider applying a wood stain instead.
3. Designing and Laying Out the Mosaic
With the table base prepared, you can now design and lay out your mosaic. This is the creative heart of the project, where you can express your individual style and vision.
Creating a Design
Start by sketching your design on paper. Consider the size and shape of the table base, the colors and textures of the tiles, and the overall theme you want to achieve. You can create a symmetrical or asymmetrical design, incorporate geometric patterns, or even use free-flowing organic shapes. There are no limits to your creativity!
Laying Out the Tiles
Once you have your design, lay out the tiles on the table base to get a visual representation of how the finished mosaic will look. This allows you to make adjustments and ensure the tiles are positioned correctly before applying adhesive. Use a pencil or marker to outline the areas where the tiles will be placed.
4. Applying the Mosaic Tiles
With the design laid out, you can begin applying the mosaic tiles to the table base using the chosen adhesive. Work in small sections, applying adhesive to the surface and then carefully placing the tiles on top. Ensure the tiles are evenly spaced and aligned according to your design. Use a tile spacer to maintain consistent gaps between the tiles, creating a clean and professional finish.
Using Grout
After the adhesive has completely dried, remove any excess adhesive and apply grout to fill the gaps between the tiles. Use a grout float to spread the grout evenly and remove any excess. Allow the grout to dry and then use a damp sponge to clean the surface of the table, removing any haze or residue.
5. Finishing Touches
Once the grout has dried, clean the table base and apply a sealant to protect the mosaic from water, stains, and wear and tear. This will preserve the beauty and longevity of your creation. Choose a sealant that is compatible with your tile and grout materials. Consider using a water-based sealant for a natural finish or a polyurethane sealant for a glossy look.
To enhance the appearance of your mosaic table, you can add finishing touches such as decorative accents, embellishments, or even additional layers of mosaic tiles. Let your creativity guide you and personalize your table to match your preferences.

How To Make A Mosaic Table Art Masterclass

Mosaic Table Top Using Ceramic And Plates

A Simple Mosaic Table To Make The

Learn How To Make A Mosaic Table The

How To Make A Mosaic Table Top 15 Steps With S Wikihow Coffee Designs

How To Make A Mosaic Table From Plates And Ceramics

How To Make A Sea Glass Mosaic Table The Boondocks Blog

How To Make A Bottle Cap Mosaic Table Do It Yourself Fun Ideas

Mosaic Table Top Using Glass Tiles

Make Your Own Ceramic Mosaic Table Top