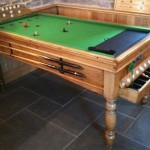
Setting Up a Snooker Table
Setting up a snooker table is a process that requires careful planning and execution. Whether you're installing a new table or moving an existing one, understanding the proper steps will ensure a smooth and successful setup. This guide will outline the key considerations, from selecting the right location to leveling the table and ensuring proper lighting.
1. Location Selection
Choosing the right spot for your snooker table is crucial for both functionality and aesthetics. Ideally, the location should be:
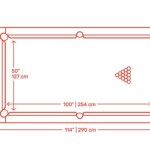
- Spacious: A snooker table requires ample space around it for players to move freely and execute shots effectively. Allow at least 5 feet of clearance on all sides.
- Level: The room or area where the table will be placed should be on a level surface. Uneven floors can lead to inconsistencies in ball movement and play.
- Well-lit: Adequate lighting is essential for clear visibility of the balls and the playing surface. Natural light is preferable, but artificial lighting should be positioned to avoid glare or shadows.
- Temperature-controlled: Snooker tables are sensitive to temperature fluctuations. Extreme heat or cold can warp the table and affect the ball's bounce.
- Free of dust and debris: A clean environment helps maintain the table's condition and prevents dust from interfering with play.
2. Table Assembly and Leveling
Once the location is chosen, the next step involves assembling the table and ensuring it is perfectly level. Here's a step-by-step process:
- Assemble the table frame: Follow the manufacturer's instructions carefully. Secure all bolts and ensure the frame is sturdy and stable.
- Install the playing surface: Attach the slate to the frame. Make sure the slate is securely fastened and sits flush with the frame.
- Level the table: This is a crucial step. Use a spirit level to check for unevenness in all directions. Adjust the leveling legs or feet (usually located at the corners) until the surface is perfectly level.
- Attach the cushions: Secure the cushions to the frame according to the manufacturer's instructions. Make sure the cushions are tight and properly aligned.
- Install the pockets: Fit the pockets to the table, ensuring they are snug and properly positioned. The pockets should be positioned at a specific angle to ensure the balls drop correctly.
3. Final Touches and Maintenance
After the table is assembled and leveled, there are a few final steps to ensure optimal playing conditions:
- Apply felt: The playing surface is typically covered with a felt cloth. Ensure the felt is evenly stretched and secured to the slate. The felt should be smooth and free of wrinkles.
- Install lighting: Install appropriate lighting fixtures to provide adequate illumination for the table. The lighting should be positioned to avoid glare and shadows.
- Set up accessories: Place a table brush or other accessories within easy reach for cleaning the table and balls.
- Regular cleaning: Clean the table regularly using a soft brush or cloth to remove dust and debris. Avoid using harsh chemicals or abrasive cleaners.
- Protect the table: Cover the table with a protective cover when not in use to prevent dust and dirt from accumulating.
Setting up a snooker table requires patience and attention to detail. By following these guidelines, you can ensure a smooth and successful setup, giving you a beautiful and functional table ready for years of enjoyable play.

Snooker Table And Overview

Table Layouts Snooker Billiards Pool And Darts Te Ara Encyclopedia Of New Zealand

How To Rack Up Pool And Snooker Hamilton Billiards Blog

How To Setup A Snooker Table

Rules Of Snooker Wikipedia

What Are The Rules Of Snooker How To Play Scoring Table Size And Differences With Pool Sporting News

8ft Titan Snooker Table For Immaculate Condition 500 Plus Collection Costs Gcl Billiards

The Official 8 Ball Rack Setup Proper Way Explained

How To Set Up A Pool Table Comprehensive Guide For Beginners

How To Rack A Pool Table