Simple Picnic Table DIY: A Comprehensive Guide
Constructing a picnic table can significantly enhance outdoor spaces, providing a dedicated area for dining, relaxation, and social gatherings. Embarking on a DIY picnic table project offers the opportunity to customize the design to specific needs and preferences while potentially saving costs compared to purchasing a pre-made table. This article provides a detailed guide for building a simple, durable picnic table, covering material selection, step-by-step assembly instructions, and essential considerations for ensuring a long-lasting and functional result.
The design outlined in this guide centers around a classic rectangular picnic table with attached benches. This design strikes a balance between simplicity, stability, and ease of construction, making it suitable for individuals with basic woodworking skills. The table is designed to comfortably accommodate approximately six to eight adults.
Material Selection and Planning
Choosing the right materials is paramount to the success and longevity of the picnic table. The type of wood, fasteners, and protective finishes all contribute to the table's structural integrity and resistance to environmental factors. Before commencing the project, careful planning is necessary to determine the required dimensions, material quantities, and optimal work environment.
Wood Selection: Pressure-treated lumber is highly recommended for outdoor picnic tables due to its resistance to rot, decay, and insect infestation. Southern yellow pine and redwood are common choices for pressure-treated lumber, offering a balance between affordability and durability. Cedar is another excellent option, known for its natural resistance to decay and its attractive appearance; however, it tends to be more expensive than pressure-treated pine. Avoid using non-treated lumber unless it is specifically intended for outdoor use and appropriately sealed and maintained. The dimensions of the lumber will typically be 2x4s and 4x4s for the frame and legs, and 2x6s for the tabletop and benches. Exact dimensions will depend on the desired size of the finished table.
Fasteners: Galvanized or stainless steel screws and bolts are essential for assembling the picnic table. These materials are corrosion-resistant, preventing rust and ensuring the long-term structural integrity of the table. Deck screws are specifically designed for outdoor use and provide excellent holding power. The size of the screws and bolts will vary depending on the thickness of the lumber and the connection points. Consider using carriage bolts for securing the legs to the frame, as they offer a clean, tamper-resistant appearance and superior strength.
Protective Finish: Applying a protective finish is crucial for safeguarding the wood from moisture, UV radiation, and other environmental elements. Exterior-grade paint, stain, or sealant can be used to enhance the table's appearance and prolong its lifespan. If using paint, select a primer specifically formulated for exterior wood. Stain allows the wood grain to remain visible while providing protection, while sealant creates a water-resistant barrier. Consider using a product that contains UV inhibitors to prevent discoloration and fading caused by sunlight.
Tools: The following tools will be needed for the construction of the picnic table: safety glasses, measuring tape, pencil, circular saw or hand saw, power drill with various drill bits, socket wrench set, sandpaper, square, and a level. A miter saw can be beneficial for making precise angle cuts, but it is not strictly necessary. Clamps are also helpful for holding pieces together during assembly.
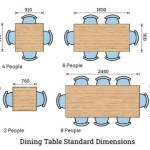
Planning and Dimensions: A standard picnic table typically measures approximately 6 feet long, 5 feet wide (including the benches), and 30 inches high. The tabletop is usually around 30 inches wide, and the benches are typically 12 inches wide and positioned about 18 inches from the ground. Adjust these dimensions to suit particular preferences and space constraints. Create a detailed cutting list based on the desired dimensions to minimize material waste and ensure accurate cuts.
Step-by-Step Assembly Process
The assembly process involves constructing the frame, attaching the legs, and installing the tabletop and benches. Precision and attention to detail are important at each stage to ensure a structurally sound and aesthetically pleasing finished product.
Frame Construction: The frame provides the structural support for the tabletop and benches. Cut the 2x4 lumber according to the cutting list to form the outer perimeter of the frame and the internal support beams. Assemble the frame using screws, ensuring that the corners are square. Apply wood glue to the joints before screwing them together for added strength. Internal support beams should be evenly spaced to prevent sagging of the tabletop and benches. Reinforce the corners with metal brackets for enhanced stability.
Leg Attachment: The legs provide the support for the entire table. Cut the 4x4 lumber to the desired leg height, ensuring that all four legs are the same length. Angle the bottom of each leg slightly to improve stability on uneven surfaces. Attach the legs to the frame using carriage bolts, washers, and nuts. Position the legs so that they are slightly angled outward for added stability. Reinforce the leg attachments with additional screws for extra security.
Tabletop Installation: The tabletop provides the surface for dining and other activities. Cut the 2x6 lumber to the desired length of the tabletop. Space the boards evenly across the frame, leaving small gaps between them for drainage and expansion. Secure the tabletop boards to the frame using screws. Pre-drill pilot holes to prevent the wood from splitting. Ensure that the screws are countersunk to create a smooth, even surface. Sand the tabletop to remove any splinters or rough edges.
Bench Installation: The benches provide seating for users. Cut the 2x6 lumber to the desired length of the benches. Attach the benches to the frame using screws. Position the benches so that they are evenly spaced from the tabletop. Pre-drill pilot holes to prevent the wood from splitting. Ensure that the screws are countersunk to create a smooth, even surface. Sand the benches to remove any splinters or rough edges.
Finishing and Maintenance
Proper finishing and regular maintenance are essential for preserving the appearance and extending the lifespan of the picnic table. Applying a protective finish will shield the wood from the elements, while routine cleaning and maintenance will prevent damage and ensure long-term functionality.
Sanding and Preparation: Before applying any finish, thoroughly sand the entire picnic table to create a smooth, even surface. Remove any splinters, rough edges, or imperfections. Use progressively finer grits of sandpaper to achieve the desired smoothness. Clean the table with a damp cloth to remove any dust or debris.
Applying the Finish: Apply the chosen protective finish according to the manufacturer's instructions. Use a brush, roller, or sprayer to apply the finish evenly. Apply multiple coats for enhanced protection, allowing each coat to dry completely before applying the next. Consider using a sealant or varnish to further protect the wood from moisture and UV radiation.
Regular Maintenance: Clean the picnic table regularly with soap and water to remove dirt, grime, and debris. Inspect the table periodically for any signs of damage, such as cracks, splits, or loose screws. Tighten any loose screws or bolts. Reapply the protective finish every year or two, or as needed, to maintain its protective properties. Store the picnic table indoors or cover it with a waterproof tarp during the off-season to protect it from harsh weather conditions.
By following this comprehensive guide, individuals can successfully construct a simple, durable, and functional picnic table that enhances their outdoor living space for years to come. The key lies in careful planning, precise execution, and consistent maintenance.

Diy Building Plans For A Picnic Table

How To Build A Picnic Table The Home Depot

25 Diy Picnic Tables Best For Your Yard
:max_bytes(150000):strip_icc()/instrcutables-5b23f5680e23d90036196cb0.jpg?strip=all "15 Free Picnic Table Plans In All Shapes And Sizes")
15 Free Picnic Table Plans In All Shapes And Sizes

Diy Building Plans For A Picnic Table

Strong And Easy Picnic Table Free Plans 346

How To Build A Picnic Table The Home Depot

How To Build A Picnic Table In Just One Day Simple Diy Tutorial Plans

Diy Building Plans For A Picnic Table

20 Diy Picnic Table Ideas To Build This Summer The Handyman S Daughter