Turning a Tree Trunk Into a Statement Table: A Comprehensive Guide
The transformation of a raw tree trunk into a functional and aesthetically pleasing table is a challenging yet rewarding endeavor. This process requires careful planning, appropriate tools, and a thorough understanding of woodworking techniques. The resulting table can serve as a unique centerpiece, showcasing the natural beauty and inherent character of the wood. This article will provide a detailed overview of the key stages involved in converting a tree trunk into a durable and visually appealing table, from sourcing the wood to applying the finishing touches.
The type of tree trunk chosen will significantly impact the final product. Factors such as wood species, grain pattern, dimensions, and the presence of any defects need careful consideration. Hardwoods like oak, maple, walnut, and cherry are generally preferred for their durability and attractive grain. Softwoods such as pine or cedar can also be used, but may require more careful handling and protection. The dimensions of the trunk will dictate the size and style of the table that can be created. Ideally, the trunk should be free of significant rot, large cracks, or insect infestations. Choosing a trunk that possesses unique features, such as burls or unusual grain patterns, can add to the uniqueness of the finished table.
Selection and Preparation of the Tree Trunk
Before any cutting or shaping can begin, the tree trunk requires thorough sourcing and preparation. The first step involves obtaining a suitable trunk, which can be sourced from various locations. One option is to contact local tree removal services or arborists. They often have access to freshly cut trees that would otherwise be discarded. Another option is to purchase a trunk from a lumber yard specializing in exotic or salvaged wood. When sourcing a trunk, it is essential to inquire about its origin, species, and any treatments it may have undergone.
Once a suitable trunk has been acquired, the next step is to prepare it for milling. This involves removing any loose bark, dirt, or debris from the surface of the trunk. This can be achieved using a pressure washer, a wire brush, or a drawknife. It is crucial to exercise caution when handling freshly cut wood, as it may be heavy and unstable. Safety gear, such as gloves, eye protection, and sturdy footwear, should always be worn. After cleaning, the trunk should be allowed to air dry for a period of time. The drying time will vary depending on the species of wood, the dimensions of the trunk, and the climate. Generally, a rule of thumb is to allow the wood to dry for one year per inch of thickness. Proper drying is crucial to prevent cracking and warping during the subsequent milling and finishing stages.
To accelerate the drying process, several techniques can be employed. One method is to apply a wood sealant to the ends of the trunk. This helps to prevent moisture from escaping too quickly, which can lead to cracking. Another technique is to stack the trunk in a well-ventilated area, away from direct sunlight and rain. Stickers, which are thin strips of wood, should be placed between the trunk and the ground, as well as between any other pieces of wood, to allow for air circulation. Kiln drying is another option, but it is often not practical for large tree trunks. Kiln drying involves placing the wood in a controlled environment with specific temperature and humidity levels to accelerate the drying process. This method can significantly reduce the drying time, but it requires specialized equipment and knowledge.
Milling and Shaping the Trunk
After the tree trunk has been properly dried, the next step is to mill it into a usable slab for the table. This process involves using specialized equipment, such as a chainsaw mill, to cut the trunk into a flat and parallel surface. A chainsaw mill is a tool that attaches to a chainsaw and allows it to cut long, straight lines. The mill typically consists of a frame that guides the chainsaw along the trunk, ensuring a consistent and accurate cut. Before milling, it is crucial to carefully inspect the trunk for any hidden nails, metal fragments, or other foreign objects that could damage the chainsaw blade. A metal detector can be used to locate these objects.
The milling process typically involves making a series of parallel cuts along the length of the trunk. The thickness of the slabs will depend on the desired thickness of the tabletop. It is essential to maintain a consistent cutting depth to ensure that the slabs are uniform in thickness. After the initial cuts have been made, the slabs may need to be flattened using a planer or a router sled. A planer is a machine that removes thin layers of wood from the surface of a board, creating a perfectly flat and smooth surface. A router sled is a jig that guides a router across the surface of a slab, achieving a similar result. If a planer is used, it is important to take small passes to avoid putting excessive stress on the machine. If a router sled is used, it is important to ensure that the router bit is sharp and that the sled is properly aligned.
Once the slab has been flattened, the edges can be shaped to the desired profile. This can be achieved using a variety of tools, such as a router, a hand plane, or a spokeshave. The choice of tool will depend on the desired shape and the skill of the woodworker. A router can be used to create complex profiles, such as rounded edges or decorative grooves. A hand plane can be used to create subtle curves and smooth transitions. A spokeshave is a specialized hand tool that is particularly useful for shaping curved surfaces. After the edges have been shaped, the entire surface of the slab should be sanded to a smooth finish. This can be achieved using a series of progressively finer grits of sandpaper, starting with a coarse grit to remove any imperfections and ending with a fine grit to create a smooth surface. It is important to sand with the grain of the wood to avoid scratching.
Finishing and Protecting the Table
The final stage of the process involves finishing and protecting the table. This step is crucial to enhance the beauty of the wood and protect it from moisture, scratches, and other damage. There are several different types of finishes that can be used, each with its own advantages and disadvantages. Oil-based finishes, such as tung oil or linseed oil, penetrate the wood and provide a natural-looking finish. They are relatively easy to apply and maintain, but they offer limited protection against scratches and stains. Water-based finishes, such as polyurethane or acrylic, form a protective layer on the surface of the wood. They offer excellent protection against scratches and stains, but they can sometimes appear less natural than oil-based finishes.
Before applying any finish, it is important to ensure that the surface of the wood is clean and free of dust. This can be achieved by wiping the surface with a tack cloth or a clean, damp cloth. The finish should be applied in thin, even coats, following the manufacturer's instructions. It is important to allow each coat to dry completely before applying the next coat. Multiple coats are typically required to achieve the desired level of protection and sheen. After the final coat has dried, the surface can be lightly buffed with a fine-grit sandpaper or steel wool to create a smooth, even finish.
In addition to applying a finish, it is also important to consider the base or legs of the table. The base should be strong and stable enough to support the weight of the tabletop. There are many different options for the base, ranging from simple wooden legs to more elaborate metal designs. The choice of base will depend on the desired style and the overall aesthetic of the table. The base should be securely attached to the tabletop using screws, bolts, or other appropriate fasteners. It is important to ensure that the fasteners are strong enough to withstand the weight and stress of the table. Once the base is attached and the finish is applied, the table is complete and ready to be used. Regular cleaning and maintenance will help to preserve the beauty and durability of the table for many years to come.

Diy Natural Tree Stump Side Table Justinecelina

Diy Natural Tree Stump Side Table Justinecelina

Giant Tree Trunks Turn Into Stunning Coffee Tables

Diy Natural Tree Stump Side Table Justinecelina

Turning Tree Trunks Into Stunning Tables The Art Of Creative Woodworking

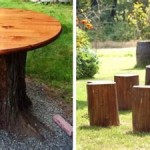
19 Creative Ways Of Turning Logs And Stumps Into Garden Furniture

How To Diy Stump Table 17 Apart

Diy Tree Stump Coffee Tables One Room Challenge Week 2 Holland Avenue Home

The Internet S Most Asked Questions

Turning A Massive Tree Trunk Into Stunning Volcanic Table