Essential Aspects of X Base Side Table DIY
Embarking on a DIY project can be an incredibly rewarding experience, especially when it involves transforming ordinary objects into stylish and functional pieces for your home. If you're looking to add a touch of sophistication to your living space, building an X Base Side Table is a perfect choice. Here's a comprehensive guide to the essential aspects involved in this exciting DIY project:
Materials and Tools
Before you begin, ensure you gather all the necessary materials and tools. You will need:
- Four 2x6 lumber pieces for the legs
- One 1x12 lumber piece for the tabletop
- Wood glue
- Clamps
- Drill
- 1 1/4-inch wood screws
- Saw
- Sandpaper
- Paint or stain (optional)
Cutting the Lumber
Start by cutting the lumber to the desired dimensions. The legs should be 18 inches long, while the tabletop should be 24 inches wide and 12 inches deep.
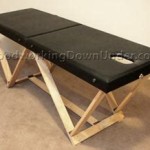
Assembling the Base
Next, assemble the base of the table. Place two of the legs parallel to each other, with a distance of 24 inches apart. Apply wood glue to the ends of the legs and place the other two legs on top, forming an "X" shape. Secure the legs with clamps and drill 1 1/4-inch wood screws through the legs to create a sturdy joint.
Attaching the Tabletop
Once the base is assembled, attach the tabletop. Apply wood glue to the top of the base and place the tabletop on top. Secure the tabletop with clamps and drill wood screws through the tabletop and into the legs. Ensure the screws are evenly spaced to distribute weight evenly.
Sanding and Finishing
After the tabletop is attached, sand any rough edges or splinters for a smooth finish. You can opt to paint or stain the table to match your desired decor. Allow the finish to dry completely before using the table.
Tips for Success
- Use a level to ensure the tabletop is even.
- Pre-drill holes for the screws to prevent splitting the wood.
- Allow the glue to dry completely before clamping and screwing for a strong bond.
- Customize the table by adding additional features, such as a shelf or drawer, to suit your needs.
- Protect the table from scratches and spills by applying a clear sealant or varnish.

Rustic X Base Diy End Table Tylynn M

Diy Side Table With X Base

X Base Table Start To Finish Centsational Style

Rustic X Base Diy End Table Tylynn M

Diy Coffee Table Easy X Base With Round Top

Diy X Base Console Table With Middle Shelf

Diy Side Table With X Base

Build A Round X Base End Table Designs By Studio C

Tutorial Rustic X Base Console Table The Chronicles Of Home

Diy X Base Console Table With Middle Shelf